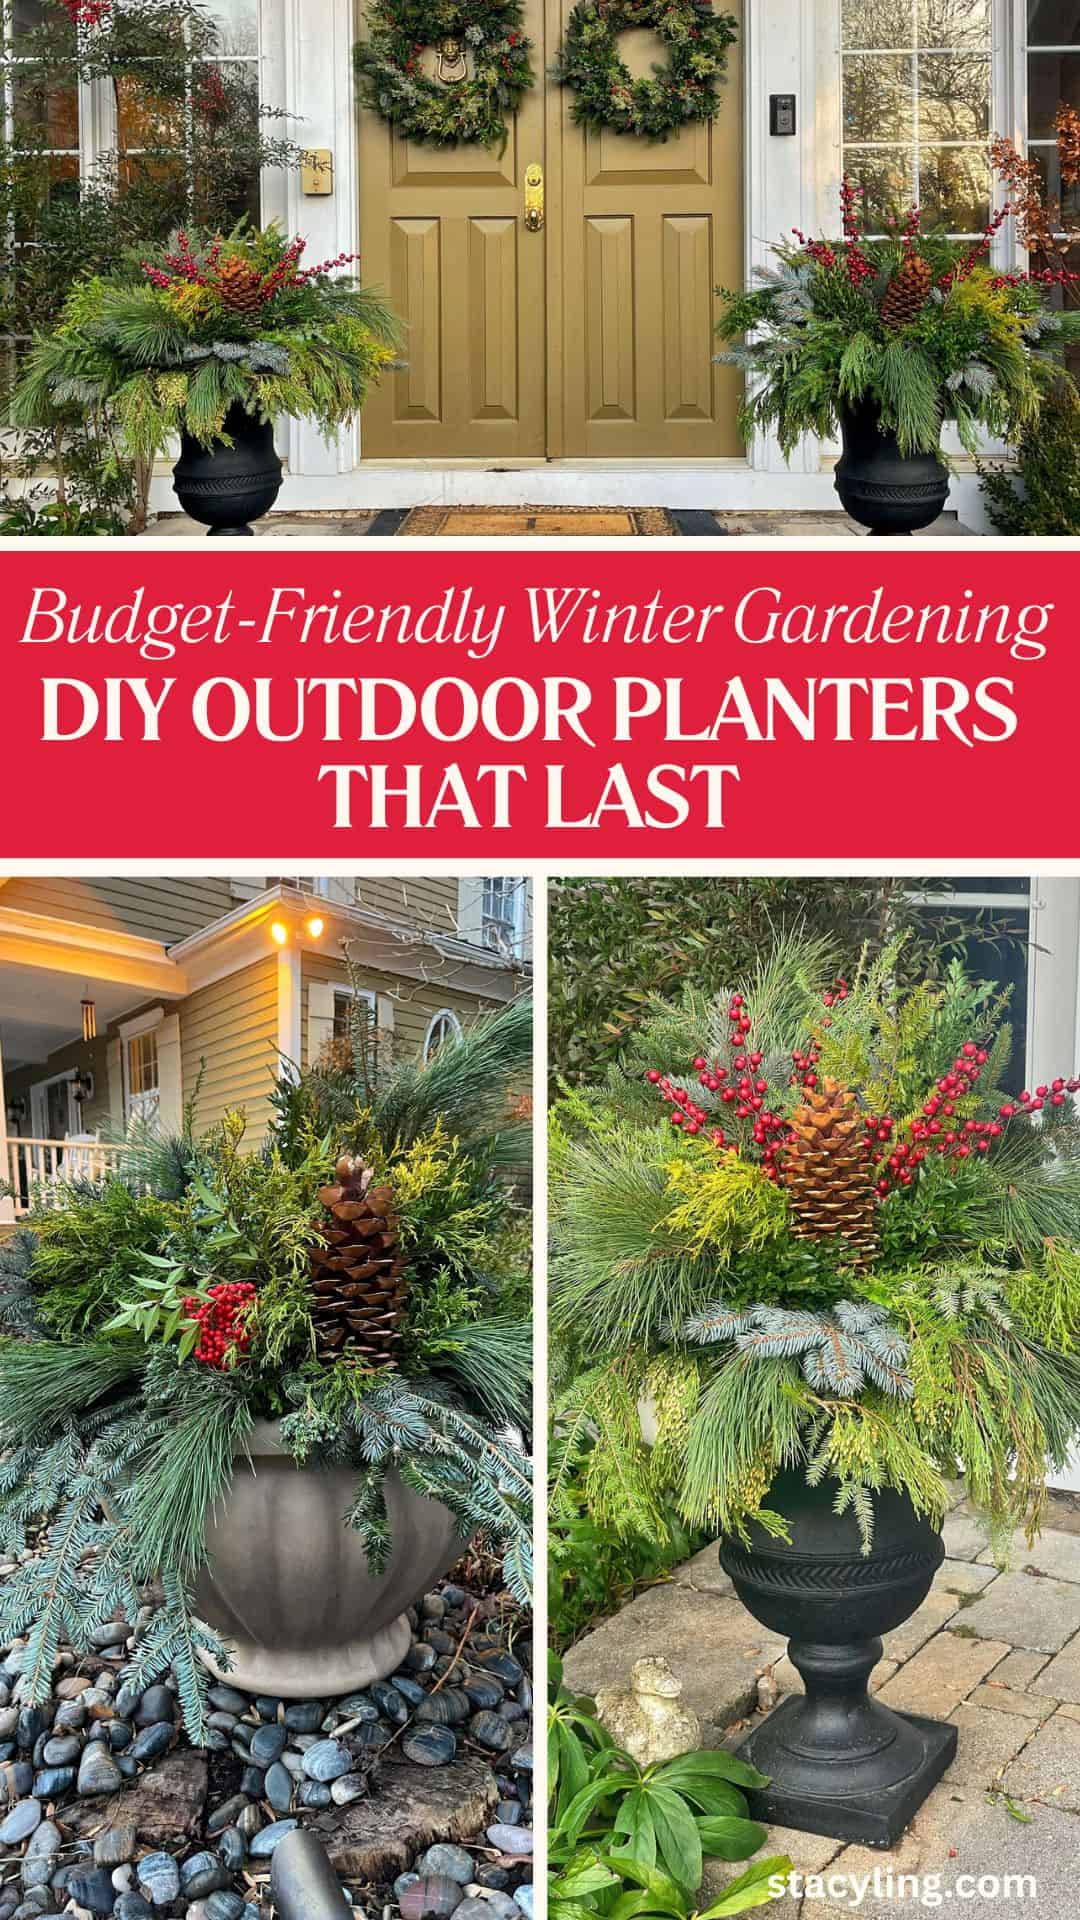
Budget-Friendly Winter Gardening: DIY Outdoor Planters That Last

Start winter gardening with easy DIY outdoor planters. This guide shows you how to make beautiful, long-lasting pots for a cozy front porch.
Looking for a way to add some charm to your front porch this winter? You don’t have to wait until spring to start winter gardening. With a few fresh evergreens and some festive decor, you can create stunning outdoor planters that will last throughout the season.
Hi, I’m Stacy Ling, a trained master gardener in USDA Zone 6b, New Jersey, and out of all the seasons, winter container gardening is my favorite. It’s a great excuse to clean out those deceased mums from your porch planters and spruce things up for the holidays and beyond.
In this post, I’ll show you how to transform your porch into a cozy winter wonderland and share my favorite tips for making beautiful, long-lasting container gardens.
If you want to explore the fundamentals behind container design—choosing the right soil, pots, plants, and care routines—my Container Gardening for Beginners guide walks you through everything I’ve learned my thirty years of gardening.
(Posts on stacyling.com may contain affiliate links. Click HERE for full disclosure.)

The Joy of Winter Gardening
Many gardeners put away their gloves when the cold weather arrives, believing that gardening is only a spring and summer pursuit. However, with the right approach, you can make your outdoor space come alive even in the depths of winter.
Winter gardening not only adds curb appeal to your home but also offers a therapeutic and creative outlet during the long, chilly months. Now is a great time to pot up some outdoor planters while you can tolerate the cooler temperatures, get some fresh air, and create a cozy, welcoming look for your front entry.


Winter Gardening With Pots: Supplies Needed
The amount you spend on supplies depends on what you have access to in your own landscape. Don’t be afraid to get creative and use things you have on hand.
Here is a list of what you will need to get started:
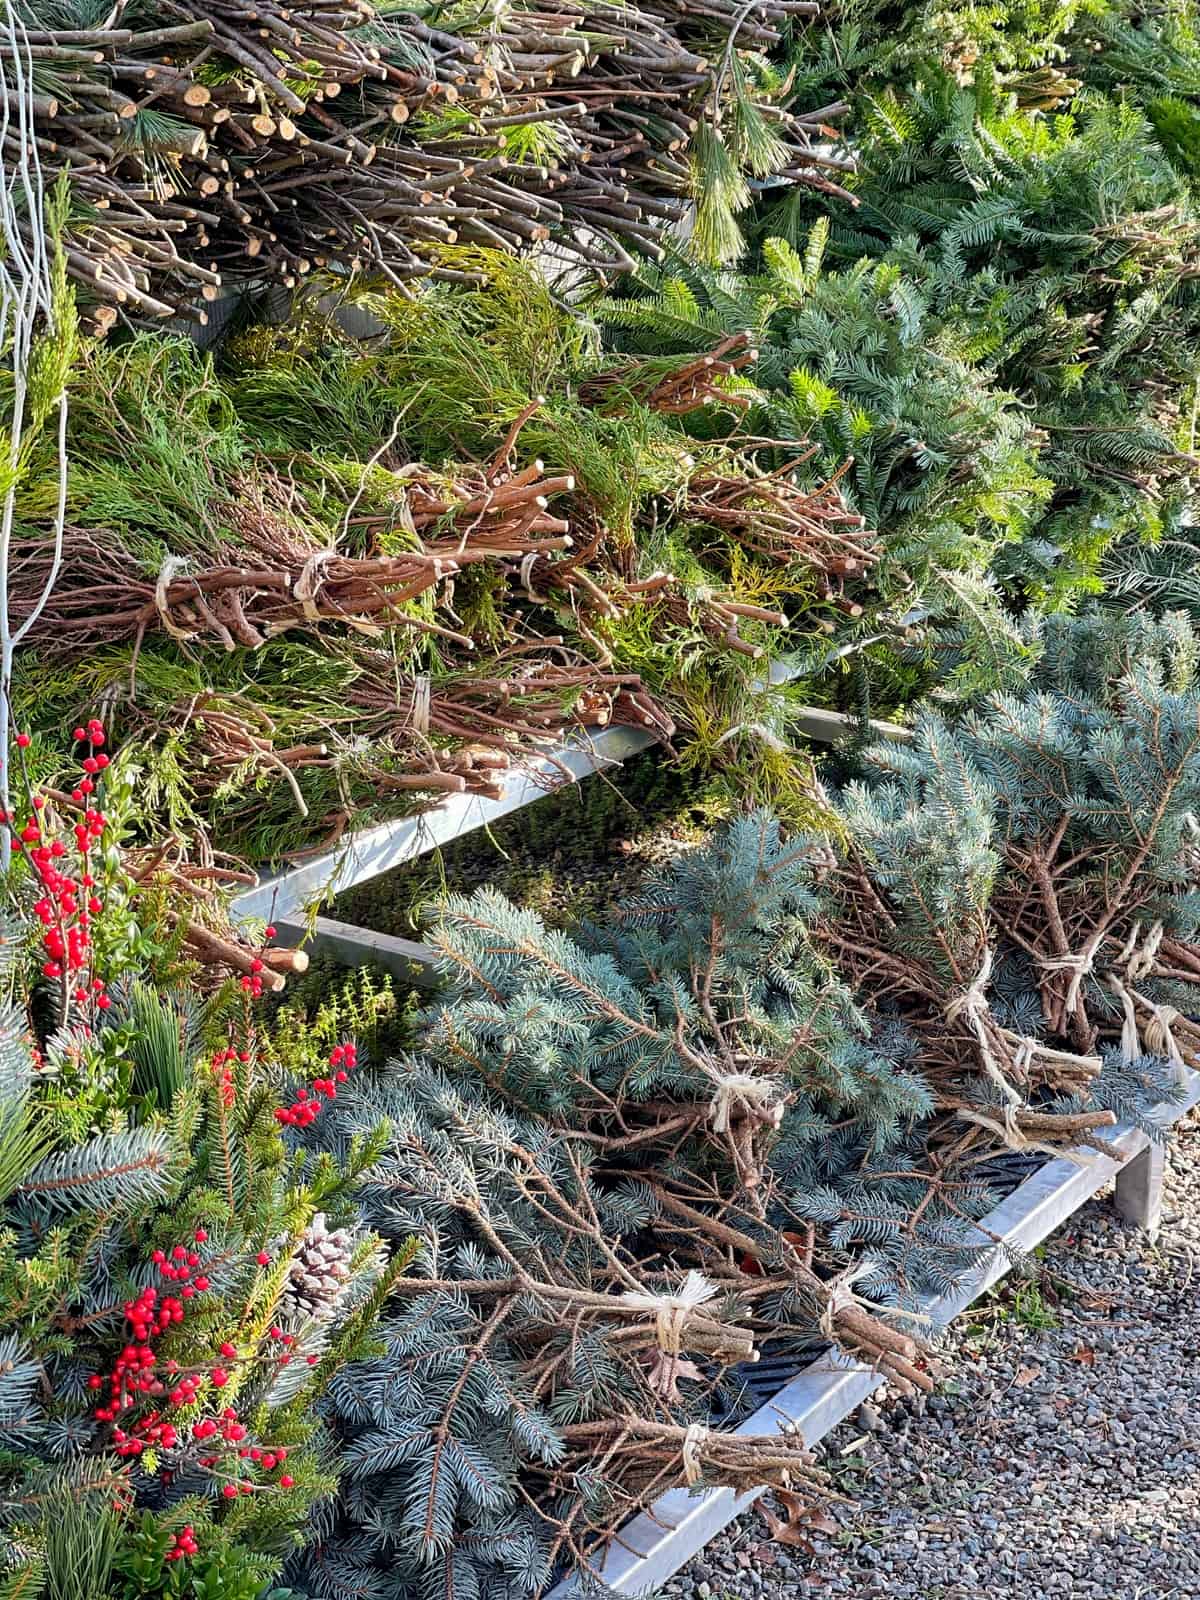
- Fresh-cut evergreens (different varieties)
- Winter decor like ribbons, berries, colored branches, etc.
- Pruners – I use these because they are nice and sharp!
- Garden Gloves – This is what I use – they are a must because they protect your hands from sharp needles while keeping them warm while you work.
- Potting soil – I use this one for all of my planters.
- Outdoor planters – I love using urns for this type of project. The greens look much more elegant. This is the one that I use.

How to Make Your Own Winter Planters
Winter container gardens are much easier to create than they look. They are low maintenance, require a minimal investment, and can last through February if you care for them properly.
Before you start potting, you may want to place your other front porch decor, like wreaths and doormats, to create a cohesive look. When you’re ready to begin, follow these steps:
- Gather Your Supplies: Lay out your evergreens, berries, and other decor. For my planters, I used balsam greens, juniper, cedar branches, and variegated boxwood.
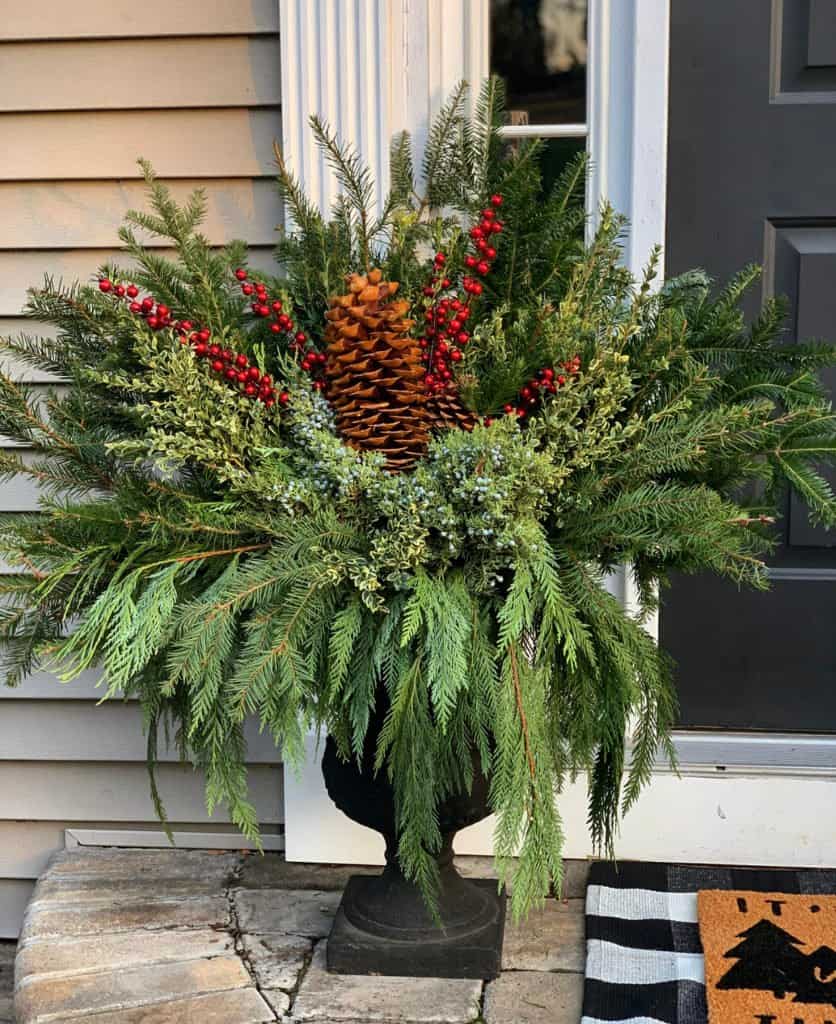
- Start with a Thriller: Use the thriller, filler, and spiller container design technique. Begin with the taller thriller branches, such as balsam greens, to add height and drama. Place them in the center of the pot, fanning them out for a symmetrical look.
- Add Fillers: To create fullness, add filler branches like variegated boxwood. Tuck them in to fill the space around your thriller. The variegated boxwood adds a lot of visual interest and texture. You can also tuck in more balsam branches to fill any gaps.
- Incorporate Spillers: Next, add spiller branches, such as cedar branches, so they drape over the edges of the container. I love the look of cedar in winter containers; they are gorgeous!
- Tuck in Accents: Once the greenery looks full, continue to tuck in more branches, like juniper with their small berries, to add more texture and color. You can then complete the look by adding decorative accents like a large red faux berry sprig and oversized pinecones.
If you’re new to the thriller, filler, spiller design method, I break it down step-by-step in my container design guide.


Choosing Your Materials
For a beautiful planter, you should choose foliage that has different colors and textures that provide a nice contrast to the white snow or muted colors of winter.
- Christmas Decor: Don’t forget to add a festive touch! Tuck in pinecones, LED fairy lights, or ribbons. I love to use oversized pinecones to help break up the greenery and add interest.
- Fresh-Cut Evergreens: You can forage for or purchase evergreen branches. Look for different foliage colors, sizes, and textures. A few to look for include boxwood, cedar, juniper, holly, rhododendron, balsam, Fraser fir, and white pine.
- Berries and Colorful Accents: To add a pop of color, incorporate winter berries like red holly, winterberry, or juniper. These not only look stunning but can also provide food for local wildlife. You can also use dried flower heads like sedum. If you don’t have access to fresh berries, there are many great faux options.

Caring for Your Winter Planters
Once you’ve made your gorgeous planters, it’s important to water them after you are finished. After that, they are generally very low maintenance.
- Under a Protected Area: If your containers are under a covered porch or awning, you can water them every now and then, but you can also simply let them be and dry out on their own. The greenery will last a long time either way.
- Exposed to the Elements: If your container is not under a protected area, the outdoor elements should take care of them all winter long.
In my former home, I maintained my winter planters under the roof line of my small front porch and they usually looked pretty good until about mid-February. I used to pull them away from the roof line during inclement weather or water them when I remember which helps them last longer. But to be honest, I used to forget so I pretty much just let them be.
Learn more container care basics in my Container Gardening for Beginners guide.

Beyond the Planters: Creating a Cohesive Front Porch Look
While your beautiful DIY winter planters will be a focal point, a few other simple touches can pull your entire porch together. I find that simplifying the decor in smaller spaces creates a more elegant and cozy feel. Here are a few ways I like to style my front entry to coordinate with my container gardens.
Add a Festive Wreath
The front door is always my starting point for decorating. Whether you go with a live or faux wreath, it’s a must-have. Since I lean towards a rustic elegant look, I often use a beautiful ready-made wreath from a favorite shop or create a DIY version. This simple choice inspires the overall aesthetic for my winter planters, from incorporating farmhouse red to adding pinecones.

Shop Live and Faux Winter Wreaths

Layer a New Doormat
To complete the look, I like to keep the decor simple and add a new mat. A pretty coir mat layered with a gingham rug adds a little extra coziness and polish to the front porch, without distracting from the beauty of your winter planters.

Shop for New Door Mats
Frequently Asked Questions
How do you keep evergreen branches fresh in a planter? The key to keeping your branches fresh is to keep them hydrated. The best way to do this is to keep the potting soil moist, particularly for the first few weeks after planting. For branches that are not planted, you can mist them with water.
How long do outdoor winter planters last? With proper care, a well-made winter planter can easily last from late fall through February, or even into early spring. The cold temperatures help preserve the cut branches and keep them looking fresh.
Do winter planters need drainage? Yes, your planters should always have a drainage hole at the bottom. This prevents water from freezing and expanding, which could crack the container, and keeps the soil from becoming waterlogged.
Can you reuse the soil from a winter planter? Yes, you can reuse the soil. Simply remove the branches and other materials in the spring. You can then add some fresh compost or fertilizer to the existing soil to replenish its nutrients before planting your spring flowers.

More About Winter Gardening and Making Porch Planters for Winter
I’ve found that making these planters is one of my favorite holiday traditions. I love creating a festive look for the front porch, and the fact that these planters stay beautiful all season long is a huge bonus. It’s a wonderful way to decorate for the holidays and keep your porch feeling cozy and welcoming well into the winter months. I hope you feel inspired to try your hand at winter gardening and create a beautiful display that you can enjoy every year.
If you’d like more winter gardening and outdoor planter ideas, please read visit my posts:
For more seasonal container garden inspiration, visit my Container Gardening for Beginners guide and my thriller–filler–spiller design tutorial
Have you made front porch planters for winter before? You can use this technique in both outdoor planters and window boxes too? If you’ve made them before, I’d love to hear how you like to design yours. I would love to know more in the comments below.
Need more tips for winter gardening? Please check out these posts from the Penn State Cooperative Extension and Iowa State University.
Thanks for stopping by the blog today!
Enjoy your day! xoxo

FREE Guide: The Ultimate Evergreen Care Cheat Sheet
Stop needles in their tracks! Download this FREE guide and discover pro tips for watering, placement, and more. Get the longest-lasting, most beautiful greenery you’ve ever had. Sign up here to get the guide.


Love these! So do you just push them down in soil to stay put?
Thanks:)
Yes – the soil eventually freezes but I stuff them pretty good too which anchors them really well
Your winter planters are beautiful
Thank you so much Debbie!
Thanks for the how to for these gorgeous Christmas planters .
You are welcome Linda! Thank you! xoxo
Your greenery is so gorgeous friend! I love those wreaths! You’ve inspired me to incorporate more greenery into my Christmas decor this year!!
I’m so happy to hear that! Thank you!
Your outdoor planters are so pretty and your dogs are too cute!
Thank you Kim!