How to Start Seeds Indoors Without a Greenhouse (The Ultimate Guide)

Learn how to start seeds indoors without a greenhouse! Step-by-step guide, tips for success, and essential equipment.
Starting seeds indoors is a method of germinating plants inside your home several weeks before the last frost, giving seedlings a head start on the growing season. With the right light, containers, and moisture, seeds can be grown successfully on windowsills or under grow lights without the need for a greenhouse. This approach is especially helpful for flowers, herbs, and vegetables that require a longer growing season or aren’t commonly sold as transplants.
Hi! I’m Stacy Ling, a trained Master Gardener growing in hardiness zone 6b here in New Jersey. I’ve been growing flowers for nearly 30 years, through every type of weather pattern, soil challenge, and critter invasion you can imagine.
And if you’ve never started a garden from seed before, you’re in for a treat! It’s truly amazing how a tiny seed can transform into a room full of blooms.
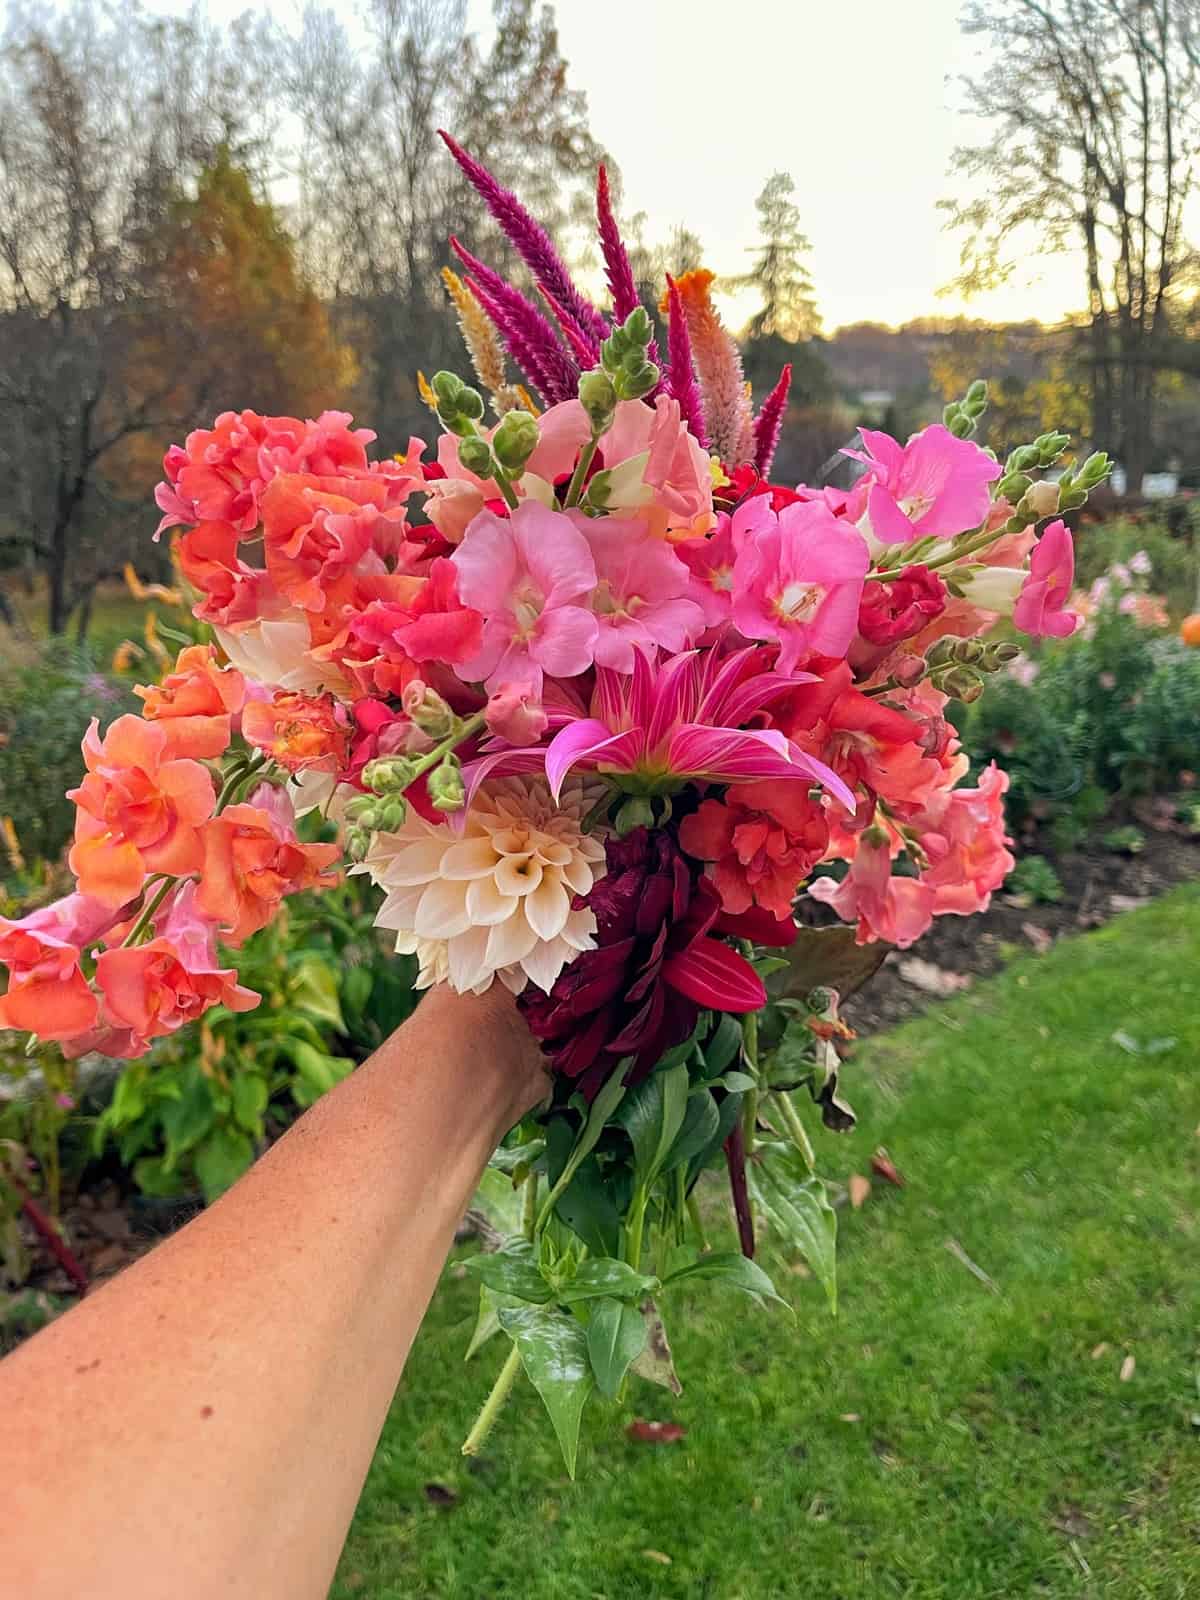
While I do start some vegetables like tomatoes and peppers, my main passion is starting seeds for my cut flower garden. Most of the stunning, unique varieties you see in floral arrangements, like ‘Cafe au Lait’ Dahlias or ‘Cupcake’ Cosmos, are hard to find as plants at the nursery. You have to grow them from seed!
Whether you dream of vibrant bouquets, fragrant herbs, or delicious vegetables, this guide will equip you with everything you need to know to start seeds indoors. No greenhouse required.
(Posts on stacyling.com may contain affiliate links. Click HERE for full disclosure.)
Prefer to watch instead of read?
In this video, I walk you through exactly how I start seeds indoors without a greenhouse — including my setup, why I do it this way, and how it’s going so far this season here in Zone 6b.
If you’d rather see the process step-by-step, you can watch it below.

Why Sow Seeds Indoors?
Starting seeds indoors offers a wealth of benefits:
- Control: You have the power over light, temperature, and moisture.
- Head Start: Get a jump on the growing season and enjoy earlier blooms and harvests.
- Protection: Shield your tender seedlings from harsh weather and pests.
- Variety: Explore rare and unique plants not readily available at nurseries.
- Budget-Friendly: Grow more plants for less money.
- Rewarding: Experience the satisfaction of nurturing plants from the very beginning.
- Winter Activity: Starting seeds indoors helps beat the winter blahs.


Dispelling the Greenhouse Myth
I used to believe that a greenhouse was essential for successful seed starting. But I was wrong! You absolutely do not need a greenhouse, but you do need the right equipment.
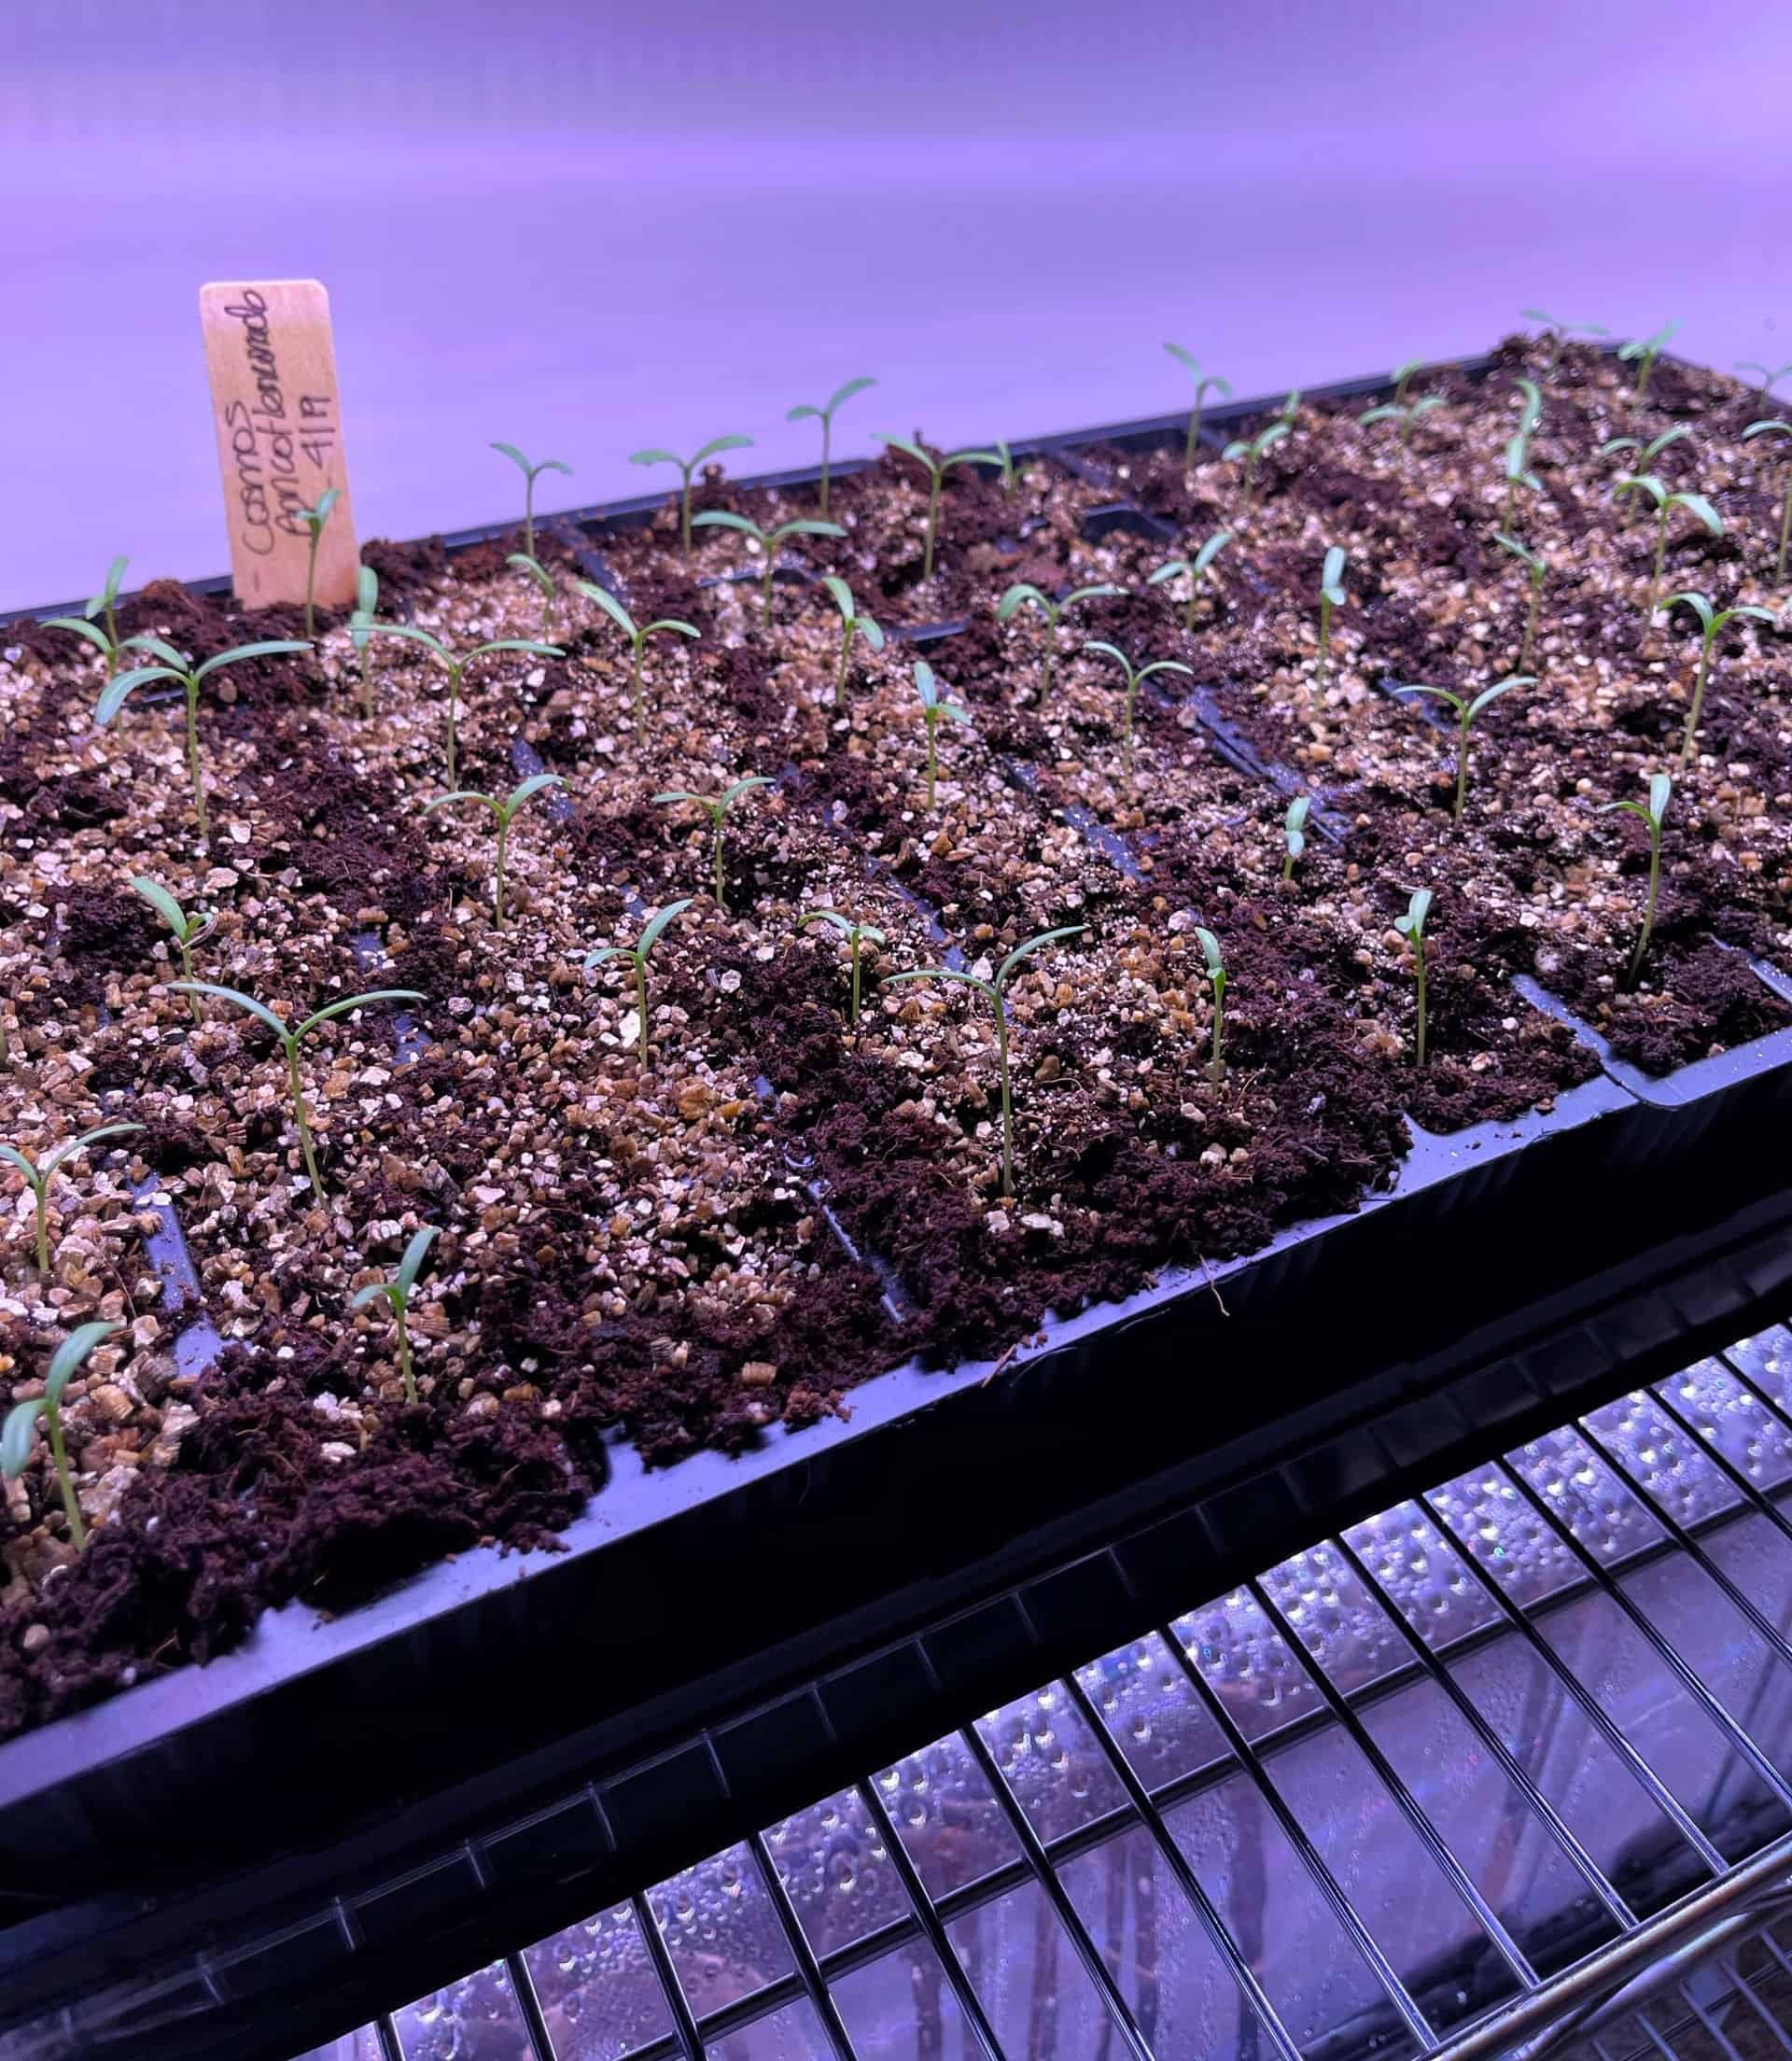
For years, I struggled to start seeds in front of my south-facing windows. Space was limited, the light was inadequate, and my seedlings were often leggy and weak. Then, I made a crucial mindset shift and invested in proper grow lights.
The results were transformative! I moved my seed starting operation to my basement (and later, my sunroom) and successfully started over 1400 flowers! It was incredible, and I was amazed at how much easier and more effective grow lights made the process. To this day, I still do not have a greenhouse and have started thousands of seeds without one for several years.
How to Create Your Indoor Seed Starting Station
1. Location is Key
Find a spot in your home with these qualities:
- Space: Enough room for your seed starting setup and growing seedlings.
- Light: Limited natural light is okay, as you’ll be using grow lights.
- Accessibility: A place where you can easily tend to your seedlings.

2. Essential Equipment You Need
You don’t need a professional greenhouse, but having the right tools makes a huge difference. (For a deep dive into the specific brands I use and love, read my full guide on [Seed Starting Supplies: What You Really Need].)
- Seeds: High-quality seeds from reputable sources.
- Vermiculite: To improve drainage and aeration in your seed starting mix.
- Seed Starting Potting Soil: A lightweight mix specifically formulated for seedlings.
- Seed Trays: Choose trays with drainage holes and consider cell trays for individual seedlings.
- Bottom or Drainage Trays: To catch excess water and prevent messes.
- Clear Dome Lids: To create a humid environment for germination.
- Grow Lights: Essential for strong, healthy seedlings. Invest in full-spectrum LED or fluorescent grow lights.
- Table or Shelf System for Seedlings: To hold your seed trays and grow lights.
- Heat Mat: Optional, but helpful for seeds that require warmer temperatures to germinate.
- Plant Labels: To keep track of your varieties.
- Oscillating Fan: To improve air circulation and prevent damping-off.
- Programmable Timer: To automate your grow light schedule.

Make Your Own DIY Seed Starting Systems
While pre-made tiered systems are available, they can be expensive. My husband and I created our own DIY system [DIY seed starting shelf system] using wire shelves and four-foot grow lights. It’s been incredibly effective and much more budget-friendly.
Get creative with your setup! Repurpose old bookshelves, build your own shelves, or even use sturdy cardboard boxes. The key is to have a stable structure to support your grow lights and seed trays.
Pro-Tip: When reusing seed starting supplies, it is essential to clean them really well with a 1:10 ratio of chlorine bleach to the water to sanitize and kill any pests or diseases lingering behind. This is actually a good practice for any pots or containers that you re-use for any type of plant.

How to Choose and Sow Your Seeds
Seed Selection
Invest in high-quality seeds from reputable sources. My favorites include:
Shop early (December and January) for the best selection. You’ll still find seeds online after December and January, but there may not be as many options or varieties to choose from. Keep in mind, that some flowers and vegetables might need to be sowed sooner than later, so you will want to get your seeds early.

Create a Plan (Don’t Wing It!)
Before you touch a single bag of soil, you need a schedule. The biggest mistake beginners make is starting seeds too early (resulting in giant, unmanageable plants indoors) or too late (resulting in no blooms).
1. Do the Math Find your area’s Last Frost Date. Look at the back of your seed packet to see if it says “Start indoors 4-6 weeks before last frost.”
- Example: If your last frost is May 15th, and Snapdragons need 8 weeks, you need to plant them around March 20th.
2. The “Spreadsheet” Method I used to write this on scraps of paper, but now I swear by a simple garden journal or spreadsheet. Create columns for:
- Plant Name
- Days to Maturity
- Sow Date (Calculated from your frost date)
- Germination Time
- Notes (Did it need light? Did it need a heat mat?)
Having this written down prevents the “What did I plant here?” panic later in the season!
3. Organize Your Packets Group your seed packets by “Sow Month.” Put all your February sowings (like Snapdragons and Sweet Peas) in one bundle, and your March/April sowings (like Zinnias and Cosmos) in another. This way, you aren’t fumbling through 50 packets trying to find the right ones.
Want To Get More Organized to Start Seeds?
CLICK HERE to get my FREE DOWNLOADABLE PRINTABLE that will help you get organized to sow seeds this year. Print as many pages as you want and add them to your gardening journal for ease of reference during the growing season.

Directions for Sowing Seeds Indoors
- Fill your seed trays or pots with pre-moistened seed starting mix. Gently pack it down to remove air pockets.
- Sow seeds according to the packet directions, planting them at the correct depth.
- Cover the seeds with vermiculite or seed starting mix.
- Label your trays or pots.
- Cover the trays with clear dome lids.
- Place the trays on a heat mat (if using) under your grow lights.

Caring for Your Seedlings as They Grow
Once your seeds sprout, the real work begins! Here is how to keep them healthy until they are ready for the outdoors.
1. Bottom Watering is Best: Avoid watering from the top, which can displace tiny seeds and encourage fungal diseases like “damping off.” Instead, place your cell trays in a solid bottom tray filled with an inch of water. Let the soil absorb the moisture from the bottom up for about 15-20 minutes, then pour out the excess water.
2. Thinning is vital: This is the hardest part for new gardeners, but it is necessary! If you sowed multiple seeds in one cell and they all sprouted, you must remove the extra seedlings so they don’t compete for nutrients.
- Wait: Let them grow until they have their first set of “true leaves.”
- Snip: Identify the strongest seedling in each cell. Use clean scissors to snip the weaker ones off at the soil line. (Do not pull them out, or you might damage the roots of the one you want to keep!)
3. Fertilizing: Seed starting mix is usually sterile and has no nutrients. Once your seedlings grow their first set of true leaves, they will get hungry! Start feeding them with a liquid fish emulsion fertilizer diluted to 1/4 strength once a week.
Hardening Off Seedlings
Before transplanting your seedlings outdoors, it’s crucial to “harden them off.” This process gradually acclimates them to outdoor wind, direct sun, and fluctuating temperatures, preventing shock and ensuring their survival. If you skip this step, all your hard work indoors could be lost in one day!
About two weeks before your last frost date, start by placing your seedlings in a protected, shady location for a few hours each day, bringing them back inside at night. You will gradually increase their exposure to sunlight and wind over the next week or two.
This process requires a specific schedule to get right. For my day-by-day timeline and temperature guide, read my detailed post on [how to harden off plants the right way].

Transplanting Your Seedlings Outdoors
Once your plants are hardened off and the danger of frost has passed (for warm-season crops), it is finally time to get them into the ground!
This is a delicate transition. Seedlings grown indoors often have sensitive root systems that need careful handling compared to nursery-bought plants. You need to plant them at the right depth, protect them from that first day of full sun, and water them in immediately to establish good soil contact.
Don’t let transplant shock ruin your hard work. Read my step-by-step guide on [how to properly transplant seedlings into the garden].
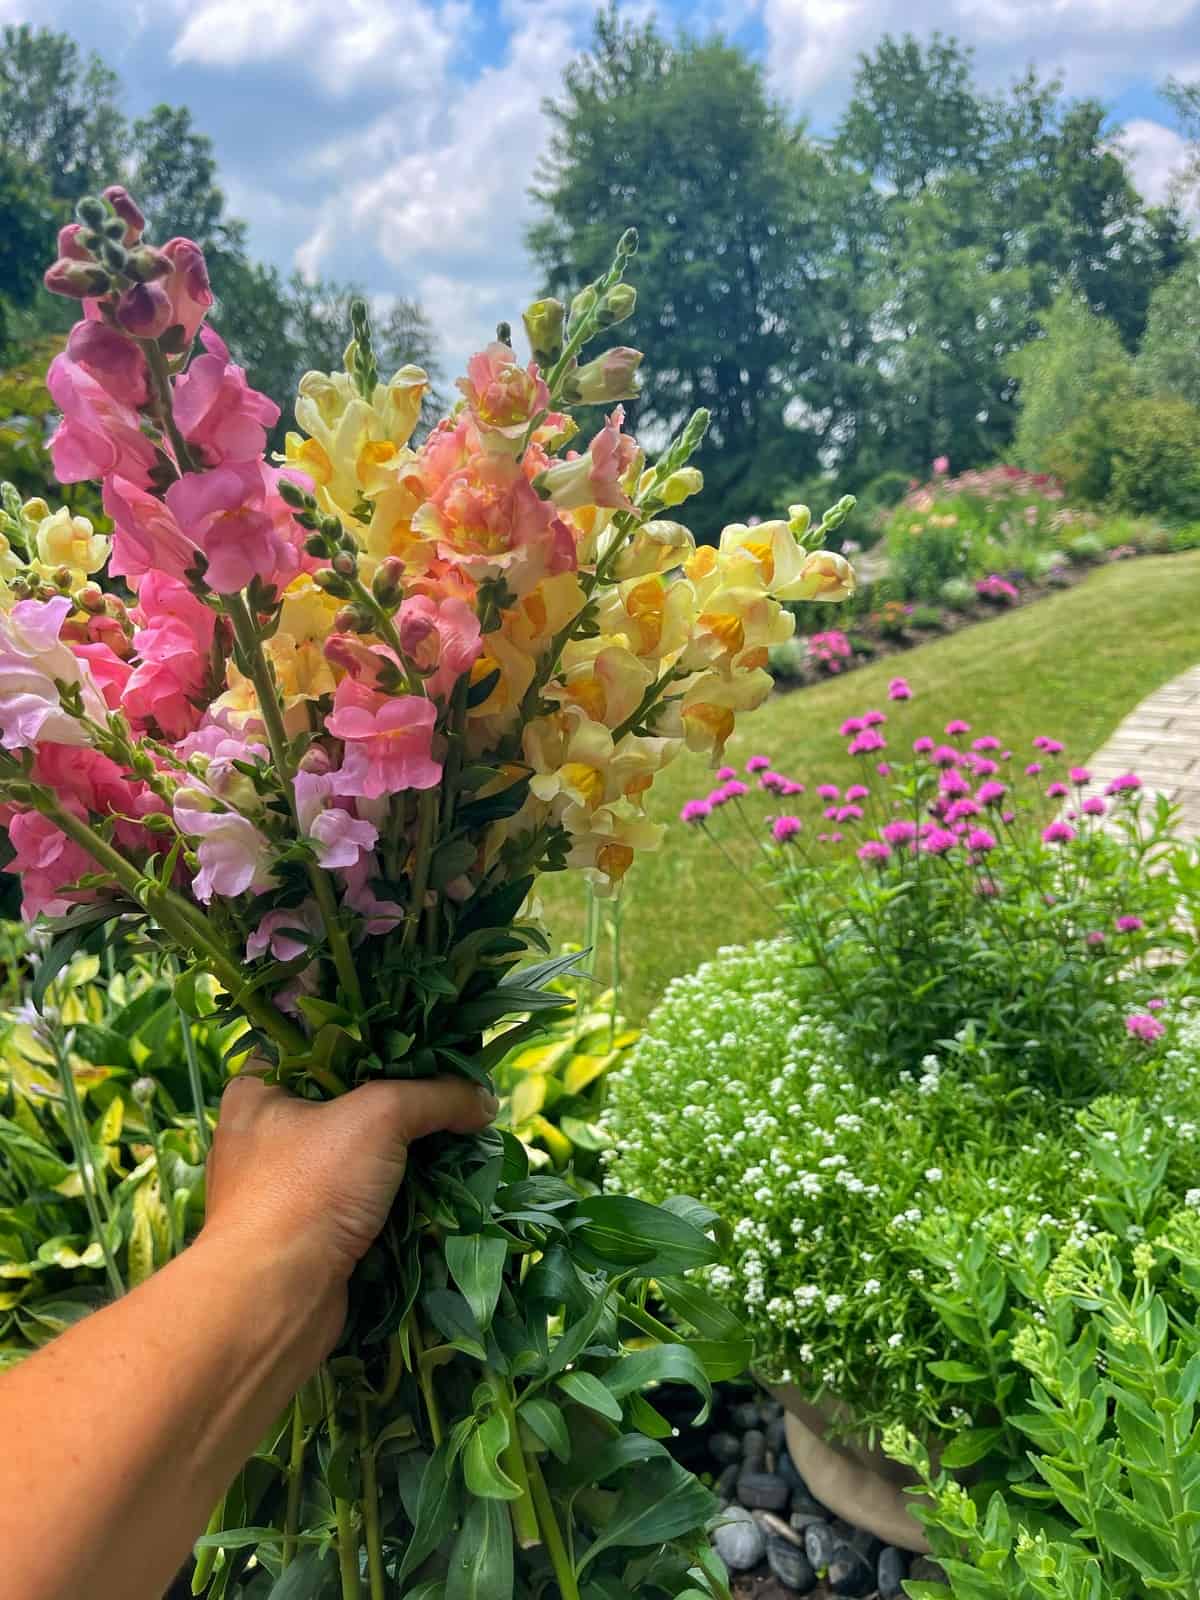
Flowers I Like to Start From Seed Indoors Every Year in My Zone 6B Garden
While I love to try new things every growing season, there are a few tried-and-true blooms that are the backbone of my harvest. These are the heavy producers that pump out blooms all summer long.
(If you are new to growing specifically for bouquets, be sure to check out my full guide on [cut flower gardening for beginners] to see how I plan the layout for these varieties.)
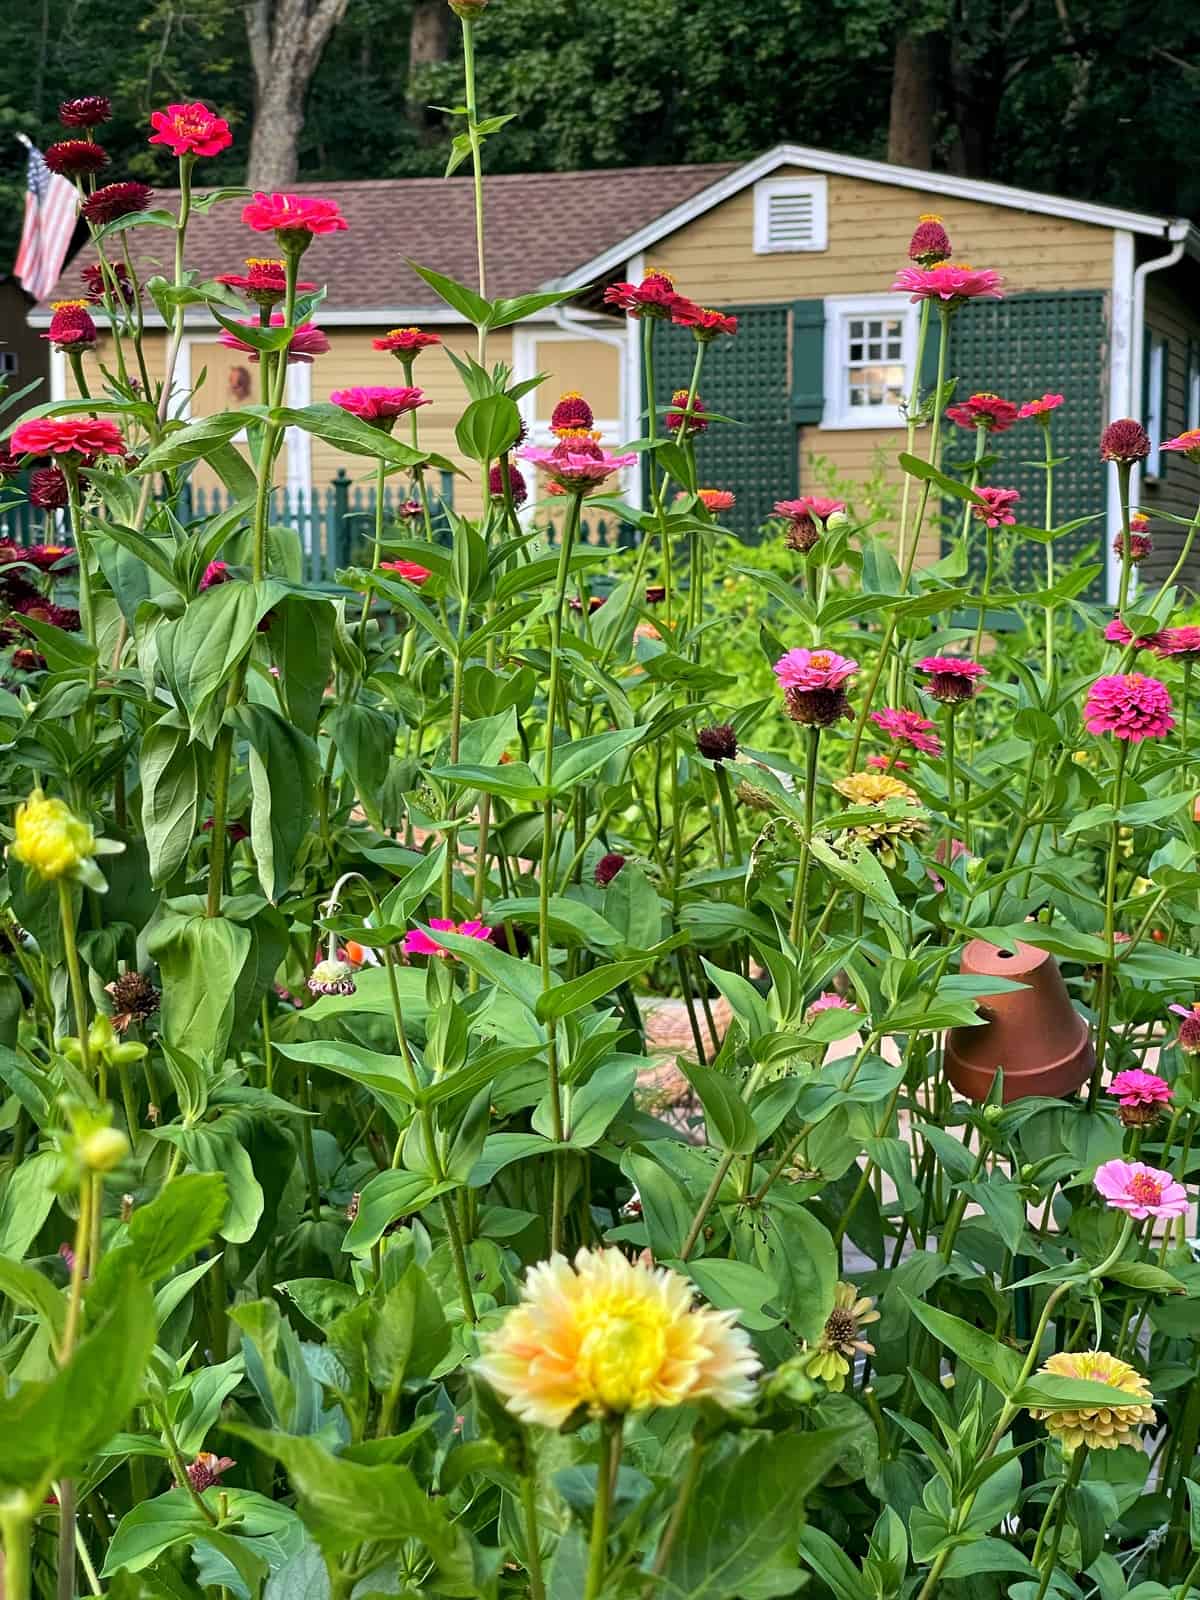
- Zinnias (My #1 Must-Grow!)
- Strawflowers
- China Asters
- Ageratum
- Celosia
- Gomphrena
- Statice
- Amaranth
A Note on Other Flowers: I grow lots of other flowers from seed too (like Larkspur and Sweet Peas), but I don’t start them indoors under lights. Instead, I use the [winter sowing method], which involves sowing seeds outdoors in milk jugs during the cold winter months. It saves indoor shelf space and creates hardy plants! But I also like direct sowing seeds in spring, like sunflowers and borage that are simple to grow and don’t need time under grow lights.
Herbs and Vegetables I Grow From Seed
Since I focus more on starting flowers from seed, I don’t do as much herbs and vegetables consistently. But here’s a list of plants I’ve started from seed with success:
- Basil
- Parsley
- Cilantro
- Tomatoes
- Bell Peppers

Troubleshooting & Pro Tips for Success
After starting thousands of seeds indoors over the years, I’ve learned that most problems come down to a handful of common mistakes. A few small adjustments early on can save a lot of frustration later.
Below are some of the most important lessons I’ve learned through experience. If you want a deeper dive into what not to do — and why — I’ve outlined the most common seed-starting mistakes I’ve made (and corrected) here.
1. Skip the Biodegradable Peat Pots
I really wanted biodegradable peat pots to work, but in my experience they tend to stay too wet and often develop mold on the outside. That excess moisture can lead to unhealthy seedlings. I now rely on reusable plastic cell trays instead.
If you reuse trays or pots, be sure to sanitize them with a solution of 1 part bleach to 10 parts water before planting.
2. Manage Your Cords From the Start
This seems minor, but it makes a big difference in day-to-day maintenance. When setting up heat mats and grow lights, position cords so they run neatly behind your shelving unit.
The first year I didn’t think about this, cords dangled in front of trays and got in the way every time I watered or checked seedlings. A clean setup is much easier to manage long-term.
3. You Don’t Need a Heat Mat for Every Seed
Heat mats are useful for warm-season plants like zinnias, tomatoes, and peppers. However, some cool-season flowers — such as snapdragons and poppies — actually prefer cooler soil to germinate.
Always check your seed packets. If bottom heat isn’t recommended, you can usually skip the heat mat.

4. Skip the Peat Pellets in Starter Kits
If you purchase a seed-starting kit, I recommend replacing the peat pellets that often come with them. I’ve found they’re slow to hydrate, remain compacted, and are harder to work with overall.
A high-quality, lightweight seed-starting mix is much easier to manage and produces more consistent results.
5. Double-Check Seed Counts Before Ordering
Seed packets vary widely in how many seeds they contain. Some may include 25 seeds, while others include 100 or more.
I’ve learned this lesson the hard way after realizing too late that I didn’t have enough sweet pea or snapdragon seeds to fill my trays. Checking counts ahead of time helps avoid last-minute scrambling.
6. Know Which Seeds Need Cold Stratification
Some seeds, like larkspur, require a period of cold exposure before they’ll germinate. Missing this step can throw off your entire seed-starting schedule.
As soon as seed packets arrive, I read through the instructions and plan backward from my planting dates so nothing gets delayed unexpectedly.
In my zone 6b garden, I’ve learned that if a seed requires cold stratification, it does best with the winter sowing seeds method.

7. How to Fix Leggy Seedlings
If seedlings grow tall, pale, and floppy, they’re stretching for light.
The fix:
Keep grow lights close — about 3-4 inches above the seedlings — and raise them gradually as plants grow.
The extra help:
An oscillating fan provides gentle movement that encourages stronger stems and more resilient plants.
8. Preventing Damping Off
If healthy seedlings suddenly collapse at the soil line, damping off is often the cause. This fungal disease thrives in wet, stagnant conditions.
Prevention tips:
- Always use sterile seed-starting mix
- Avoid overwatering
- Maintain good airflow
A small oscillating fan helps keep the soil surface dry. I’ve also found that a light dusting of cinnamon on the soil surface can help reduce fungal issues.

7 Common Mistakes to Avoid in Your Cut Flower Garden
I’ve learned a lot of these lessons the hard way! Avoid these common pitfalls to save yourself time and ensure a better harvest.
1. Staking Too Late (or Not Enough)
Don’t wait until your flowers are falling over to support them! Start staking plants like Zinnias, Snapdragons, and Dahlias while they are still small. I also learned that individual stakes often aren’t enough for a heavy production garden.
Pro Tip: Use a grid trellis stretched horizontally over the bed. The plants grow through it, and it offers incredible support against wind and rain.
2. “Winging It” With the Layout
It is tempting to just start digging, but a little planning goes a long way. I once tried to plant Sunflowers as a border and they looked sparse and odd. I realized later that they look much better planted en masse as a patch. Sketch out your plan to ensure tall plants don’t shade out shorter ones!
To learn more about why a garden planner is your best friend, click here: The Essential Garden Planner
3. Trusting Your Memory (Label Everything!)
You might think you’ll remember which row is the ‘Benary’s Giant’ Zinnia and which is the ‘Queen Lime,’ but you won’t! I used to label just one or two plants per tray, and it wasn’t enough. Label every tray and row clearly. Place the labels deep in the ground so they don’t get lost as the foliage grows.
I can’t tell you how many times I have not labeled and truly regretted it.

4. Sowing the Whole Packet
Just because a packet has 100 seeds doesn’t mean you need 100 plants of that variety! I used to feel pressure to sow them all, and I ended up with way more plants than I had space for. Sow only what you need and save the rest. Keep the extra seeds in a cool, dry place (like a photo box in a cool closet) for next year.
5. Ignoring Spacing Requirements
It is crucial to follow the spacing directions on the seed packet. I once planted sun-loving flowers in a part-shade area and crowded them too close together. The result? Fewer blooms and weaker stems. Trust the grower’s advice on the packet!
6. Forgetting to Take Notes
I always tell myself I’ll remember which varieties performed best, but by winter, the details are fuzzy. Keep a simple garden journal like this one. Note down what bloomed first, what succumbed to pests, and what you want to grow more of next year.
7. Not Pinching Your Plants
It feels counterintuitive to cut off the top of a healthy young seedling, but for plants like Zinnias, Snapdragons, and Dahlias, “pinching” encourages them to branch out. This gives you a sturdier plant and significantly more blooms throughout the season.

Final Thoughts About Starting Seeds Indoors
If you’ve always wanted to start seeds indoors but haven’t been successful at it or were afraid to try, I hope you’ll give it a whirl after reading this post. I start seeds for my cutting garden every growing season and it is worth the effort every year that I do!
Have you ever started seeds indoors before? Let’s chat more about it in the comments below.
For more information about starting seeds indoors, please check out this article from the Rutgers Cooperative Extension.
Grow a Cut Flower Garden With Me
To follow along with the rest of this Grow With Me series, please check out these posts.
- An Overview (you are here)
- Supplies for Starting Seeds Indoors Without a Greenhouse
- Why Flower Seeds Fail to Germinate
- Why Seeds Germinate But Don’t Grow
- What You Need to Know About Hardening Off Plants
- How to Plant a Garden After Starting Seeds Indoors
- Cut Flower Gardening for Beginners
Thank you for visiting the blog today!
Enjoy your day! xo


What a great post! I am growing some plants from seed for the first time, this year. I am so excited and your post has been so helpful! Happy planting. 😊
Thank you so much Kim! I’m so happy to hear that. We will be doing it together then! It will be a really fun gardening journey. I can’t wait to see what you grow!
Just ordered a bunch of seeds. Can’t wait to try this.
Rachel
I’m so excited you are starting form seed too! It will be so fun to grow all of our gardens together. I can’t wait to see what you grow!
Great post!! I’m going to start mine in the basement too. Trying to figure it all out now…can’t wait for your next part where I can let you do all the work and then see what I have do!!!
hahahahaha thank you! I’m so glad we’ll be doing it together. I’m so excited to see what everyone grows this year!
I love your post Stacy! I’m sending everyone that doesn’t have a greenhouse over to your blog! Thank you for sharing my pictures and link. You’re my favorite garden friend!
Thank you!!! I’m so excited to do this! We just planned out how we are doing the set up. I hope we find everything for it over the weekend. This is going to be so much fun to do with you!!
I love having DIY projects!!
I always start my seeds like you did and was thinking about a grow light system this year. Thank you so much for the tips. My hubby said the same thing lol. So excited!!
Sincerely,
Corine
Thanks Corine! What are you growing this year? I just got some supplies yesterday! I can’t wait to set it up! xoxo
I jumped in the seed wagon a bit late and floret flowers.com is sold out of almost everything. What other seed companies can you recommend?
Kindly,
M Kimmel
It’s not too late! You can find seeds at your local nurseries too. Have you checked out Burpee?
Thanks for for the great ideas for the hard to by for family member who loves flowers and gardening.
I’m so glad Linda! These are my favorite! The blooms are beyond gorgeous!
Stacy
So many great tips.
Thank Rachel!