Add Rustic Charm with this DIY Pallet Wood Star

Create a stunning rustic tree topper for free! This easy DIY pallet wood star adds instant farmhouse charm to your Christmas decor.
Hi! I’m Stacy Ling, a Master Gardener living in Zone 6B New Jersey, where I share my passion for garden-inspired living, rustic home decor, and easy DIY projects. One thing I love most—especially around the holidays—is creating budget-friendly pieces that bring the warmth and charm of the garden right into our home.
This DIY wood pallet star tree topper is one of my all-time favorite projects. It adds rustic, vintage coziness to our Christmas tree and—best of all—it cost us nothing to make. We used leftover materials we already had from previous projects, and my husband whipped it up in an afternoon.
We made it several years ago, and we still use it today on the Christmas tree in our formal living room. It’s become part of our holiday traditions and looks even better year after year.
(Posts on stacyling.com may contain affiliate links. Click HERE for full disclosure.)


Why We Made a New Tree Topper
When my husband and I first got married—back when we lived in a tiny one-bedroom condo—we bought an angel tree topper from Rickels. (Remember Rickels? It was like Ace Hardware, but long gone now!)
For about 25 years, that angel sat on top of our real Christmas tree every December.
But a few years ago, after switching to a beautiful faux tree that looks incredibly real, the angel suddenly didn’t feel right anymore. The proportions were off, the look didn’t fit our style, and honestly… we were ready for a change.
My husband took one look and said, “I’m making a star out of that wood pallet we’ve got out back.”
And off he went.
A few hours later, we had the perfect rustic star tree topper that was handmade, meaningful, and exactly the vibe we were going for.

Supplies Needed
This project was made entirely from leftover materials. Feel free to improvise with whatever you have on hand.
Materials & Tools:
- Sandpaper
- Wood pallet
- T-square
- Pencil
- Stick ruler
- Star template (we used an old rusty metal star as a guide)
- Compound miter saw
- Oscillating saw or jigsaw
- Clamps
- Drill
- Screw gun
- Leftover screws and miscellaneous hardware
- Picture hanging wire

⚠️ Safety Notes
The photos in this post show how we made our star, but please follow general safety guidelines anytime you’re working with pallet wood or power tools.
Here are a few good practices to keep in mind:
- Choose pallets stamped HT (heat treated) rather than “MB,” which indicates chemical treatment.
- Inspect pallet boards for old nails, stains, or anything questionable before cutting.
- Work in a ventilated area and use caution when cutting or sanding.
- Wearing safety glasses, gloves, and a dust mask is never a bad idea when working with wood, especially reclaimed wood.

How to Make a DIY Wood Pallet Star Tree Topper
1. Prepare the Wood
- Gather your tools and supplies.
- Break down the pallet into smaller, usable pieces.
2. Create Your Template
- Use a star template—or trace a star shape you love onto paper or cardboard.
- We used a rustic metal star we already had as our guide.

3. Lay Out the Pallet Pieces
- Position three or more wood pieces together to form the base layers.
- Trace the star shape onto the pallet wood with a pencil.
4. Cut Out the Star
- Use a compound miter saw to cut the straight edges.
- For tighter or more detailed cuts, switch to an oscillating saw or jigsaw.

5. Assemble the Star
- Line up the cut pieces to recreate your traced star shape.
- Pre-drill holes to prevent splitting.
- Use screws and any hardware you have available to secure everything together.

6. Add Hardware for Attaching
Fasten picture hanging wire or similar hardware to the back so it easily sits on top of the tree.

7. Sand & Finish
Lightly sand the edges to smooth out rough spots. Keep the natural rustic look or add stain/paint if you want a different finish.
8. Add It to the Tree
Place your new star on top and adjust as needed. Step back and admire your custom, handmade holiday decor!

Customization Ideas
I love mine as is, but if you want to personalize your star even more? Try these ideas:
- Stain or paint it in natural, whitewashed, metallic, or bold holiday colors.
- Wrap fairy lights around the edges for a soft glow.
- Add greenery or floral picks for a garden-inspired holiday touch.
- Distress the wood for a vintage farmhouse look.
- Use reclaimed barn wood, driftwood, or fence boards instead of pallet wood.
- Scale the size up or down to create matching wall décor, mantel pieces, or wreath accents.
There are so many ways to make it uniquely yours.
💲 Materials & Cost Breakdown
| Item | Cost | Notes |
|---|---|---|
| Pallet wood | $0 | Reclaimed from previous projects |
| Screws & hardware | $0 | Leftover supplies |
| Picture-hanging wire | $0 | Scrap wire |
| Sandpaper | $0 or minimal | Used scraps we had on hand |
| Total Cost | $0 | Completely upcycled and budget-friendly |
🌲 More Christmas Tree Styling Ideas
- How to Style a Rustic Christmas Tree
- The Best Ornaments for a Natural, Garden-Inspired Tree
- Holiday Home Tour
- 23 Inspiring Christmas Aesthetics For Your Home

The Finished Look
It turned out so beautifully—and definitely suited our new tree much better than the angel we retired. Although it was bittersweet to pack away the tree topper we bought when we first moved in together, this new pallet star feels just as meaningful. Handmade projects somehow hold their own kind of sentimentality.
And years later, we still love it just as much as the day my husband made it. It looks perfect with our rustic Christmas decor and gives our living room tree a warm, homespun touch.

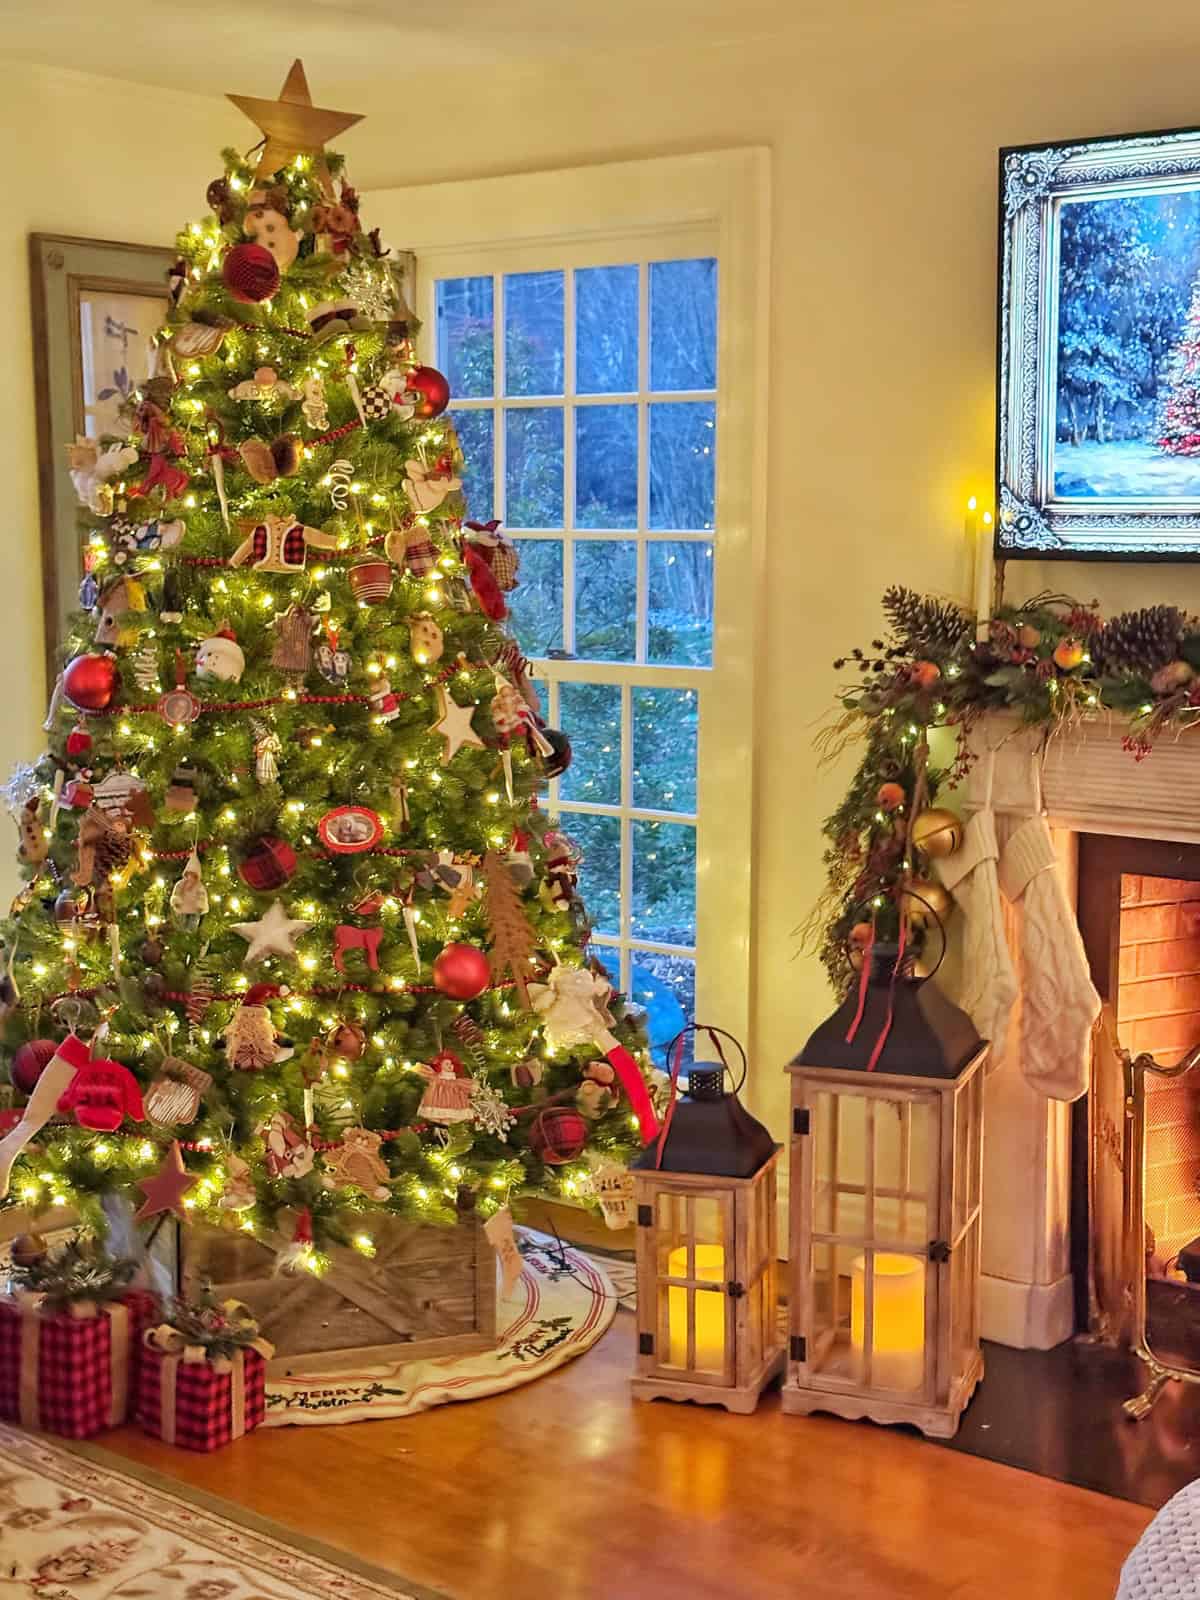
And We Still Use This DIY Tree Topper To This Today!
Since making this project, we moved to a new home and I still love this Christmas tree topper! It’s held up and adds that bit of rustic elegance to my space. Here are a few pics.


Final Thoughts on Making This DIY Tree Topper
This DIY pallet star tree topper is one of those simple, meaningful projects that becomes part of your home’s story. Made from leftover materials and crafted in a moment of inspiration, it brings a warm, rustic charm to our Christmas tree each year.
Even though it replaced the angel we used for decades, this handmade star feels just as sentimental (maybe even more so) because it was created with love, using things we already had.
If you’re looking for a budget-friendly, customizable, and truly heartfelt way to top your Christmas tree, give this pallet wood star a try. It’s easy, it’s beautiful, and it brings a little magic to your holidays every single time you plug in the lights.
Think you’d ever make this project for your tree? How would you customize it? Let’s chat more about it in the comments below.
Thanks for stopping by the blog today!
Enjoy your day! xoxo


Love the rustic star and it looks great on your tree and how creative, you used a wood pallet. Thank you for sharing the ‘How To’. Christmas is my favourite time of year. I put up 3 trees but my favourite is in my living room ‘Family Tree Christmas Tree’ which has some large rusty stars (so your wood pallet idea would work really well), about 35 small picture frames with family photos which are labelled on the back of the frame (some are vintage mercury glass frames) which really shine through and some wooden as well as metal cardinal birds, various ornaments and faux bird nests along with faux red berries and white lights – sometimes red lights and some vintage ‘clip’ on battery operated candles and lastly you can’t forget the ‘Christmas Spider’ and ‘German Pickle’.
I love that Janice! Your trees must be so beautiful! I love the family tree idea – I’ve always wanted to do something like that!