DIY Table Topper: Never Run Out of Seating for Holidays and Parties

Easily build a DIY table topper to expand your dining space for holidays and parties. Never worry about running out of seats again!
Hi, I’m Stacy Ling, a dedicated home gardener, seasoned hostess, and the author of the Bricks ‘n Blooms blog. I write from my 1850 farmhouse in zone 6b, New Jersey, where I’ve spent years tackling big-scale DIYs, like building this custom table topper, to comfortably fit our large family gatherings. If I can transform my own historic home and garden, you can definitely tackle this project!
Do you need to add a folding table or two in order to accommodate more dinner guests during the holidays?
We always need more room than our dining table can comfortably fit during the holidays, so we came up with a solution that solves this problem and enables us to still host a large sit-down dinner without using them. If you or your spouse are handy, this weekend project is for you! Wait until you see how we made a custom topper to make our dining table bigger for extra seating.
(Posts on stacyling.com may contain affiliate links. Click HERE for full disclosure.)
5 Proven Ways to Make a Dining Table Bigger for Extra Seating
Before we dive into the details of my custom DIY table topper, let’s chat about the various ways you can increase your dining capacity. Because the best solution depends on your budget, permanence needs, and desired aesthetic. When we built this, we were on a tight budget and needed something that would accommodate 16-20 people in my small dining room.
1. The Classic Solution: Table Leaves and Extensions
For traditional dining sets, table leaves (or extensions) are the most seamless way to gain extra space. They store inside the table or separately and slide into place, increasing the length of the table while maintaining a consistent height and finish.
- Pro: Perfect match for the existing table and very stable.
- Con: Limited to the number of leaves your table supports; often expensive or impossible to acquire for older/vintage tables.
2. The Flexible Solution: Convertible Furniture
If you host large groups only a few times a year, look for multi-functional furniture.
- Folding Console Tables: Many console tables, designed to sit against a wall, can unfold or extend via hidden mechanisms to become full-size dining tables.
- Drop-Leaf Tables: These tables have hinged sections on the side that can be lifted and supported, offering quick, temporary width.
- Pro: Great use of space for small dining areas; no extra storage needed for table parts.
- Con: Can be costly; limited seating capacity compared to a custom topper.
3. The Budget Solution: Plywood Under a Tablecloth (Quick Fix)
Need space right now? The fastest, cheapest way to add a few feet to the end of a table is with a long piece of MDF or plywood.
- Place the plywood across your existing dining table and extend it to rest on top of a secured folding table.
- Drape a floor-length tablecloth over both surfaces to unify the look and hide the seam.
- Pro: Inexpensive and immediate solution.
- Con: Stability can be a concern if the surfaces are not perfectly aligned; not as durable as a finished topper.
4. Our DIY Solution: The Custom Table Topper (Best Value & Custom Size)
This is the solution we landed on! A custom-built table topper is essentially a large, sturdy panel designed to rest on top of your existing table, extending the length and width exactly to your specifications. It’s perfect for large gatherings because it provides a uniform, stable surface.
- Pro: Fully customizable (shape, size, materials); budget-friendly DIY project.
- Con: Requires basic woodworking skills; requires vertical storage when not in use.
Solutions at a Glance Comparison
| Method | Cost | Difficulty | Stability | Aesthetic |
|---|---|---|---|---|
| Table Leaves | High (if custom) | Easy (No DIY) | Excellent | Perfect Match |
| Convertible Table | High | Easy (No DIY) | Good | Integrated |
| Plywood/MDF Fix | Low | Very Easy | Fair | Requires Tablecloth |
| DIY Table Topper | Medium-Low | Moderate (DIY) | Excellent | Custom & Rustic |
Why a DIY Table Topper is the Best Solution for Extra Seating
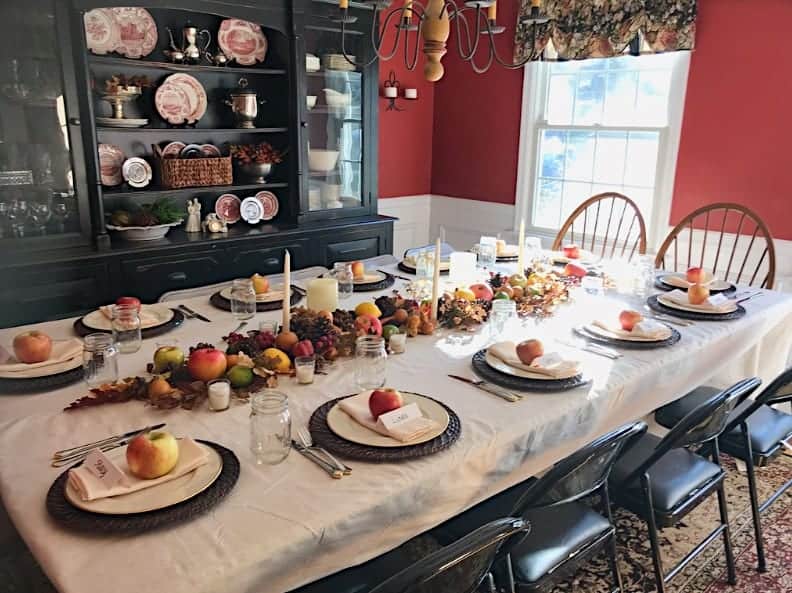
Every year, we host Thanksgiving dinner, and I love to set a beautiful fall table for sit-down meals. We often have more guests than our dining table can accommodate, so we used to resort to using folding tables to fit everyone.
However, the different heights, wobbly legs, and mismatched look of the tables always bothered me. I knew there had to be a better way.
A few years ago, when we were hosting fourteen adult guests (two more than our table could seat), we decided to search for a more permanent solution. We couldn’t find folding tables that met our needs, and other options seemed impractical or too expensive.
After some brainstorming, we came up with a weekend project that allowed us to ditch the folding tables and comfortably seat more than twelve guests in our dining room – a DIY table topper!

How to Make a DIY Table Topper for Extra Seating
Tired of squeezing around folding tables during the holidays? This DIY table topper is the solution you’ve been searching for! Not only does it provide extra seating without sacrificing style, but it’s also a customizable and budget-friendly weekend project. Here’s how to create your own:
Materials You’ll Need
- Pre-weathered shiplap boards: The quantity will depend on the size of your table topper. (We used 12 boards for our 5’x9′ topper.)
- (4) 1″x4″ boards: These will be used to screw the shiplap boards together and provide additional support.
- Wood glue: For extra bonding strength.
- Sheetrock screws: To secure the boards together.
- Screwdriver (or drill): To drive the screws.
- Saw: To cut the boards to size.
- Measuring tape: To measure your table and the boards.
Pro Tip: Pre-drilling pilot holes for the screws will prevent the wood from splitting.
Placement of 1x4s
- Inner 1x4s: Position these just outside the dimensions of your existing table. This allows the topper to rest on the table’s frame without causing damage.
- Outer 1x4s: Place these a few inches from the outer edge of the topper to provide additional support and stability.
Important Note: Leave a small gap (about 1 inch) between the shiplap boards for expansion and contraction due to humidity changes.
Step 1: Measure and Plan
Before you grab your tools, it’s crucial to determine the ideal dimensions for your table topper. Consider the size of your existing table, the number of additional guests you’d like to accommodate, and the available space in your dining room.
Pro Tip: Aim for a comfortable space of at least 24 inches per person.
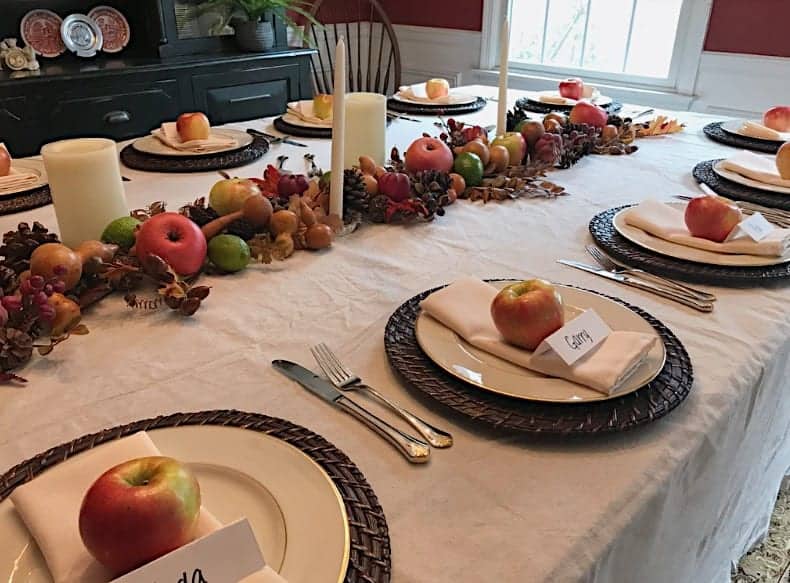
For our small dining room, we wanted to create a more square shape to maximize seating at the ends of the table. After measuring our table with leaves installed, we decided on a 5’x9′ topper.
Choosing Your Material
We opted for pre-weathered shiplap boards for our topper because they offered flexibility in sizing and a rustic charm that complements our decor. However, you can use any material that suits your style and needs, such as plywood, reclaimed wood, or even a repurposed door!


Step 2: Cut and Assemble the DIY Table Topper
With your materials gathered and measurements in hand, let’s get building!
- Cut the Shiplap: Using your saw, cut the shiplap boards to the desired length based on your measurements from Step 1. Remember to account for the 1-inch gap between each board for expansion.
- Cut the 1x4s: Measure and cut each 1×4 board to the width of your finished table topper, minus 1-2 inches on each end. This will ensure the 1x4s aren’t visible from the sides.
- Lay Out the Boards: Arrange the shiplap boards face down on a flat surface, leaving a 1-inch gap between each board. Position the cut 1x4s perpendicular to the shiplap boards, with two just outside the length of your existing table and two a few inches from the outer edge of the topper.
- Secure and Glue: Pre-drill pilot holes to prevent splitting, then screw the 1x4s to the first shiplap board. Apply wood glue to the groove of the first shiplap board, then firmly press the next board into place, interlocking the groove and tongue. Repeat this process, securing and gluing all the boards together.
- Weigh Down and Dry: If any areas of your table topper start to bow, place weights (such as paint cans) on top to ensure it dries flat. Allow the glue to dry completely before moving or using the topper.


The Perks of a DIY Table Topper: More Than Just Extra Seating
Our DIY table topper has been a game-changer for holiday gatherings and special occasions. It’s not just about the extra seating—it’s about creating a welcoming and comfortable space for everyone to enjoy. Here’s what we’ve learned from our experience:
Enhanced Functionality and Versatility
- More Seating: The most obvious benefit is the ability to comfortably accommodate additional guests without resorting to mismatched folding tables.
- Flexible Configuration: A table topper allows you to transform your dining space to fit the occasion. You can easily switch between a smaller, intimate setting and a larger gathering by simply adding or removing the topper.
- Increased Surface Area: Besides seating, the topper provides extra space for serving dishes, platters, and drinks, making your table more functional and preventing overcrowding.
Aesthetic Appeal and Personalization
- Customizable Design: Unlike store-bought options, a DIY table topper can be tailored to match your exact dimensions, style, and preferences. You can choose the materials, finish, and decorations to create a truly unique piece that complements your existing furniture and decor.
- Enhanced Ambiance: A well-decorated table topper can elevate the overall ambiance of your dining room, making it more inviting and festive.

Long-Term Durability and Storage
- Sturdy Construction: With proper materials and techniques, a DIY table topper can be just as sturdy and durable as a traditional table, ensuring years of use and enjoyment.
- Easy Storage: When not in use, the topper can be stored vertically against a wall, under a bed, or in a closet, freeing up valuable floor space.
- Disassembly Option: If space is limited, you can disassemble the topper by removing the screws and storing the individual boards separately.
My Experience
My DIY table topper has become an indispensable part of our holiday traditions. It allows us to host large family gatherings without sacrificing comfort or style. The extra space and seamless integration with our existing table create a warm and inviting atmosphere that everyone enjoys.
We’ve found that storing the topper is simple and convenient. We typically lean it upright against a wall in our garage, but it could easily be stored in an attic or basement.
Tips for Moving and Storing Your Topper:
When not in use, your table topper can be easily stored. Consider sliding it under a bed, leaning it against a wall in a closet, shed, garage. We kept ours leaned up against the wall in our garage.
- Enlist Help: The topper can be heavy, so ask a friend or family member to help you move it.
- Protect Your Floors: When moving the topper, use furniture sliders or a blanket to prevent scratches on your floors.
- Choose a Dry Location: Store the topper in a dry place to prevent warping or damage.

Additional Tips and Ideas
Want to take your DIY table topper to the next level? Here are some additional tips and ideas to help you customize, store, and even build a new topper with different materials.
Decorate Your Table Topper with Style
Let your creativity shine! A well-decorated table topper can be the centerpiece of your gathering, adding personality and charm to your dining space. Here are a few ideas to get you started:
- Tablecloths: Choose a tablecloth that complements your existing decor or the season. For a rustic look, opt for a natural linen or burlap fabric. For a more formal affair, consider a crisp white or patterned tablecloth.
- Placemats and Runners: Add a pop of color or texture with placemats and runners. Choose materials and patterns that complement your tablecloth and overall theme.
- Centerpieces: A centerpiece can be the focal point of your table. Consider a floral arrangement, a collection of candles, or a unique decorative item that reflects your personal style.
For our Thanksgiving gathering, we opted for a simple drop cloth that perfectly matched the size of our table topper and complemented our fall decor. Remember, decorating your table topper is a chance to express your creativity and create a memorable experience for your guests.
Alternative Materials
If shiplap isn’t your style, there are plenty of other materials you can use for your table topper. Plywood is a budget-friendly option, while reclaimed wood adds a touch of rustic charm. You can even get creative and repurpose an old door or tabletop for a unique look.
Frequently Asked Questions (FAQ)
Q: Does the extra height of the topper feel awkward for guests?
A: Not at all! The shiplap and 1×4 supports add minimal height, and once seated, neither we nor our guests ever noticed the difference.
Q: Will the topper scratch my existing dining room table?
A: To be extra safe, you can affix rubber bumpers or soft felt pads (the kind used on chair legs) to the bottom of the 1×4 supports that touch your original table surface.
Q: Can I make this topper round or oval instead of rectangular?
A: Yes, you can! You would assemble the rectangular base as described and then use a jigsaw or circular saw to cut the desired curve into the edges once all the boards are secured together.
Q: What is the ideal space needed per person?
A: A standard guideline is at least 24 inches (2 feet) of width per person for comfortable dining.

Final Thoughts on Building a DIY Table Topper
Congratulations on building your very own DIY table topper! By following these simple steps, you’ve expanded your dining space and created a welcoming atmosphere for your guests. Remember, this project is totally customizable, so feel free to experiment with different materials, finishes, and decorations to create a topper that works for your space, needs, and reflects your personal style.
I’d love to see your finished creations! Share your DIY table topper photos in the comments below and inspire others to tackle this fun and rewarding project. Happy hosting!
Want more ideas for your small dining room space? Check out this article from Better Homes and Gardens.
Thanks for stopping by the blog today!
Enjoy your day! xoxo


How to Make a DIY Dining Table Topper For Extra Seating
Equipment
- 1 saw
Instructions
- First, cut the shiplap to the desired length.
- Then, cut each 1×4 to size to meet the width of the finished table top but leave an inch or two from the ends (see photo above). The inner 1x4s should line up with the outside of the existing table that it will sit on so it does not move when it is resting on top.
- Lay each shiplap board loosely next to each other face down on the ground (so the tabletop is facing down).
- Then lay each 1×4 across in the place where they will get screwed in. Place them perpendicular to the shiplap boards (see photo above). The 1×4’s will help secure the shiplap and provide support.
- Set (2) 1×4’s just outside the length of your existing dining room table so the tabletop will snuggly rest on top of your existing table without budging. Then set the other two a few inches away from the edge so the table ends have additional support when finished.
- Screw the 1×4 to the first shiplap board, then apply glue in the groove so you can lock the next piece of shiplap into place.
- Repeat this process until you are done securing and gluing all of the boards together.
- Weight down any areas that start to bow so it dries flat.
- Allow the glue to fully dry before moving and using.
Looking for More DIY Ideas for Your Home?
Making your own improvements to the home is a great way to keep costs down while sprucing things up. Here are a few ideas to not only make things look better in your home, but in some cases, will add value as well
- How to Paint Wood Cabinets with Chalk Paint
- Painting Kitchen Cabinets with Chalk Paint FAQ
- How to Refinish Wood Cabinets with Gel Stain
- Painting Upholstery Fabric on an Antique Bench
- How to Strip Wood with Oven Cleaner
- Before and After Sunroom Makeover
- 1850 Farmhouse Family Room Makeover Project
- Before and After Coffee Table Makeover


Awesome idea!!! That way no one feels left out. I do have a question, have you had any problems with someone putting too much weight on one side of the table and the other side tipping up?
Thank you Crystal! No – It’s worked out really well and I love the square configuration so much more than the rectangular dining table for bigger gatherings. xoxo
Stacy I don’t remember this post! Love it.
Thank you! That table works so well! xo
Hi Stacy – Love the idea of enlarging the table and making people feel comfortable.
I wish you and your family a wonderful blessed Thanksgiving as we all have so much to be thankful for. You are a blessing to all of us who read your blog.
Thank you so much Diana! Me too – its makes it a lot more comfortable for everyone.
Did the extra inches in height that the tabletopper added to the existing table seem awkward? The finished project looks great.
Not at all! We didn’t even notice.
Brilliant! We can sit 12
Comfortably at our dining table. When we need more room, we add a drop leaf table to the end, making room for four to six more.
Thank you Renae! We have the leaves too for the table but still needed more room! This worked out well – the folding tables were never stable or even with the rest of the tables.
Stacy
I want to do this. What a great idea.
Thank you! We love that topper!
Any information on screw size for this project??