Gel Stain Cabinet Refinishing: See the Shocking Before and After

Ready for a cabinet glow-up? Discover how cabinet refinishing with gel stain makes updating your kitchen easy. See the stunning before & after!
Stuck in a rut with dated cabinets that drain your kitchen charm? You don’t need a contractor’s wallet or a sledgehammer to unleash the rustic magic your space deserves.
No need for paint fumes and elbow grease of traditional cabinet makeovers – we’re talking about the budget-friendly secret weapon that is transforming kitchens across the land: gel stain. Have you used it before?
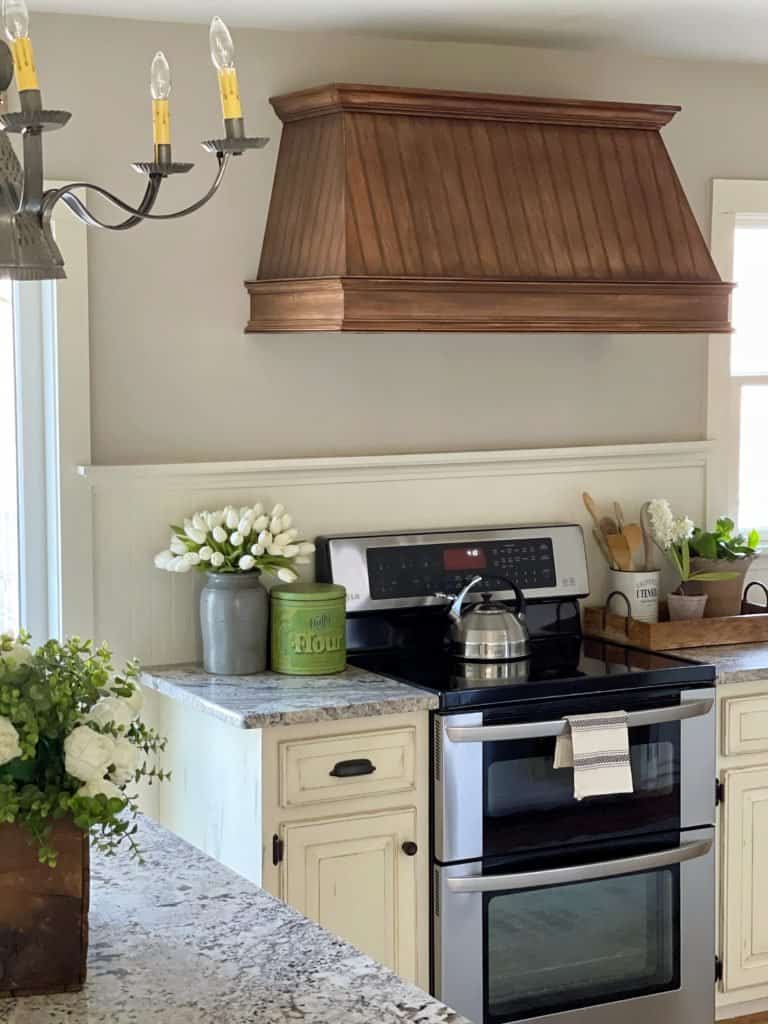
And to prove its power, I’m throwing open the doors (and before-and-after photos!) of my own farmhouse kitchen, where a boring old hood vent found new life with a dose of gel stain magic.
Prepare to witness a transformation so dramatic, that Joanna Gaines herself might do a double take. We’ll ditch the drop cloths and embrace the ease of gel stain, leaving you with cabinets boasting rich, characterful depth at a fraction of the cost.
So grab your favorite cup of brew, settle in, and get ready to unlock the rustic potential hiding in plain sight – all thanks to the wonder of gel stain! Wait until you see how my hood vent turned out using General Finishes Gel Stain.
(Posts on stacyling.com may contain affiliate links. Click HERE for full disclosure.)
About Staining Cabinets
Whether you’re craving a cozy farmhouse vibe or a sleek modern edge, a fresh coat of color can work wonders. But when it comes to choosing a weapon, the battlefield’s divided: gel stain or traditional stain?
Traditional stain, the OG, soaks deep into the wood, highlighting its natural grain. It’s perfect for bringing out the beauty of oak or walnut but can be tricky on uneven surfaces or blotchy woods.
Gel stain, the new kid on the block, sits atop the wood like a colorful glaze. It’s a dream for beginners, offering even coverage and hiding blemishes with ease. Think bold, opaque shades or subtle antiquing effects – the possibilities are endless!
So, which team are you on? I’m on Team Gel stain. Here’s how I got there.
Cabinet Refinishing With Gel Stain
Have you ever stained wood before? It sounds like a daunting process but it’s so easy to do, and even simpler using General Finishes Gel Stain.
This type of wood stain applies a deep, rich color that an oil-based stain does not achieve. When we renovated the kitchen a few years ago, I struggled with how to refinish the vent hood. It was such a beautiful piece but it looked so bland in my farmhouse kitchen.
I planned to paint the hood vent with a soft white chalk paint like the wood cabinets, but wanted it to stand out from the rest of the cabinetry. So I ultimately decided to stain it.
There are so many different types of cabinet finishes available today. Which one you choose is personal to the look you want to achieve. Since I wanted the hood vent to be the focal point, I decided to go with General Finishes Gel Stain in Antique Walnut.
And the transformation is unbelievable! If I paid a contractor do this, the cost to refinish cabinets would have been astronomical. Instead, my cabinet refinishing cost was a can of gel stain and a few extra supplies that I pretty much had on hand.

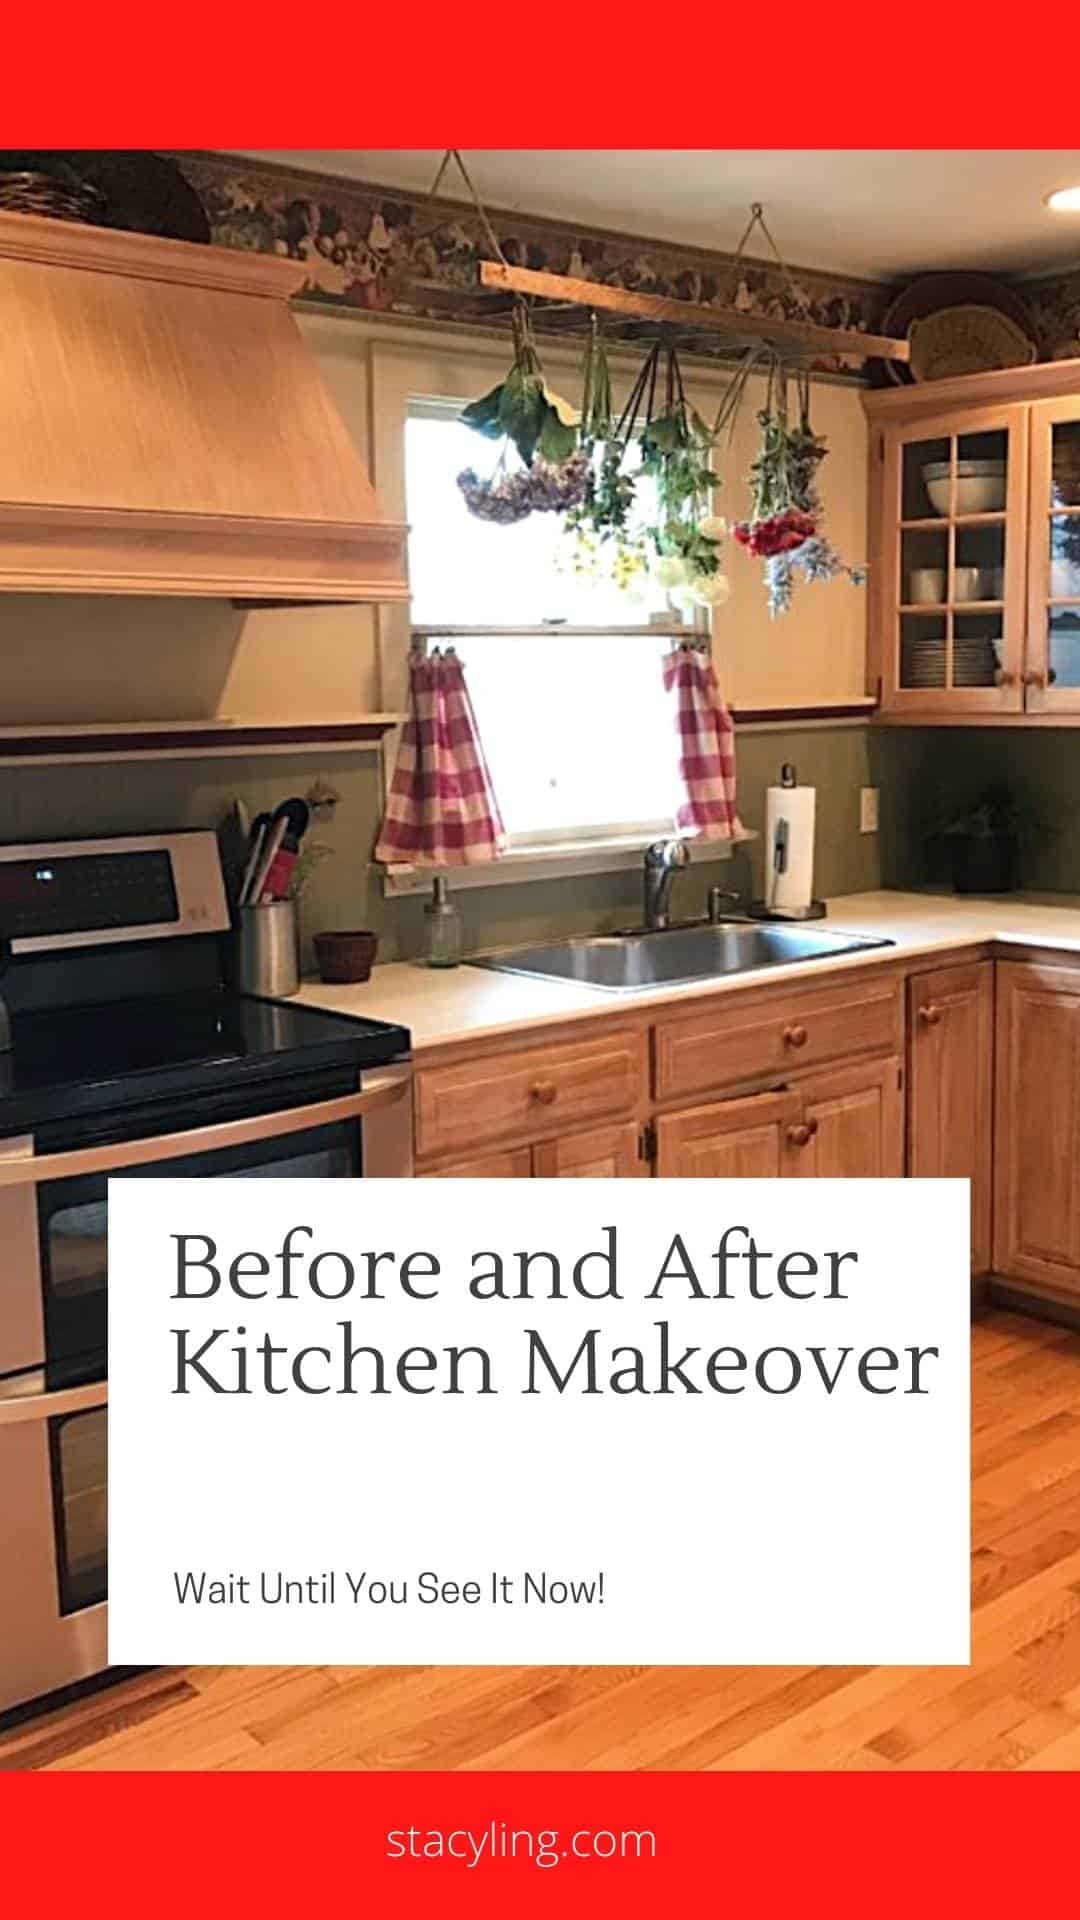
Cabinet Refinishing: Before Using General Finishes Gel Stain on the Hood
I poured over Pinterest and Google for months to come up with an overall design on how to refinish kitchen cabinets. Since I chalk painted the cabinets white, I thought it would be overkill to paint the hood vent white too.
So I chose to stain the hood to bring out the pretty details and become a statement piece in the kitchen. The former homeowner built this hood from scratch and did an amazing job, didn’t he? It was pretty but bland and lacked a venting system. So the hood vent was for decoration only.
The former homeowner installed these cabinets and built the hood himself about thirty years ago. While the craftsmanship is incredible, the detail is almost unnoticeable and the hood vent gets lost in the kitchen.

For this kitchen remodel, we wanted to make the hood operational so we purchased a vent insert that could be installed after refinishing it. After researching different types of stains, I started seriously considering gel stains.
I poured over Pinterest to learn cabinet refinishing and how to apply gel stain. While most articles worked with General Finishes Gel Stain in Java, I chose to go a shade warmer and lighter with General Finishes Gel Stain in Walnut.
Take a look at this close-up of the hood. The beadboard detail is barely noticeable. I always knew the hood had this detail but didn’t appreciate it as much as I do now after applying gel stain.
Cabinet Refinishing: Preparing to Gel Stain the Hood
Whenever I work with a new product, I practice on a few pieces before going “all in” to build up my confidence and see how I like it. Since I finished painting the cabinets white and was in total “go mode,” I went for it.
I read the directions on the can, several articles on Pinterest and visited General Finishes’ website to view their tutorial here. I must have watched that video 10 times to ensure I knew what I was doing before gel staining cabinets.
When I was ready to get started, I remember heading to the basement with the repeated mantra “if it doesn’t look right, you can always paint it; if it doesn’t look right, you can always paint it.” And I have to admit, I was pretty nervous to start but when I’m ready to go…I’m ready to go.
So here is how I did it…

How to Refinish Wood Cabinets with Gel Stain
Refinishing wood cabinets with gel stain is a pretty quick process. What takes the most time is the drying time because you need to allow 24 hours between coats for drying. Be sure to work in a well-ventilated area too. Wait until you see how easy it is to stain wood cabinets!
Supplies Needed Gel Stain Kitchen Cabinets
If you’re looking to add a little bit of style to your home, then gel-staining kitchen cabinets might just be the perfect solution. With a few simple tools and materials, you can transform old cabinets into something truly amazing. If you are redoing cabinets and want to try this method, here’s what you need gel stain kitchen cabinets.
- Cleaner/De-greaser
- 1 Quart of General Finishes Gel Stain
- 5 Foam Brushes
- 2 Rolls of Shop Towels
- 1 Quart of General Finishes Top Coat
- Sandpaper (various grades)
- Mineral Spirits
- Bucket or garbage bag to toss stained towels
- Staining brush
- Several paint mixing sticks
- Plastic gloves to keep the product off of your hands (trust me, you need them!)

Easy Steps for Gel Staining Your Cabinets
Gel staining your cabinets can give them a dramatic new look! Follow these directions for a smooth process and a beautiful finish.
1. Prep Your Cabinets
- Remove Doors & Hardware: Take off all cabinet doors and hardware. To make reinstallation easy, label each door and piece of hardware, and sketch a quick diagram showing where everything goes.
- Clean Thoroughly: Give your cabinets a good scrub with a de-greaser. Rinse them well afterward to ensure no residue is left behind, as this can affect how the stain adheres.
- Set Up Your Workspace: Work in a well-ventilated area. Protect your hands with gloves to avoid staining your skin. Open the gel stain can and stir it thoroughly. Don’t worry if it looks thick; it will smooth out as you stir.
- Sand the Surface:
- Unfinished wood: Lightly sand with 120- and 150-grit sandpaper to create a slightly rough surface for the stain to grip.
- Finished wood: Use a slightly stronger grit sandpaper to rough up the existing finish.
2. Apply the Gel Stain
- Apply a “Slip Coat”: Before applying the stain, wipe on a thin “slip coat” of mineral spirits. This helps the gel stain glide on evenly, spread smoothly, and reduces visible lap marks.
- Work Quickly & Continuously: Gel staining is a fast process, so work in sections and try not to stop until you’ve completed that section. This prevents overlap marks and ensures an even finish.
- Stain Application:
- Saturate a foam brush with gel stain and quickly apply it to several areas of your surface.
- Use a shop towel to immediately spread the stain out into a nice, even coat.
- Remove excess stain: Using clean shop towels, wipe off all excess stain. Make sure to wipe all edges to avoid leaving behind any globs of stain.
- As you wipe the stain off, always wipe with the grain of the wood for the best appearance.
- Check your surface carefully to ensure you haven’t missed any spots.
3. Drying & Top Coating
- First Coat Dry Time: Let your first coat of gel stain dry overnight.
- Second Coat (Optional): If you want a deeper color, apply a second coat using the same process.
- Final Dry Time: Allow the gel stain to dry for a full 24 hours before applying a top coat for protection.
While the stain looks gorgeous after gel staining, it almost seems like you can skip top coating but don’t do that! It is so important to apply a top coat after the stain dries. General Finishes sums it up pretty well, so consider this: gel stain is the color and the top coat is the protection of that color. Therefore, don’t skip top coating!

Applying the Top Coat for Durable Cabinet Refinishing
Once your gel stain has dried, it’s time to apply a protective top coat. For areas like a kitchen hood that see a lot of moisture, a high-performance, flat-finish top coat (like the one you chose) is an excellent choice for durability and a modern matte look.
What You’ll Need
- Gel Top Coat (stirred well)
- Gloves
- Foam brush
- Staining brush (or a clean, soft bristle brush)
- 220-grit sanding pad
- Shop towels
- Clean, lint-free cloth
Top Coat Application Steps
Coat 1: The Initial Seal
- Prepare: Open your can of gel top coat and stir it very well until it’s smooth. Wear gloves to protect your hands.
- Apply Thinly: Using a foam brush, apply a very thin coat of the top coat to your cabinet surfaces. Aim for an even, light application.
- Even Out: As you apply, use the foam brush to gently even out any areas.
- Wipe Edges: Make sure to wipe off any excess top coat from the sides and edges of your wood surfaces.
- Feather with a Brush: Take a staining brush (or a clean, soft bristle brush) and lightly brush out the finish in the direction of the wood grain. Do not apply pressure; simply let the brush gently drag across the surface to smooth it.
- Dry Time: Allow this first coat to dry overnight.
Coat 2: Building Protection
- Light Sanding: Once the first coat is completely dry, lightly sand the entire surface with a 220-grit sanding pad. Always sand in the direction of the wood grain. This step helps create a smooth surface for the next coat and improves adhesion.
- Remove Dust: Wipe off all sanding dust thoroughly with a clean shop towel.
- Apply Second Coat: Apply the second coat of top coat using the exact same technique as the first coat (thin application with a foam brush, feathering with a staining brush, and wiping edges).
- Polish (Optional, for an extra smooth finish):
- Dampen a small piece of a shop towel with a tiny bit of the gel top coat.
- Lightly wipe and polish the surface in the direction of the grain, removing just a little bit of the finish. This helps to further smooth and even out the coat.
- Immediately follow with one last pass using a clean, lint-free cloth, almost “feathering” the finish for a flawless look.
- Dry Time: Allow this second coat to dry overnight.
Coat 3: Maximum Durability
- Final Cure Time: After applying the third coat, allow the cabinets to dry and cure for a full 72 hours before regular use. This longer curing period ensures maximum durability and protection.
- Repeat Process: Apply the third coat using the same techniques as the second coat (including the light sanding and dust removal, and optional polishing step if desired).
Note: Although I used a flat finish there still is a natural sheen to the piece. It looks gorgeous in person and I would choose to use the flat finish again.
After allowing the hood to dry for 72 hours, a licensed electrician installed and hooked up the new venting system for us. Doesn’t it look amazing? The finish on the hood is beautiful and has held up very well over the last few years.

I’ve worked with several brands and types of stains before, but the gel stain provides a very rich-looking finish that you do not get from an oil-based stain.
When looking at the before and after pics of the hood, the wainscotting detail stands out so much more after finishing it with this product and it now looks like a very expensive custom piece.
I know the process sounds daunting, but each application is very quick and easy. The thing that took the most time is the 24-hour drying time between coats. But it is well worth the wait.
This hood is my favorite piece and I am very proud of it. Now that it’s all done, I really love my kitchen!
If you are thinking about trying to gel-stain kitchen cabinets, I highly recommend it! And if you are considering chalk painting cabinets, check out my FAQ with lots of answers here.


More About Redoing Kitchen Cabinets
Refinishing kitchen cabinets can feel like a monumental task, but let me tell you, working with gel stain has been an absolute game-changer. If you’ve ever been intimidated by traditional staining or the thought of stripping cabinets down to bare wood, gel stain is your new best friend. It truly is so much easier to use!
What I particularly love about gel stain is its forgiving nature. Its thicker consistency means less dripping and splattering, making vertical surfaces like cabinet doors a breeze to work on. You don’t have to be a professional to get a beautiful, even finish. Plus, the minimal sanding required compared to traditional methods saves so much time and effort, letting you focus on the satisfying transformation.
And speaking of transformation, I can’t express how much I adore my hood vent now. It was once just a utilitarian piece, blending into the background, but with the rich, deep color from the gel stain and the elegant flat top coat, it has truly become the statement piece of my kitchen. It draws the eye, adding a touch of sophisticated drama that elevates the entire space. Every time I walk into the kitchen, I’m struck by its beauty and the surprising impact such a simple, DIY-friendly product can have.
So, if you’re on the fence about updating your cabinets, I wholeheartedly recommend giving gel stain a try. It’s a remarkably accessible way to achieve professional-looking results and fall in love with your kitchen all over again.
Have you ever refinished cabinets in your kitchen or bathroom before? Would you ever try using gel stain after reading this post? I would love to know more in the comments below.
Thanks for stopping by the blog today!
Enjoy your day! xoxo

More Cool DIYs You May Enjoy
- How to Paint Wood Cabinets with Chalk Paint
- How to Paint Upholstery Fabric with Chalk Paint
- Painting the Piano
- Upcycled Vintage Framed Chalkboard


Beautiful job , your kitchen is lovely !
Thank you so much Joyce!!!
I know this is a crazy question, but I’m asking because I really don’t have a workspace to remove all of the cabinets. Since gel stain doesn’t really drip and I understand that you can apply it on vertical surfaces, is it absolutely necessary to remove the cabinet doors? I was thinking as long as I remove the handles and tape the hinges then I should be ok? Any input would be appreciated ☺️
Hey there Amber! It’s a good question. I totally hear you in not wanting to remove the doors. But if it were me, I would still remove the doors. I hope this helps! xo
What is the color and brand of the gel stain?
It is linked for you in the blog.
Stacy,
This looks great. I don’t remember seeing this before.
Thank you! That’s my favorite part of the kitchen remodel! xo
Your kitchen turned out beautifully! We want to try our hand at DIY refinishing for our bathroom vanities to make them match. Thank you for sharing your process!
I love the contrast between the hood and the cabinets! We gave our kitchen a much-needed facelift and we loved how it turned out so now we want to give DIY cabinet refinishing a shot for our laundry room. So glad I found your post!
Thank you so much! I really appreciate that!
Beautiful!
Thank you Deb!
Beautiful! I’m in love with that hood and that transformation! Gorgeous!
Thank you so much Leslie! It was so fun meeting you at Haven this week!
Your kitchen is absolutely stunning!! I am wondering why you went with the brand of gel stain you did vs. a name brand from like Home Depot or Lowe’s? I have been looking into how to redo my house doors & trim. Refinishing them, not replacing. I like upcycling. Thanks for your post!
When I extensively researched best methods online that was the brand that came up a lot so I ordered it and worked with it (but went with a different color from Java which seemed to be what most people used). Really loved the result!
The hood is gorgeous and i agree that it brought out the bead board. I didn’t notice that feature in the before picture until you mentioned it in the article . I was really excited to see a project using walnut stain as it seems like most show java. Have you ever used walnut over honey oak on anything? Thanks for a great post
I haven’t but I’d test it on a small area that you don’t see! When I was researching this project, I found that all the projects used java too. It was too dark for what I wanted. I love the walnut finish!