Create a Stunning Gallery Wall with Vintage Botanical Prints in Under an Hour

Create a stunning gallery wall with vintage botanical prints in under an hour. Learn quick and easy steps to refinishing frames and arranging wall art.
There’s something magical about creating a personalized gallery wall that reflects your unique style. Recently, I transformed a blank wall in my home using vintage botanical prints, and it brought such warmth and character to the space.
If you’re like me and love quick and rewarding DIY projects, you’ll adore this one. In under an hour, you can refresh old frames and arrange beautiful prints that tell a story.
Let me share how you can easily achieve this charming look in your own home. And if you have frames laying around that you aren’t using, even better!
(Posts on stacyling.com may contain affiliate links. Click HERE for full disclosure.)
Moving and Redecorating
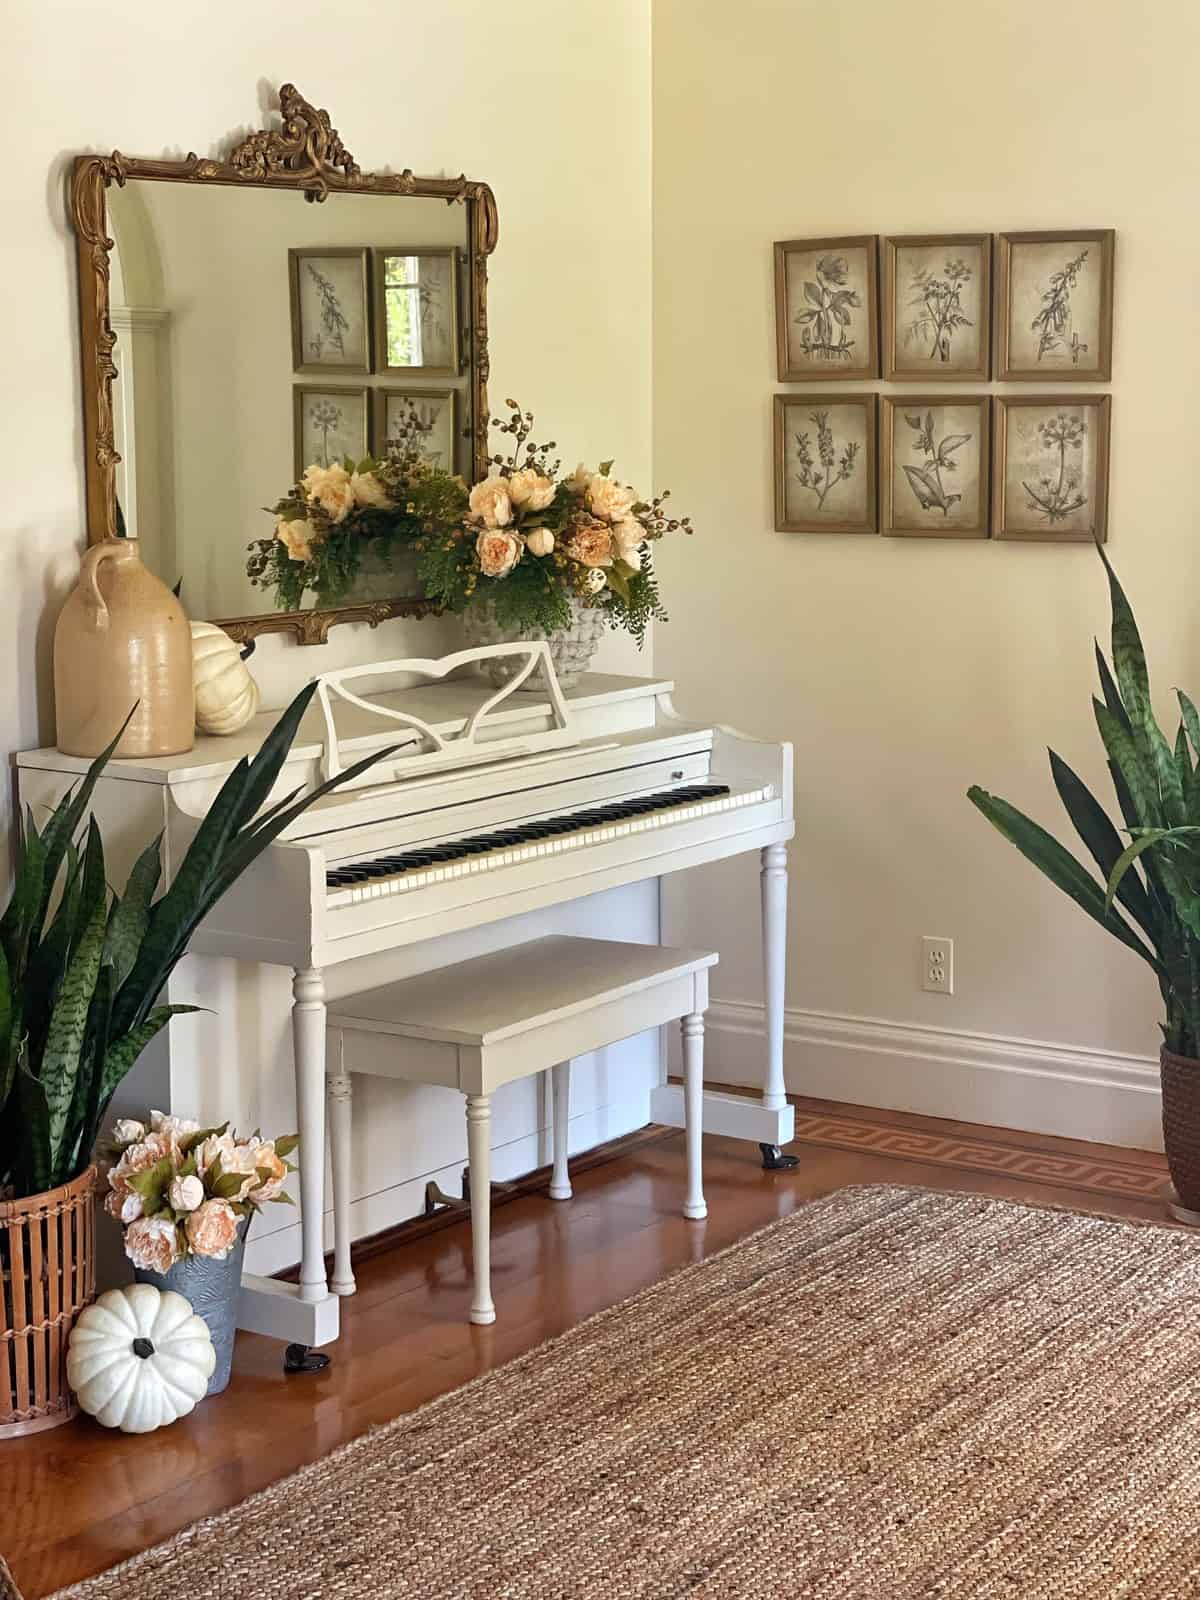
Since making this DIY vintage botanical print gallery wall, we moved!!!! And while I loved the look in my old house, it didn’t coordinate well with my aesthetic in the new house. So, I refinished the frames again using a different method, and I’m thrilled with the result!
Our recent move was a big transition, and when we unpacked, I felt a bit overwhelmed by the blank walls and the task of decorating our new home. I didn’t want to rush into putting everything up just anywhere.
Instead, I decided to take my time and thoughtfully curate the decor to match the unique aesthetic of our 1850 farmhouse. This deliberate approach allowed me to learn and appreciate the character of our new space, ensuring each piece felt right at home.
Creating the vintage botanical print gallery wall was one of the first steps in making our new house feel like home after painting the walls in the front entry hall.
Gallery Wall Ideas Fill Empty Spaces
If have an empty wall space and aren’t sure what to do with it, consider making a gallery wall. I love mine with these vintage botanical prints, but you can use any theme that suits your style!
Whether you make one of family photos or some other prints that you love, it’s a great way to update a space and make it your own. Whether it’s family photos or favorite prints, a gallery wall is a fantastic way to personalize and update your space.
Are Gallery Walls Going Out of Style?
Here’s what I say to that – no. While they may feel like they are going out of style, when done well with things that you love, it is a great way to warm up a space and add your personality.
What are the Rules for a Gallery Wall?
To me, there are no rules but here are some thoughts to keep in mind.
- Keep gallery walls straight and level
- Make a mock of your wall first before hanging
- Mix up the sizes and types of frames for an informal look but consider staying in the same finish to keep it cohesive.
- Use the same frames for a formal look.
- Fill the wall by going high and wide

The Evolution of My Vintage Botanical Print Gallery Wall Idea
After remodeling my former dining room, I had a blank wall that needed something. I made this vintage botanical print gallery wall using frames that I already had.
Years ago, we used to have a HUGE gallery wall of family photos in our finished basement. Fast forward a few years to when I repainted the walls down there and never put the family photos back up. So I have several 8×10 frames of them laying around that I used for this project.
If you don’t, you can easily purchase new frames from Walmart, Target, Amazon, Michaels…so pretty much anywhere.

Quick DIY Project: My Gallery Wall Makeover
After painting some of the rooms here at the new house, my vintage botanical prints were a little dark for my aesthetic so they needed another makeover. We recently painted the front entry hall (what a difference that was) and I had some empty walls.
So I decided to quickly makeover these frames so they would go better with the aesthetic of my vintage farmhouse.
Here’s how I quickly transformed the look with this easy DIY project.

Essential Supplies For This Gallery Wall Idea Makeover
If you don’t have craft or paint supplies on hand, you’ll need to get some.
For this project I used:
- Wood Picture Frames
- Vintage Botanical Prints
- Gold Rub ‘n Buff
- Old Paint Brush
- Level
- Hammer
- Picture Frame Hooks

Rub ‘n Buff Tutorial for Refinishing Picture Frames
I swear Rub ‘n Buff is so easy to work with. You can use it on almost any surface and get a beautiful result after.
Since I had a tube lying around that I was planning to use on another easy home project, I had just enough to refinish six wood frames.
Now I had to cover black frames, so if yours are not dark, you might not need to use it as much because a little goes a long way where Rub ‘n Buff is concerned.
Since moving into our new home, my daughter unloaded all of our picture frames onto the library shelves. So they were just sitting around with no particular place to be!
I quickly grabbed my vintage print botanical frames and got to work. Here’s how I refinished the frames in under 20 minutes.

First, I popped each picture and glass out of the frames. Then I squeezed some Rub ‘n Buff into a plastic cup.
I dipped an old paintbrush into the cup and applied it to the frame until it was fully covered. If you’ve never worked with Rub ‘n Buff before, it goes on quick and smooth, so a little goes a long way.
After covering each frame, I allowed them to fully dry and cure for 24 hours before inserting the vintage botanical prints and hanging them on the wall.


How to Hang a Gallery Wall
Before hanging the wall art arrangement, I layed each frame out on the floor until I had the desired spacing. And then I measured the distance between each frame plus the distance to where it would hang.
I determined where I wanted the first row to hang, then leveled the line so the frames would hang evenly.
I marked the wall where each frame should hang. And then installed picture frame hooks with a hammer. Once the first row was hung, I repeated the process for the second row.
I have more frames that I can refinish, so I may print out 3 more botanical prints and create a third row. What do you think? Should I add another row? Tell me in the comments below!


Alternative Ideas for Refinishing Frames
If you want to refinish your frames differently, here are a few other methods to try.
- Chalk Paint: Use chalk paint for a matte, vintage look. It’s easy to apply and can be distressed for added character.
- Gold Leaf: For a luxurious feel, apply gold leaf. This method can add a touch of elegance to any frame.
- Distressed Wood: Sand and stain the frames for a rustic, farmhouse style. Experiment with different wood stains for varied effects.
- Spray Paint: Quick and versatile, spray paint allows you to easily match your frames to any color scheme. Try metallics for a modern touch.
- Fabric or Paper Covering: Adhere fabric or decorative paper to the frame for a textured, patterned finish. This can be a great way to tie in other decor elements from your space.
These techniques can help you achieve the perfect look for your wall art arrangement.

Final Thoughts on Creating a Stunning Gallery Wall
Creating a gallery wall with vintage botanical prints has been a wonderful way to personalize my new home. Taking the time to carefully plan and execute this project not only filled an empty wall but also brought a sense of warmth and character to our 1850 farmhouse.
Whether you choose botanical prints, family photos, or another theme, a gallery wall is a versatile and stylish way to make any space uniquely yours. I hope this guide inspires you to start your own gallery wall project and enjoy the process as much as I did!
Thank you for visiting the blog today!
Enjoy your day! xo

You have inspired me to create a gallery wall with vintage botanical prints. Love the finished look, Stacy.
Thank you so much Kim! xo
I really like your gallery wall Stacy….but Im thinking another row would really make a statement ? Just my opinion ..
Thanks and I agree – I only used 6 frames with the downloads I printed out at the former house so only updated those for now. The rest are still boxed up from the move. Just used what I had available and on hand to update the space.