Drying Herbs the Easy Way: How to Preserve Your Garden Harvest

Learn how to dry herbs the easy way to preserve your garden harvest and enjoy homegrown flavor long after the growing season ends.
There is nothing quite like the aroma of fresh herbs drifting through the kitchen, instantly elevating everyday meals. I have been growing herbs for decades, and from the earliest days of my garden, harvesting and preserving them has been just as important as growing them. From earthy sage and rosemary to bright basil and cilantro, herbs have always been a staple in both my garden and my cooking.
As the seasons change and cooler weather arrives here in New Jersey, preserving that harvest becomes essential. Drying herbs is one of the simplest and most reliable ways to extend the life of your garden and continue enjoying homegrown flavor long after the growing season ends. It is a natural next step after growing an herb garden and harvesting more herbs than you can use fresh.
Over the years, I have experimented with several preservation methods, but air drying has consistently been my go-to. Hanging herbs to dry captures their fragrance and flavor without complicated equipment. Today, I dry most of my herbs in a dedicated drying space, a small shed that I transformed specifically for drying flowers and preserving herbs. This slow, gentle process has proven to be both effective and easy to maintain season after season.
In this post, I am sharing the simple method I use to dry herbs, along with practical tips I have learned along the way. If you want to preserve your garden harvest and keep homegrown flavor on hand year-round, drying herbs is an approachable place to start.
(Posts on stacyling.com may contain affiliate links. Click HERE for full disclosure.)

Why Hanging Herbs is the Easiest Path to Preservation
At its core, drying herbs is about removing moisture slowly and evenly while avoiding mold. Over the years, I have found that air drying accomplishes this better than any other method I have tried. Hanging herbs allows moisture to evaporate naturally, preserving both flavor and aroma without the need for special equipment.
I have experimented with dehydrators and quicker drying methods, but I keep coming back to hanging herbs because it is simple, reliable, and gentle. When herbs dry too quickly, their essential oils can be diminished. Air drying gives them time to retain the qualities that make them worth growing in the first place.
Hanging herbs also fits naturally into the rhythm of gardening. After harvesting, I bundle herbs and hang them to dry, letting the process unfold on its own. This method works especially well in a well-ventilated space and requires very little hands-on attention once the herbs are hung.
For me, hanging herbs has always been the easiest and most consistent way to preserve a garden harvest. It is low effort, low cost, and produces beautifully dried herbs that last for months. Simplicity has always guided how I garden, and this method reflects that approach perfectly.
Supplies Needed to Air Dry Herbs
You do not need much to dry herbs successfully. One of the reasons I love this method is how simple and accessible it is.
- Garden snips or pruners: I use garden snips for harvesting herbs because they make clean cuts and are easy to handle.
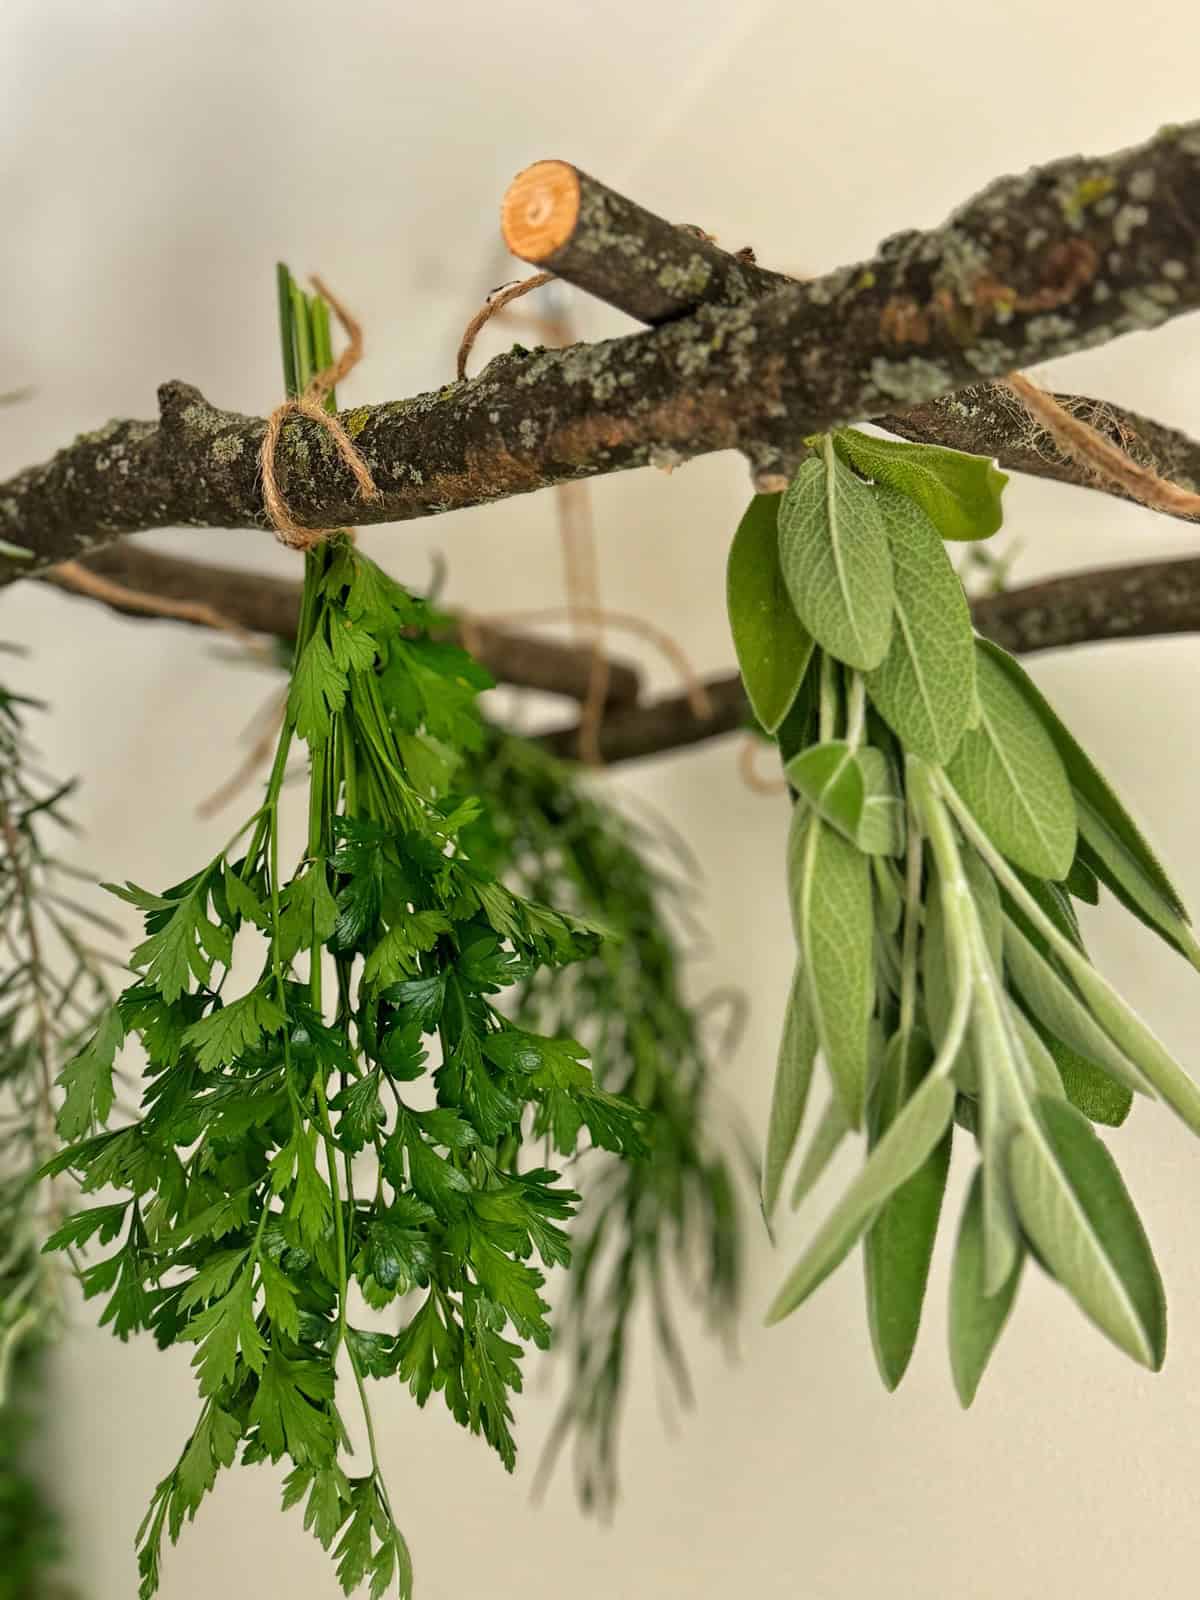
- Drying rack or hanging system: Herbs can be hung from hooks, a drying rack, or even a simple line of twine. I hang mine from the ceiling using a homemade ladder made from branches, but a store-bought drying rack works just as well (like this or this).
- Twine or string: Twine is my go-to because I always have it on hand and it allows for easy adjustment as herbs dry and shrink.
A Step-by-Step Guide to Hanging Herbs
Step 1: Harvest Herbs for Drying
The best time to harvest herbs for drying is after the morning dew has evaporated but before the heat of the day sets in. This is when herbs are at their freshest and most flavorful.
Choose healthy, vibrant stems that are free from damage or disease. The quality of your dried herbs will always reflect the quality of what you harvest, so it is worth taking a few extra moments to select the best stems.
If needed, gently rinse herbs to remove dirt or debris. Shake off excess water and allow them to dry fully before bundling to prevent moisture from getting trapped during the drying process.

Step 2: Bundle Herbs for Drying
Gather small bunches of herbs, usually about three to five stems per bundle. Smaller bundles dry more evenly and reduce the risk of mold.
Secure each bundle with twine or rubber bands. I prefer twine because it is easy to adjust and does not tighten as the stems shrink. Leave enough length on the twine to hang the bundle comfortably.
Avoid crowding the bundles together. Proper air circulation is key to successful drying.
Step 3: Hang Herbs in a Dry, Well-Ventilated Space
Choose a location that is dry, dark, and well ventilated. Basements, closets, or spare rooms can work well, and some people successfully hang herbs on interior walls.
I hang my herbs in a dedicated drying space in my she-shed, where airflow is consistent and the herbs can dry slowly and evenly. Over the years, I have found that experimenting with different locations helps you discover what works best in your own home.
Hang herb bundles upside down and space them apart so air can circulate freely. Using hooks, racks, or a hanging ladder helps keep everything organized and accessible.
Step 4: Check for Dryness
Check your herbs periodically to make sure they are drying evenly and showing no signs of mold. Drying time typically ranges from one to three weeks, depending on the herb, humidity, and airflow.
Herbs are fully dry when the leaves crumble easily between your fingers. Once dry, they are ready to be stored for long-term use.

Tips for Hanging Herbs Like a Pro
Over the years, I have learned that small details make a big difference when drying herbs. These simple tips help ensure herbs dry evenly and retain their color, aroma, and flavor.
Keep herbs out of direct sunlight
Sunlight can fade color and reduce flavor. Choose a shaded or dark location for drying. If needed, loosely covering bundles with a light cloth or paper bag can help protect them.
Prioritize good airflow
Air circulation is essential for preventing mold and encouraging even drying. Space bundles apart and avoid overcrowding, especially in humid conditions.
Label bundles clearly
Labeling each bundle makes it easy to tell herbs apart once they dry, particularly if you grow several varieties with similar-looking leaves.
Protect from dust and pests
In some spaces, using mesh bags or paper bags with ventilation holes can help keep herbs clean while still allowing airflow. This is especially helpful in garages, basements, or sheds.

Storing Dried Herbs for Maximum Flavor and Longevity
Once herbs are fully dry, proper storage is just as important as the drying process itself. Thoughtful storage helps preserve flavor and ensures herbs stay usable for as long as possible.
Use airtight containers
Transfer dried herbs to airtight containers such as glass jars or resealable bags. This protects them from moisture, light, and air, which can quickly degrade quality.
Label and date everything
Clearly label containers with the herb name and the date they were dried. This makes it easier to rotate through your stash and use herbs while they are still at their best.
Store in a cool, dark place
Keep dried herbs in a pantry, cupboard, or drawer away from heat and sunlight. I store mine in functional spice jars tucked into a spice drawer where they stay protected and easy to access.
Store herbs whole when possible
Keeping herbs whole helps preserve their essential oils. Crush or grind them just before use to release the most flavor.
I like to add mine to these pretty, yet functional spice jars and put them in my spice drawer.

Shelf Life and Potency of Dried Herbs
Most dried herbs maintain good flavor for about six to twelve months when stored properly. Some herbs, such as rosemary and thyme, can last longer due to their higher oil content and may remain usable for up to two or three years.
Trust your senses when evaluating stored herbs. If the color has faded significantly or the aroma is weak, it is usually time to replace them.
Beyond Hanging: Exploring Other Methods
While hanging herbs is my preferred method, there are other options, including dehydrators and ovens. These methods can speed up the drying process, but I have found that slower air drying best preserves the delicate flavors and aromas of homegrown herbs.
If you enjoy experimenting, different methods may work better for certain herbs or situations. For me, hanging herbs remains the simplest and most consistent approach.

Frequently Asked Question About Drying Herbs
What herbs are best for air-drying?
Herbs with lower moisture content and sturdier stems dry most easily. Rosemary, sage, thyme, oregano, and marjoram are all excellent choices and hold their flavor well during air drying.
How do you know when herbs are fully dry?
Herbs are ready when the leaves feel dry and brittle and the stems snap cleanly when bent. If leaves crumble easily between your fingers, the moisture has been fully removed.
How long does it take to air-dry herbs?
Drying time varies depending on the herb and the humidity in your space. Most herbs take between one and three weeks to dry fully, with thicker leaves taking longer.
How long do dried herbs last?
When stored properly in airtight containers and kept in a cool, dark place, most dried herbs maintain good flavor for six to twelve months. Herbs with higher oil content may last longer.
Final Thoughts on Drying Herbs at Home
Drying herbs has been part of my gardening routine for decades, and it remains one of the simplest and most rewarding ways to preserve a garden harvest. Over the years, I have refined my process, but hanging herbs to air dry has always been at the heart of it.
Today, most of my herbs are dried slowly and naturally in my drying house, a small she shed that I transformed specifically for drying flowers and preserving herbs. That space allows herbs to dry evenly, retain their fragrance, and stay protected while the process unfolds on its own.
What I love most about drying herbs is how seamlessly it fits into the gardening cycle. After growing an herb garden and harvesting more than I can use fresh, hanging herbs ensures nothing goes to waste. The result is shelves and drawers stocked with homegrown flavor that can be enjoyed long after the growing season ends.
If you are also interested in using herbs more intentionally in the garden, you may enjoy learning about companion planting with herbs and how strategic plant placement supports healthier gardens. And for herbs like lavender, which are just as beautiful as they are useful, drying and harvesting them adds another layer of enjoyment to the process.
To learn more about how I grow lavender and harvest it for drying, please see the following: How to Grow Lavender and Harvesting Lavender.
Drying herbs does not require special tools or complicated techniques. With a little patience, good airflow, and a reliable space to hang them, anyone can preserve their harvest and enjoy the rewards year-round.
What herbs did you grow this year? Will you be drying them too? Please tell me about it in the comments below, I’d love to chat!
For more information about preserving herbs from your garden, read this article from the Penn State Cooperative Extension.
Thank you for visiting the blog today!
Enjoy your day! xo
