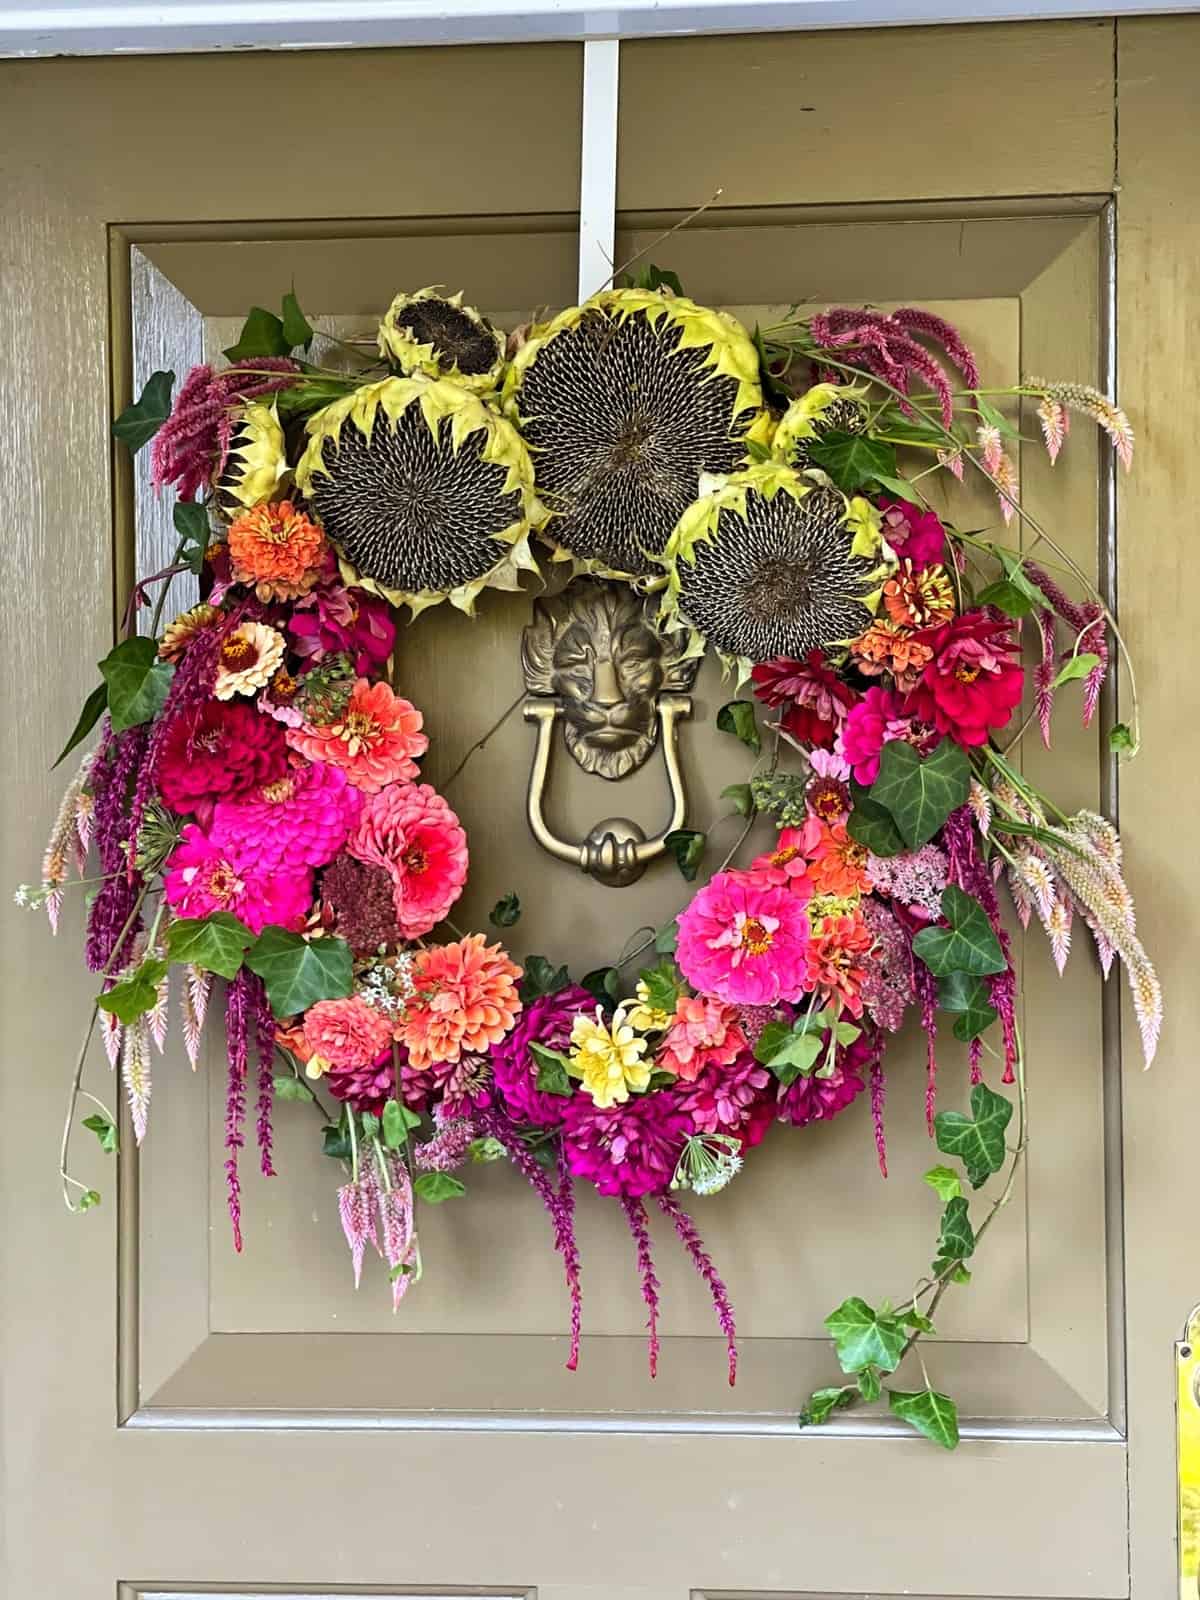
Fresh Flower DIY Fall Wreath for Your Front Door

Create a stunning DIY fall wreath for your front door using fresh flowers from your garden with this easy step-by-step tutorial.
As a flower gardener, there’s nothing quite like the joy of watching my garden burst into a symphony of colors each fall.
Dahlias, zinnias, marigolds – they all contribute to the vibrant tapestry of autumn. But what do you do with this abundance of beauty once the growing season starts to wind down?
One of my favorite ways to celebrate these blooms is by creating a fresh flower fall wreath for my front door. It’s a simple yet stunning way to bring the warmth and vibrancy of my garden indoors, welcoming guests with a burst of seasonal cheer.
And the best part?
Each wreath is a unique masterpiece. Even if I use the same types of flowers each time, every wreath looks so different and beautiful. The way the colors blend, the textures intertwine, and the overall design emerges is always a fun surprise.
So let’s head out to the garden, cut some flowers, and make a gorgeous fresh flower wreath!
(Posts on stacyling.com may contain affiliate links. Click HERE for full disclosure.)

Two Easy Ways to Make a DIY Fall Wreath
- Dried Flower Wreaths: You can either dry your flowers beforehand or use them fresh and let them dry on the wreath.
- Living Wreaths: Where you tuck in small vials of water and enjoy a live wreath. Or maybe you’ll use a wreath form made of floral foam. Either way, the idea is keep the wreath alive and blooming.
Because I love the ease and organic beauty of fresh flowers drying naturally on the wreath, that’s the method we’ll explore in this tutorial.
Flowers Straight from My Garden
Over the years, I’ve discovered which flowers dry exceptionally well on a wreath, retaining their color and shape for weeks. Here are some of my favorites to use!
- Hydrangeas (especially my beloved endless summer variety)
- Celosia
- Sunflowers
- Zinnias
- Pansies
- Salvia
- Lavender
- Statice
- Strawflower
- Yarrow
- Sedum Autumn Joy

Materials You’ll Need
You’ll be surprised at how few supplies you need for this craft:
- A bounty of fresh fall flowers from your garden (choose from the list above or your personal favorites)
- Greenery or foliage (ivy, ferns, eucalyptus)
- Grapevine wreath form (or any other wreath base you have on hand)
- Pruners or scissors
- Optional: floral wire or hot glue (for extra security, if needed)
- A basket or container to collect your flowers. If you aren’t making your arrangement right away, drop your blooms in a bucket filled with room temperature water.
Step-by-Step DIY Guide
Gather Your Blooms
Take a stroll through your garden and gather a variety of fresh flowers and foliage. Aim for stems that are roughly 8-12 inches long.

Prep the Wreath Base
If you’re using an old wreath form, clean it up and remove any existing decorations.
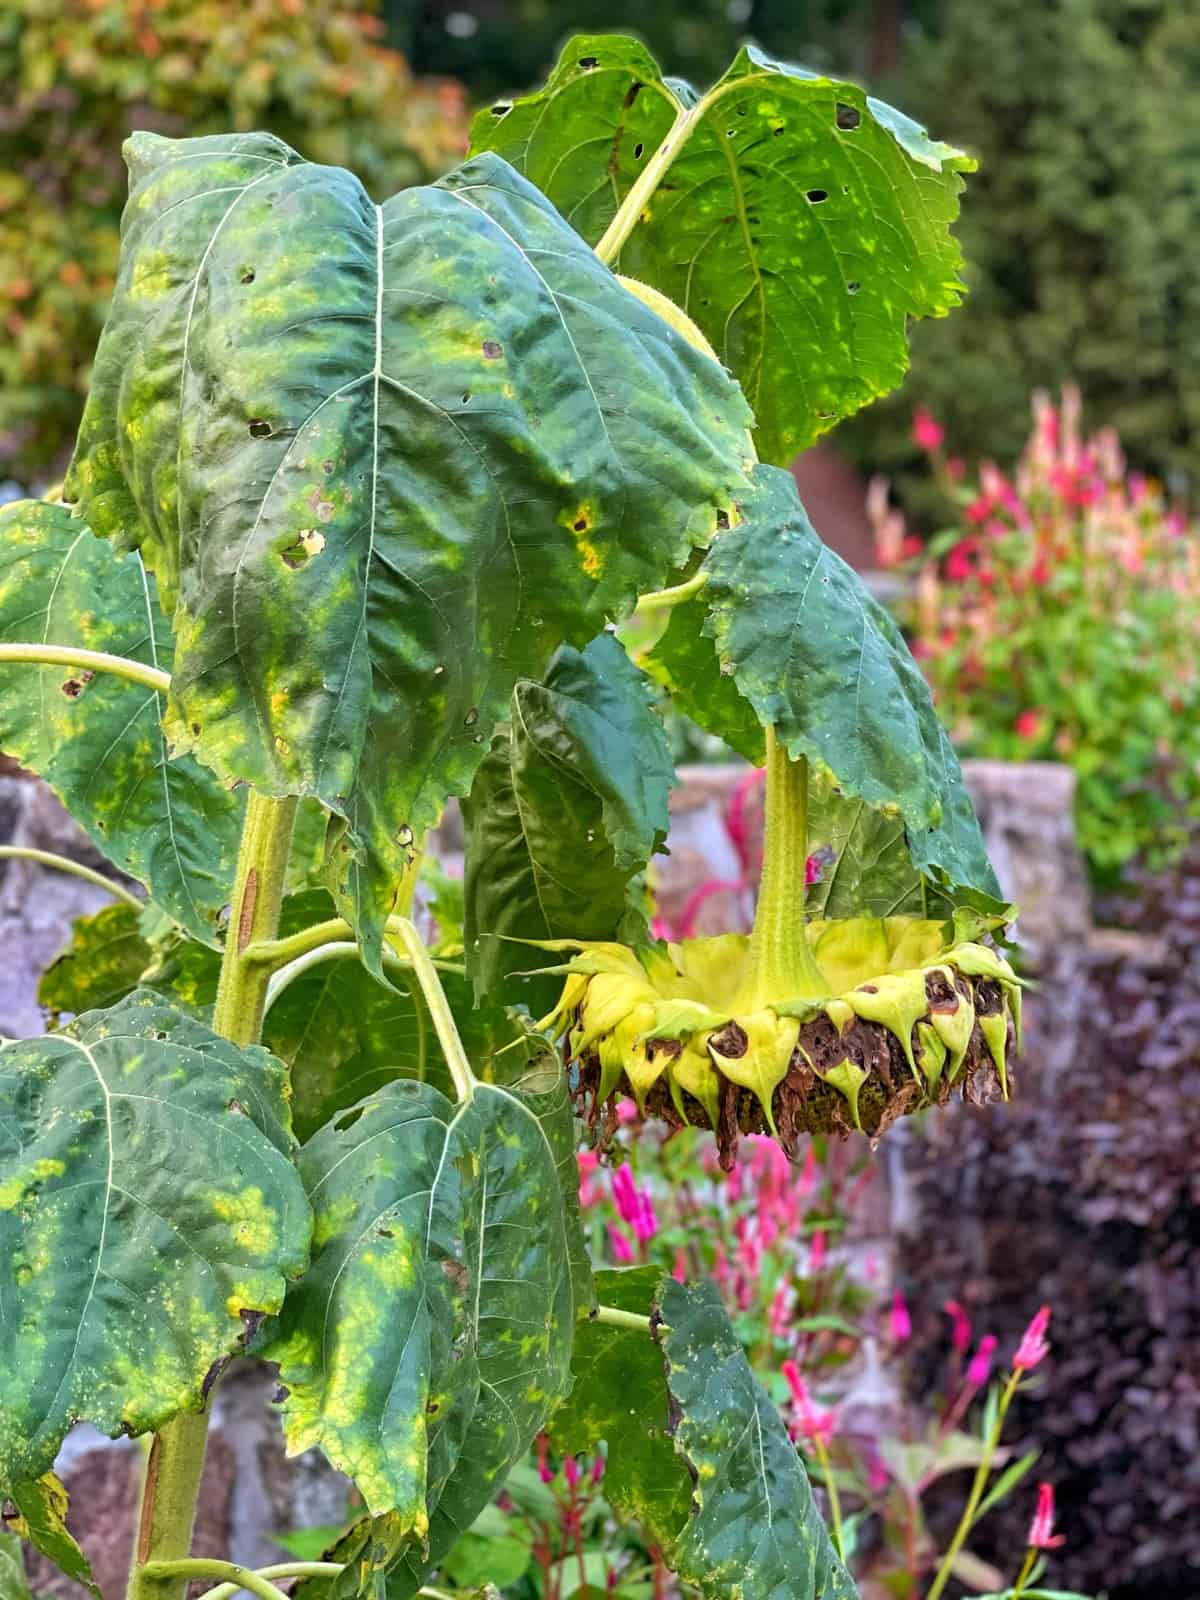
Start with the Sunflowers
Trim the stems of your sunflowers to a length that allows them to be securely tucked into the wreath without sticking out. Start by placing them at the top of the wreath.


Weave in Some Ivy or Other Trailing Vine
Weave a vining plant through the wreath form now to create a base of greenery. My garden ivy worked really well with this wreath.
Add Celosia
Tuck in bunches of celosia around the wreath, aiming for a natural and balanced look.


Incorporate Zinnias
Add your zinnias next, playing around with their placement to create visual interest. You can mix and match different varieties for a more eclectic look.

Tuck in More Ivy
If you’d like more ivy, add a few more branches throughout the wreath.

Hang and Enjoy
Your beautiful fresh flower fall wreath is complete! Hang it on your front door and enjoy the vibrant colors and scents of the season.
Pro-Tip: If you’re using sunflowers, be aware that birds might try to eat the seeds. If this is a concern, consider hanging your wreath in a more protected location.
How Long Will Fresh Flowers Last on a Wreath?
Fresh flower wreaths can last anywhere from two to eight weeks, depending on the weather, sun exposure, and humidity. To extend their freshness:
- Mist the Flowers: Lightly mist the wreath with water every few days to keep the flowers hydrated.
- Refrigerate Overnight: If possible, bring the wreath indoors and store it in the refrigerator overnight.
- Avoid Direct Sunlight: Hang your wreath in a shady or protected area.
I also recommend holding off making a wreath like this until the temperatures start to cool down. If you make this type of wreath in the blazing hot temperatures of summer, it will not last nearly as long.
Caring for Your Fresh Flower Wreath
As the flowers dry, they’ll naturally take on a beautiful vintage look. You can leave them as is or remove any that become too brittle or faded. Simply mist the wreath occasionally to prevent the flowers from becoming overly dry and brittle.
Additional Ideas & Inspiration
Don’t be afraid to experiment and personalize your wreath! Try incorporating different types of flowers, adding pinecones or berries for a more rustic touch, or using a ribbon for a festive flair.

Fresh Flower Fall Wreath FAQs
- Is it cheaper to make your own wreath? Yes, it can be much more cost-effective to make your own wreath, especially when using flowers and foliage from your garden.
- What can I use for the base of the wreath? A grapevine wreath is ideal for this project, but you can use any wreath form you have on hand, such as a straw, foam, or wire wreath base.
- How can I make my fresh flower wreath last longer? Lightly mist the wreath with water every few days, and if possible, bring it indoors and store it in the refrigerator overnight. I will admit that I don’t do this. But I do avoid hanging the wreath in direct sunlight or heat to prolong it.
- What if I don’t have any of these flowers in my garden? Feel free to substitute with other fall blooms you have on hand, or ask a neighbor or friend if you can borrow some of theirs. You can also use faux flowers for a longer-lasting wreath.
Final Thoughts Abut This DIY Fall Wreath
Creating a fresh flower fall wreath is more than just a DIY project; it’s a labor of love. It’s a way to connect with nature’s beauty, express my creativity, and infuse my home with the warmth and charm of the season. Each wreath I make is a unique reflection of my garden’s bounty, a reminder of the joy and fulfillment that comes from growing it!
We don’t have to spend a lot of money to have beautiful decor. Nor do we need to be an amazing gardener or home decorating enthusiast. Just walk outside in the landscape and see what can be foraged. Test things out. Cut foliage, flowers, and branches and see what works well in your home and garden.
Tuck them in old wreath forms, drop them in a vase or pitcher, and play around with things. I encourage you to try this simple project. Let your creativity bloom as you gather your favorite flowers and weave them into a stunning masterpiece for your front door.
If you make a fall wreath for the front door too, I’d love to see your work and hear all about it! Email me at bricksnblooms@gmail.com or tell me about it in the comments below!
Thank you so much for following along.
Enjoy a beautiful day! xo


Looking for More Flower Garden Ideas?
Here are more cut flower and cottage garden growing tips, tricks, and design inspiration.
Stacy – How long will the wreath last with fresh flowers? So beautiful.
Hey Diana! It should last at least a few weeks and will slowly dry on the wreath form so it will fade. Depends where you keep it though – if its maintained in direct sunlight it will dry out and fade much quicker.
Stacy, this wreath is stunning. It is by far one of the prettiest dried flower wreathes.
Thanks so much Tammy!
Wow! I love this so much, Stacy! Those sunflower heads are really spectacular! I am getting ready to make some decorations for either side of my front door with corn stalks, Indian corn, and some foraged blooms. I hope they turn out as well as yours!
I really appreciate that Molly thank you and I can’t wait to see!!!
Stacy,
I LOVE this wreath. I’ll share it on Sunday. Plus another link to your home tour on YT.
thank you I’m glad you like the wreath! I love how it turned out!
The sunflower wreath looks lovely with the ivy winding around it. I will have grow zinnias for sure next year. I have tried every year to grow sunflowers with no success. I live in Windsor Ontario just across from Detroit. We had a very dry year this summer as well, my 1 one Pee Gee Hydragena bloom very nicely but I watered that plant every day😋I have a small perriannial garden and marvel at your pictures of your beautiful garden.
Thank you so much Lorri! I’ve had success some years with sunflowers and not with others. This year I decided to start way more than I wanted from seed and planted more to hopefully have a few survive. Because I lose more than I’m able to grow! One year my nephews dog took them all out, another few years I had rabbits or groundhogs. Its always something right? LOL.
This is just the prettiest. I love it when you can make something special from your garden flowers other than a floral arrangement. Great job.
Thank you so much! I love how this one turned out!
I couldn’t remember if I commented already… This is just stunning!! I’m glad some of your sunflowers made it!!
Me too and thank you!!