DIY Guide: How to Install Solar String Lights in Your Yard

Learn how to install solar string lights in your yard with this DIY guide. Follow easy, step-by-step instructions to enhance your outdoor space with beautiful, energy-efficient lighting.
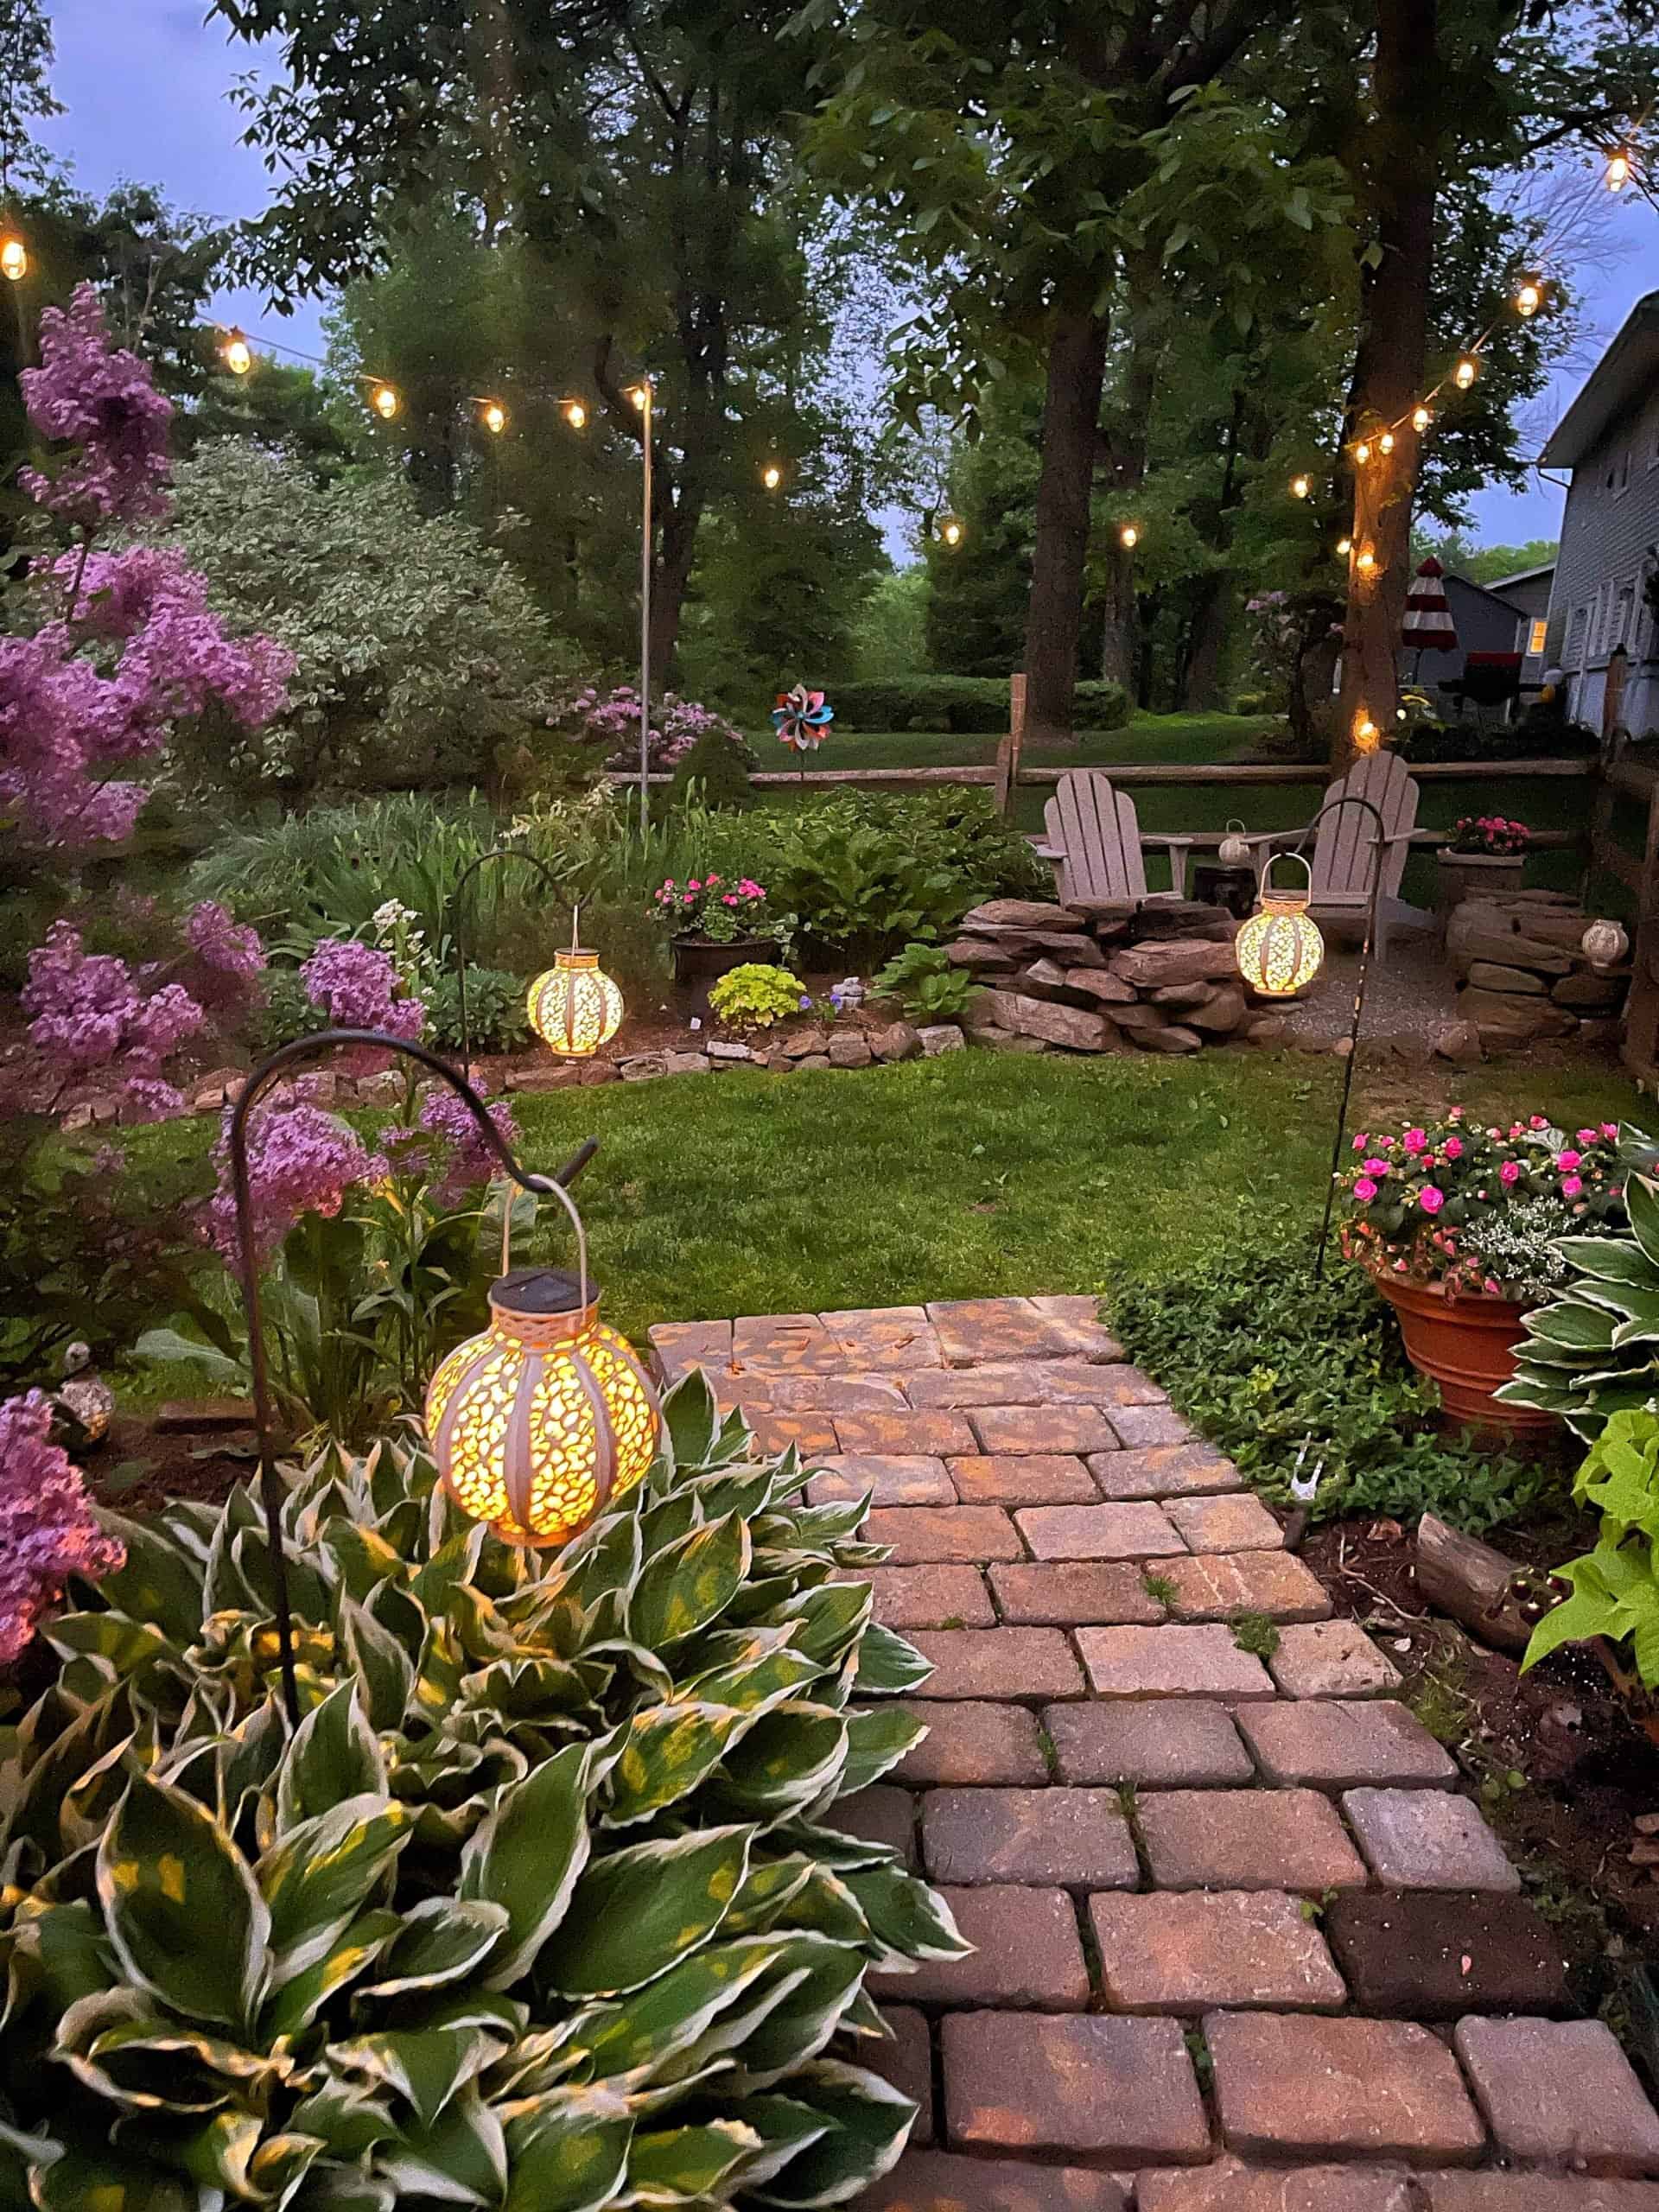
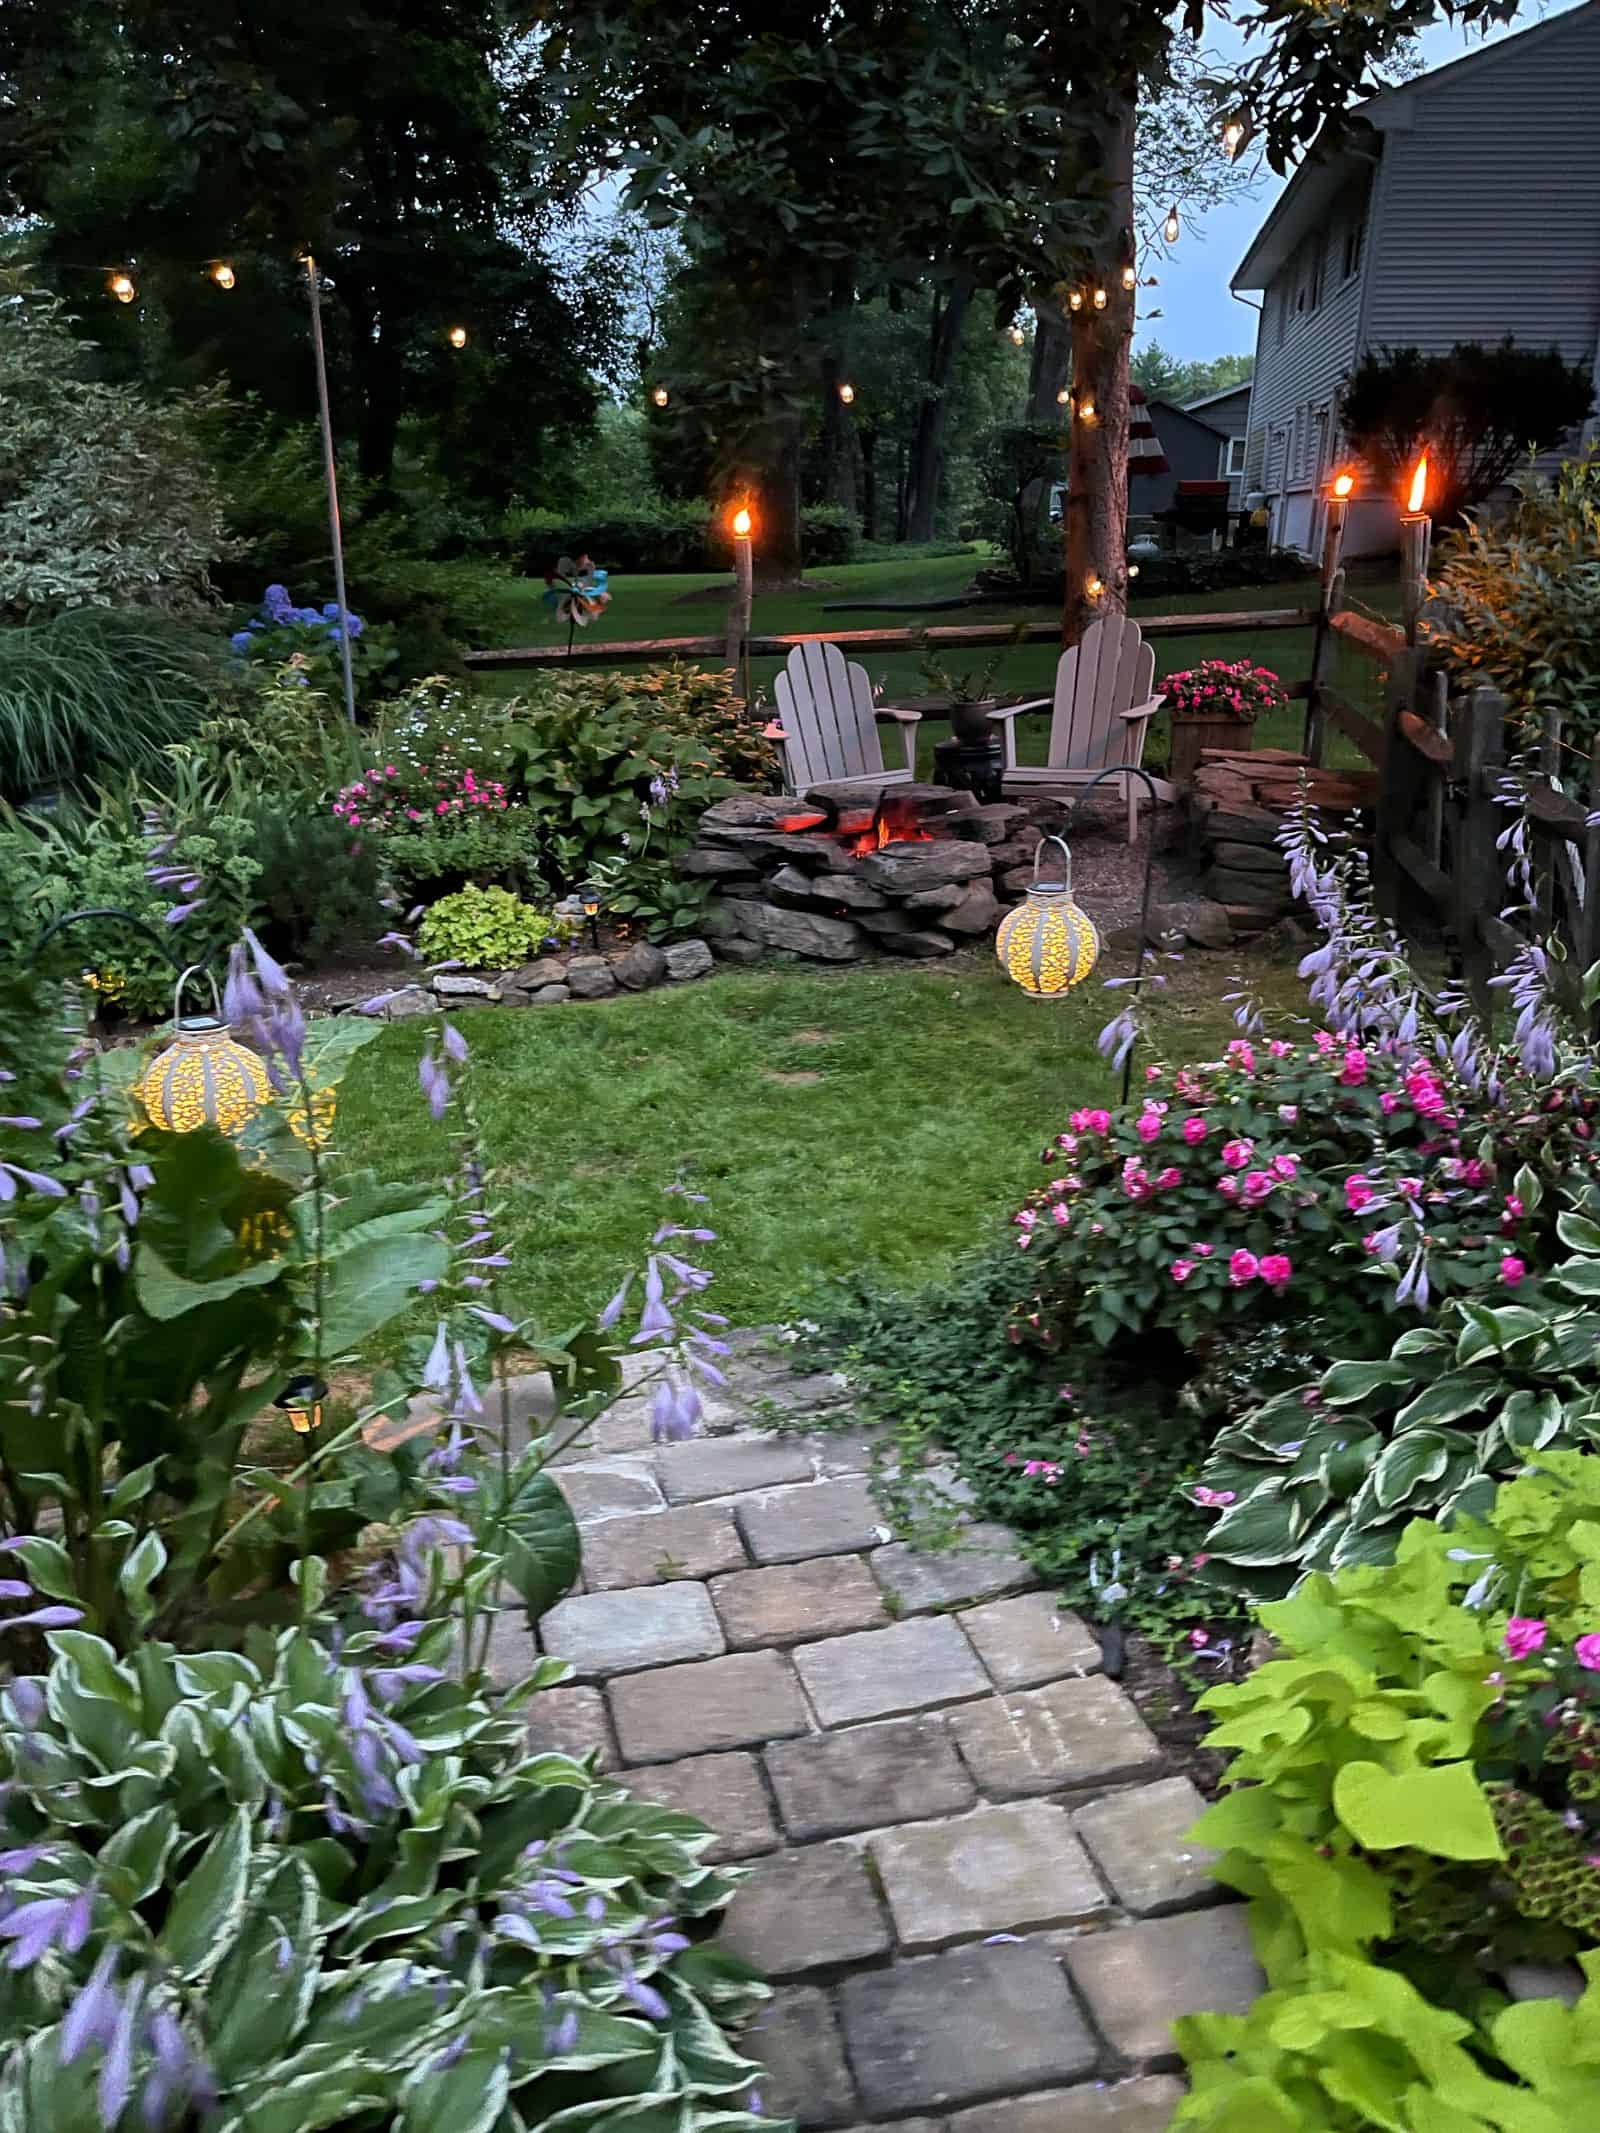
Adding solar string lights to the yard creates ambiance and improves visibility to areas of the landscape that are not well lit. Unless you have strategically placed trees and structures though, there may not be a good space to hang solar lights in the yard.
Transform your yard into a magical oasis with the warm glow of solar string lights. In this DIY guide, we’ll walk you through the simple steps to install these energy-efficient lights using galvanized metal poles for a sturdy and attractive setup.
Whether you’re hosting an outdoor gathering or simply enhancing your garden’s ambiance, this project is cost-effective and easy to complete. Let’s brighten up your outdoor living space with solar string lights.
(Posts on stacyling.com may contain affiliate links. Click HERE for full disclosure.)
Why Choose Solar String Lights for Your Yard
Solar string lights are a popular choice for outdoor lighting, offering numerous benefits that make them an excellent addition to any yard. Here are some compelling reasons to choose solar string lights:
Energy Efficiency
Solar string lights harness the power of the sun, converting sunlight into electricity through their solar panels. This means they don’t add to your electricity bill, making them an eco-friendly and cost-effective lighting solution. But the best part? You don’t need a power source to light up your backyard because the sun does the job for you!
Ease of Installation
With no need for electrical wiring, solar string lights are incredibly easy to install. This makes them perfect for DIY projects and allows for greater flexibility in placement, even in areas without nearby power sources.
Low Maintenance
Once installed, solar string lights require minimal maintenance. Simply ensure that the solar panels are positioned to receive maximum sunlight and clean them occasionally to keep them working efficiently. We’ve had ours up for several years and very minimally fuss with them. Solar string lights are super easy to use and maintain.
Versatility and Aesthetic Appeal
Available in various styles and colors, solar string lights can enhance the ambiance of your outdoor space. You can easily move them around to your liking and install them wherever you want. Whether you’re decorating for a party or adding a cozy touch to your garden, these lights provide a charming and inviting atmosphere.
Durability
Designed for outdoor use, solar string lights are built to withstand various weather conditions, ensuring they last for many seasons. Like I mentioned before, we’ve had ours up for several years. They work really well all year round and have never had an issue! Every bulb is still lit and well keep them up all year round – even during harsh New Jersey winters.
Two Methods for Installing Solar String Lights in Your Yard
When it comes to enhancing your yard with solar string lights, you have two primary methods to choose from: a permanent installation using galvanized metal poles and a more flexible, temporary setup with adjustable poles. Both options offer unique benefits and cater to different needs and preferences.
Permanent Installation with Galvanized Poles
This method involves cementing metal poles into the ground, providing a sturdy and long-lasting solution ideal for year-round use. It’s perfect for homeowners looking to create a stable and attractive lighting setup.
Temporary Installation with Adjustable Poles
For those who prefer flexibility or are renting their space, temporary string light poles are an excellent choice. These poles can be easily assembled, adjusted, and moved, making them ideal for seasonal decorations or special events.

Permanently Installing Solar String Lights in Your Backyard
My husband and I used these Yardguard galvanized metal poles to help string the lights. They are relatively inexpensive but need to be cemented into the ground for stability. Overall this project is pretty inexpensive to do and only took a few hours (minus the drying time for the concrete). Wait until you see how easy it is to hang solar lights in the yard!
Supplies Needed for Installing Solar String Lights
To complete this project, you’ll need the following materials and tools:
- solar string lights
- metal poles
- cement kit
- aluminum rail end
- mixing stick for cement (we used whatever we had laying around)
- post hole digger (if you have one)
- shovels
- carabiners
- ladders
- bungees
- level
- sledgehammer

How to Permanently Install Solar String Lights in Your Backyard: Step-by-Step Directions
We did not have a way to hang solar string lights in the fire pit garden, so we needed to add something to the yard to attach them. While a tree and our house are in the vicinity, we needed another corner or two to get more angles to drape the lights.
I wasn’t sure about cementing poles in the garden, but it looks fine and is not that noticeable. While I don’t love the poles, I do love how the lights turned out so it’s worth the sacrifice.
Planning and Preparation for Solar String Lights
- Choose the ideal location for your solar string lights. Where you want to site them will determine how many poles you need.
- Measure and mark the spots where you will place the poles. We set up ladders to determine proper spacing
- Temporarily string lights through the ladders for desired placement. Using the ladders allows you to “hang” the lights to get an idea how it will look.


Installing the Poles for Solar String Lights
- Dig holes for the poles at the marked spots. Make sure you dig them large enough to set the mix in.
- Mix the cement or concrete and pour it into the holes.
- Set the poles in place, ensuring they are level and secure.
- Rough up one end of the pole with a sledgehammer because the concrete will grip better to the metal if it is roughed up.
- Follow the cement mix manufacturer’s directions. Mix the concrete and set the pole.
- When setting the posts be sure to level them.
- Once level, we bungeed the poles to the ladder to keep them in place.
Hanging the Solar String Lights
- Attach the string lights to the poles using zip ties or hooks. We used carabiners to attach them to the poles.
- Ensure the solar panels are positioned to receive maximum sunlight.


Using Temporary String Light Poles for Your Yard
If you prefer a less permanent solution, temporary string light poles are a great option and can be easily found on Home Depot and Amazon.
I bought them from both retailers and prefer the ones from Home Depot more because they are much stronger and far more durable. They cost a bit more but will last a long time. The ones from Amazon feel more like they will break in a bad storm. Here’s how to use the temporary kits.
- Look for sturdy, adjustable poles suitable for outdoor use.
- Plan the layout and place the poles where you want to hang the lights.
- Follow the manufacturer’s instructions to assemble the poles.
- Attach the string lights to the poles using hooks or clips, ensuring they are evenly spaced.
- Ensure the poles are secure using the ground stakes that come with the kits.
Additional Tips for Yard Lighting With Solar String Lights
- Place the lights in optimal locations for maximum lighting effect.
- Regularly clean the solar panels and check connections to maintain performance.
- Consider seasonal adjustments, such as storing the lights during harsh weather to prolong their lifespan.

Final Thoughts on This DIY Solar Lights Project
And that’s it!
Although my husband did most of the work, it wasn’t very difficult to do. I wasn’t sure how I felt about the poles before we strung the lights but I LOVE how it looks at night.
Adding solar string lights to your yard is a straightforward project that brings both practical and aesthetic benefits. Whether you choose a permanent installation with galvanized poles or a temporary setup with adjustable poles, the result is a charming, well-lit outdoor space perfect for relaxing or entertaining. Follow the installation steps carefully and maintain your lights for long-lasting enjoyment.
If you have any questions, comments or suggestions, please let me know in the comments below. I’d love to hear! And feel free to share this post with anyone you think would find it helpful too.
Thanks so much for hanging out with me on the blog today!
Enjoy a beautiful day! xo


The lights look pretty and vines would love the poles
Thanks so much Sandra! I plan to add vines won’t that be so fun?
What a great project. It looks so beautiful, Stacy!
Thank you so much! I love how it turned out too! Enjoy your day! xoxo
Your garden lights turned out really pretty! Would also love to know where you got the lanterns and your Adirondack chairs as well.
Hey Lauren! The lanterns are linked in the blog – they are the best! The adirondack chairs we bought several years ago from a local woodworker, but I painted them with Ashley Gray by Benjamin Moore recently to match my shed.
Hi Stacy.thanks.for.all ideas re outside seating.your garden is gorgeous and the trees beautiful I loved the.cane furniture best so it still looks great why.not spray paint it will last.another 20.years
Hi Mary! Yes I considered that but am ready for a new look. Enjoy your weekend!