How to Design a Gorgeous Container Garden with the Thriller, Filler, Spiller Method

Design a gorgeous container garden using the thriller, filler, spiller method. Easy, beginner-friendly tips for full, balanced, beautiful planters.
Container garden design is one of my absolute favorite parts of gardening. After more than 30 years of growing plants in my Zone 6b garden, I’ve learned that the thriller, filler, spiller method is hands-down the easiest way to create lush, balanced planters—whether you’re a total beginner or a seasoned gardener looking to elevate your designs.
This simple framework takes the guesswork out of plant placement and helps you build containers that look full, layered, and professionally styled. I’ve used it for countless porch pots, window boxes, and seasonal planters over the years, and it works beautifully every single time.
If you’re brand new to container gardening or want a broader beginner foundation before diving into design, be sure to read my Container Gardening for Beginners guide. Once you have the basics down, this method will help you design show-stopping planters with confidence.
In this post, I’ll walk you through exactly how to use the thriller, filler, spiller method to design a gorgeous container garden—from choosing plants to arranging them for maximum impact—so you can create planters that turn heads all season long.
(Posts on stacyling.com may contain affiliate links. Click HERE for full disclosure.)


Container Garden Design: A Step-By-Step Guide to Stunning Planters
Designing a beautiful container garden is one of the easiest ways to level up your outdoor spaces like porches, patios, decks, garden rooms, and even small balcony nooks. After decades of planting containers in my Zone 6b gardens, I’ve learned that great design starts long before you place the first plant. The right container, soil, and structure set the stage for a planter that thrives all season.
This step-by-step guide will walk you through how to create a gorgeous container using the renowned thriller, filler, spiller method which is a simple framework that makes plant selection and arrangement almost effortless. We’ll cover how to choose the perfect container, select compatible plants, and arrange them for maximum visual impact.
Step 1: Choosing the Perfect Container For Your Design
Your container is more than just a vessel—it directly affects your plants’ health, watering needs, and overall aesthetics.
After thirty years of planting hundreds of containers, here’s what I’ve learned about choosing the right one:

Container Size Matters
This is one of the most common beginner mistakes, and I always highlight it:
- Bigger pots grow healthier plants.
- They retain moisture longer and give roots room to spread.
- Small pots dry out quickly—especially in summer.
If you’re torn between two sizes, go bigger. Your plants will thank you.
Drainage Is Non-Negotiable
No matter what style you choose, your container must have drainage holes.
If not, grab a drill and make some because poor drainage is the #1 cause of root rot. For my best tips about choosing the best pot, you might fight this post helpful: How to Choose the Perfect Planter.
Common Container Materials
Each material has different benefits—choose one that fits your style and your lifestyle:
- Terra cotta – Beautiful and breathable, but dries out quickly.
- Glazed ceramic – Holds moisture better but heavy and pricey.
- Plastic/resin – Lightweight, affordable, and retains moisture well (great for beginners).
- Wood – Natural look that insulates roots; great for rustic or cottage styles.
- Fiberglass/composite – Durable, weather-resistant, lightweight.
Choose a container that complements your outdoor aesthetic and supports the types of plants you want to grow.

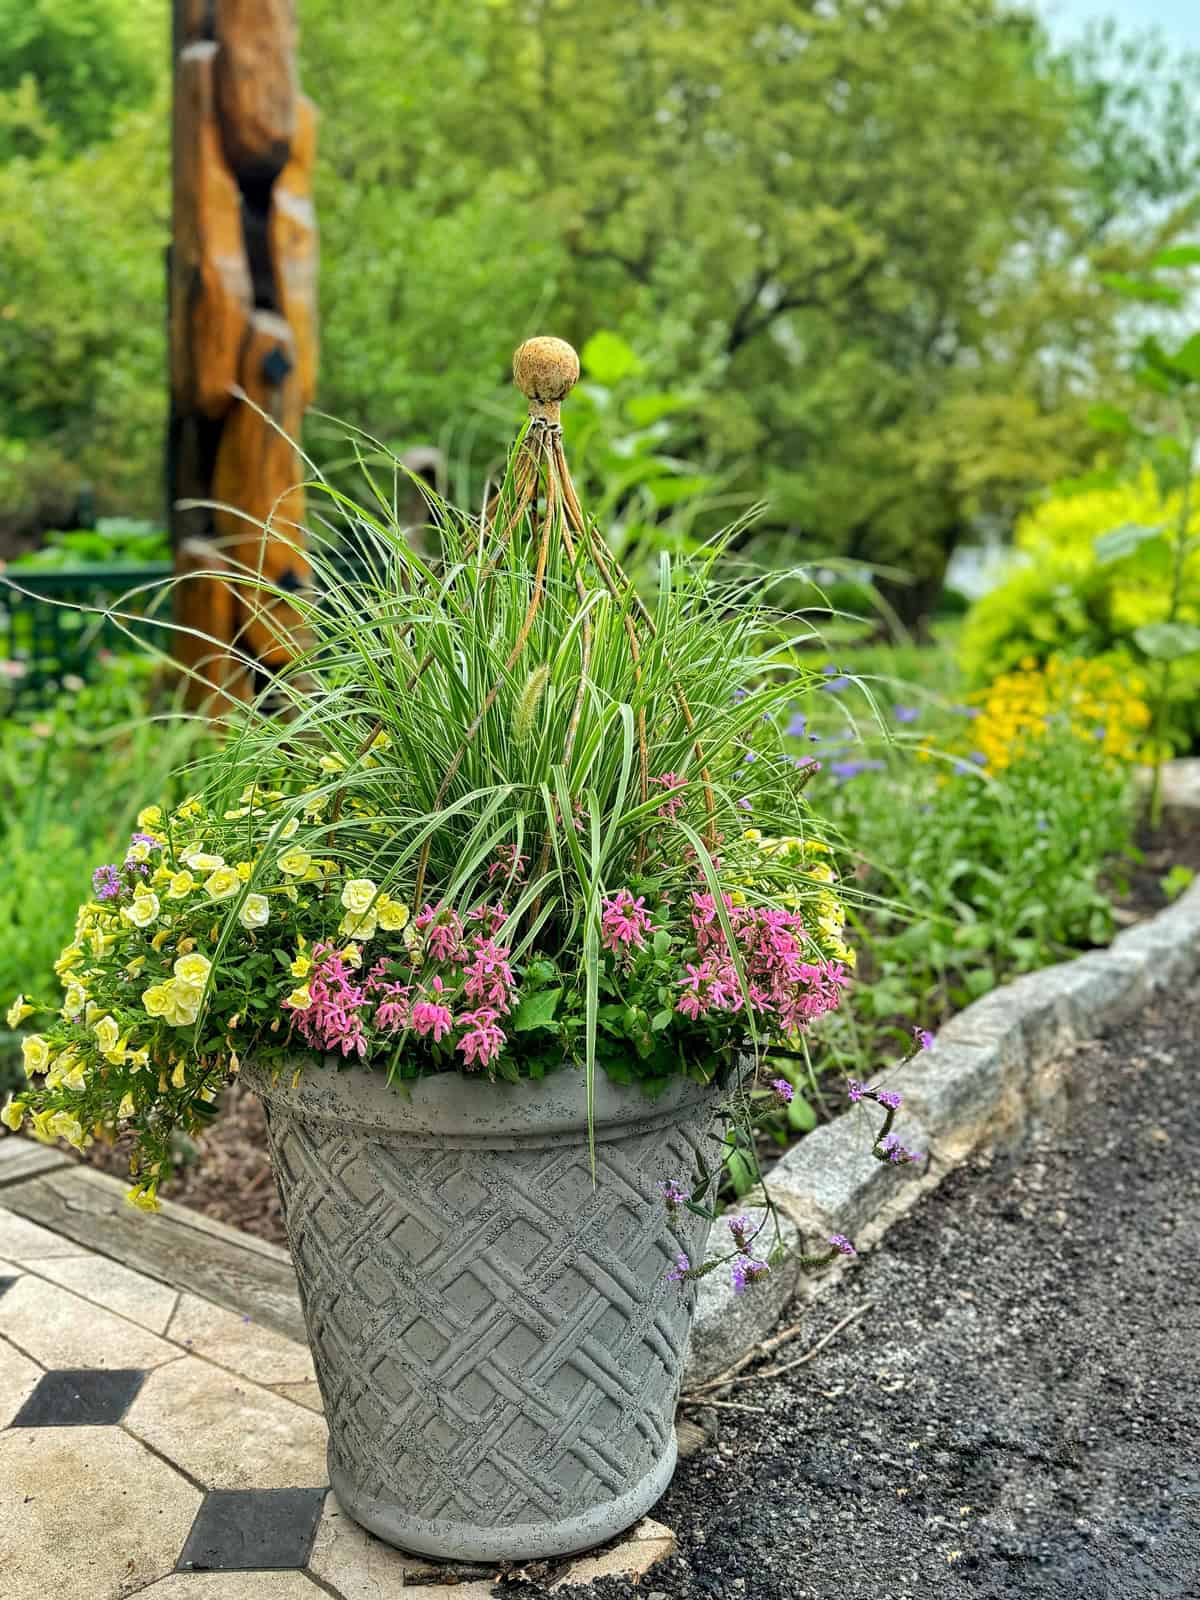
Step 2: Understand the Thriller, Filler, Spiller Method
The thriller, filler, spiller method is a timeless container garden design technique, and it’s one I’ve relied on for decades because it always creates a balanced, professional-looking planter. This simple framework helps you layer plants so the container looks full, dynamic, and beautiful from every angle.
Here’s what each element does:
- Thrillers — Tall, bold, architectural plants that create height and serve as your focal point.
- Fillers — Medium-height plants that add body, color, and texture around the thriller.
- Spillers — Trailing plants that cascade gracefully over the sides for softness and movement.
When you layer height (thrillers), fullness (fillers), and flow (spillers), your planter instantly looks intentional and lush.

A Critical Step Beginners Miss: Match Light and Water Needs
In my early years of container gardening, I made the mistake of choosing plants solely by color or texture. What I eventually learned is that your plants MUST share the same light and water requirements for the thriller–filler–spiller method to work.
Before you buy, always check:
- Sun needs: full sun, part sun, part shade, or full shade
- Water needs: drought-tolerant or moisture-loving
- Growth habits: upright, mounding, or trailing
If one plant needs daily watering and another prefers staying dry, the container will always struggle. Grouping compatible plants is one of the most important things you can do to ensure a thriving design.
Try This at the Nursery (My Personal Trick for Foolproof Designs)
When I shop for container gardens, I place all the plants I’m considering together in my cart so I can visualize the design:
- Do the colors work together?
- Does the foliage offer contrast and interest?
- Will the heights create a layered look?
- Do the blooms and textures complement the container style?
This quick trick helps you see whether the ensemble is harmonious before you ever get home.
If you’re new to combining plants, this method makes designing containers MUCH easier and removes all the guesswork.
Step 3: Selecting Stunning Thrillers for Your Container Garden
Thrillers are the stars of your container garden—the tall, dramatic plants that instantly draw the eye. They provide the height, structure, and visual anchor for your entire design. After decades of planting seasonal containers in my Zone 6b garden, I’ve found that choosing the right thriller makes every other part of the arrangement fall into place.
Place your thriller in the center of a round pot or the back of a rectangular container to create a strong focal point. Aim for plants that grow 1–2 times the height of your container so the proportions feel balanced and intentional.
Below are some of my personal go-to thriller plants that work beautifully in container gardens.
My Favorite Thriller Plants for Containers
- Canna Lilies (Canna spp.) Tall and vibrant, canna lilies add dramatic height and bold color to any container garden.
- Dracaena (Dracaena spp.) Known for its striking foliage, dracaena provides a strong vertical element and comes in various colors.
- Ornamental Grasses (Various species) Ornamental grasses, such as purple fountain grass, offer movement and texture with their tall, graceful blades.
- Elephant Ears (Colocasia spp.) With their large, dramatic leaves, elephant ears create a tropical feel and are perfect for making a bold statement.
- Cordyline (Cordyline spp.) Cordylines are known for their colorful, spiky foliage and add height and interest to container arrangements.
- Caladiums (Caladium spp.) Caladiums are prized for their large, heart-shaped leaves that come in a variety of vibrant colors and patterns, adding a striking visual element.
- Asparagus Fern (Asparagus densiflorus) With its feathery, bright green foliage, asparagus fern adds a delicate yet bold texture to container gardens.
- Prince Tut (Cyperus papyrus ‘Prince Tut’) This dwarf papyrus is known for its unique, spiky foliage that adds height and an architectural element to container arrangements.
A Quick Note on Sun Exposure
Thrillers often set the tone for your container’s overall location.
- If your thriller needs full sun (like canna lilies or ornamental grasses), your fillers and spillers must be sun lovers too.
- If your thriller prefers shade (like caladiums or some ferns), choose companion plants that thrive in lower light.
Matching light requirements will make or break your design.
Pro Tip: If you’re unsure which thriller to choose, pick one with interesting foliage. It anchors the pot even when flowers fade and provides season-long texture.
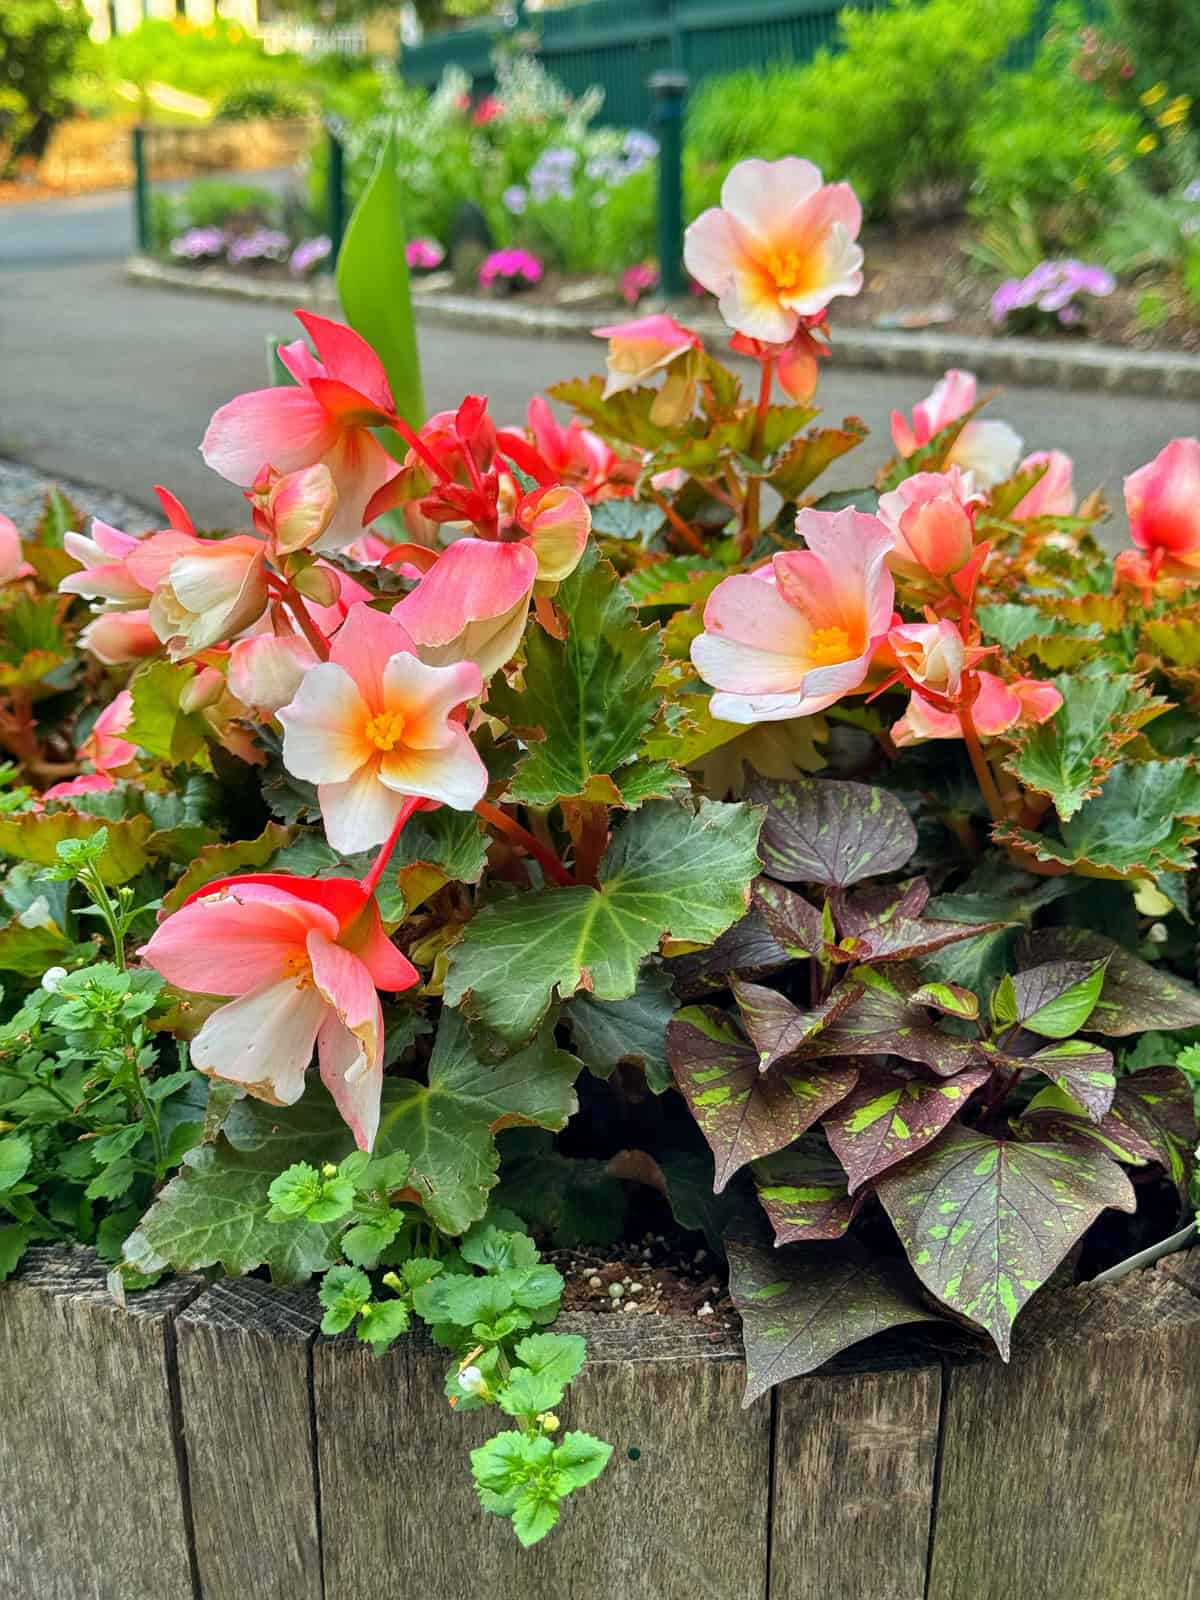
Step 4: Add Beautiful Fillers to Your Design
Fillers are what give your container garden that lush, full, layered look. These medium-height plants surround your thriller and help blend the structure of the thriller with the softness of your spillers. Think of them as the “supporting cast” that adds color, texture, and volume—filling out the pot so it looks abundant and thriving.
After 30 years of designing container gardens, I’ve learned that fillers are often what make or break the overall aesthetic. When chosen well, they unify the whole composition and help guide the eye around the planter rather than letting it stop at just the center.
What to Look for in a Good Filler
To create a cohesive design, choose fillers that complement the foliage and blooms of your thriller while also coordinating with your spillers. Look for:
- Mounding or bushy growth habits
- Contrasting or complementary foliage texture
- Bloom colors that tie your design together
- Similar light and water needs as your thriller and spiller (EXTREMELY important)
Fillers usually sit at one-third to one-half the height of your thriller, helping to transition from tall interest to trailing edges.
Here Are Some of My Favorite Fillers for Container Gardens
- Begonias (Begonia spp.) Begonias are versatile plants that provide lush foliage and vibrant blooms, making them perfect for adding color and texture to container gardens.
- Impatiens (Impatiens spp.) Impatiens are known for their bright, cheerful flowers and ability to thrive in shaded areas, adding a pop of color to any container arrangement.
- Geraniums (Pelargonium spp.) Geraniums offer striking blooms and a variety of colors, adding both height and fullness to container gardens.
- Petunias (Petunia spp.) Petunias are popular for their abundant, colorful flowers that bloom throughout the growing season, filling in spaces beautifully.
- Lantana (Lantana camara) Lantanas are hardy plants with clusters of small, vibrant flowers that attract butterflies and provide a burst of color.
- Coleus (Coleus spp.) Coleus plants are known for their stunning foliage in a wide range of colors and patterns, making them an excellent filler for adding visual interest.
- Pansies (Viola tricolor var. hortensis) Pansies are cool-season favorites with cheerful, multicolored flowers that brighten up any container garden, especially in spring and fall.
- Dahlias Tender perennials with unique flowers that are perfect for cutting and adding color with texture.
Sun vs. Shade Choices for Fillers (Beginner-Friendly Tip)
Because fillers surround your thriller, they must share the same sun exposure. A few quick guidelines:
- Full sun fillers: lantana, petunias, geraniums, dahlias
- Part shade to shade fillers: begonias, impatiens, coleus, pansies
This ensures uniform growth rates and prevents plants from burning or stretching.
Pro Tip from My Own Gardens: If you want your container to look full right away, especially in climates with shorter growing seasons like my Zone 6b. So don’t be afraid to plant fillers closer together than the spacing on the tag. Containers allow for tighter planting than garden beds because the soil is refreshed and fertilized more often.
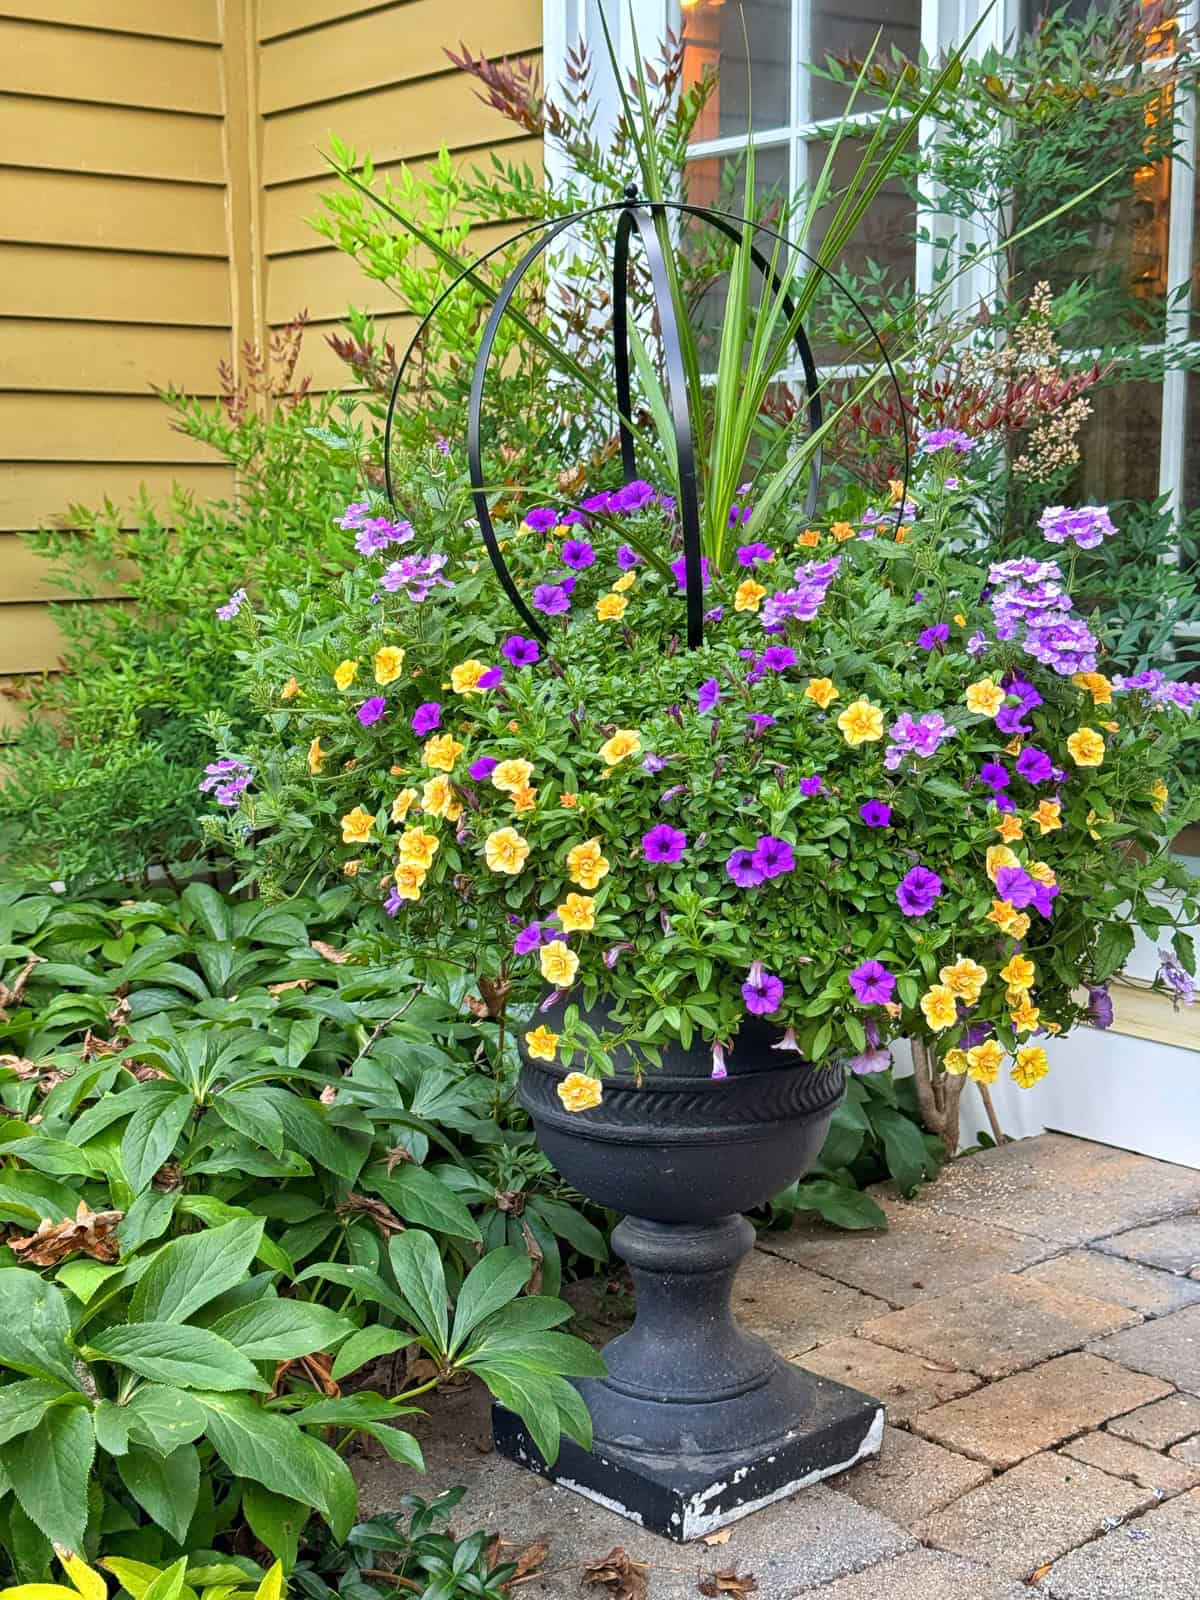
Step 5: Choose Elegant Spillers for Movement and Soft Edges
Spillers are the finishing touch of your container garden design. They soften hard edges, create movement, and bring that lush, overflowing look that makes containers truly eye-catching. After decades of planting container gardens in my Zone 6b climate, I’ve found that the right spillers can completely transform the feel of a planter by adding depth, flow, and dimension.
Spillers are usually placed around the front and sides of the container, allowing them to trail gracefully over the rim. In larger planters, you can mix several spillers for extra fullness and texture.
Before choosing your spillers, be sure they share the same sun and water requirements as your thriller and fillers. This ensures they grow evenly and stay healthy throughout the season.
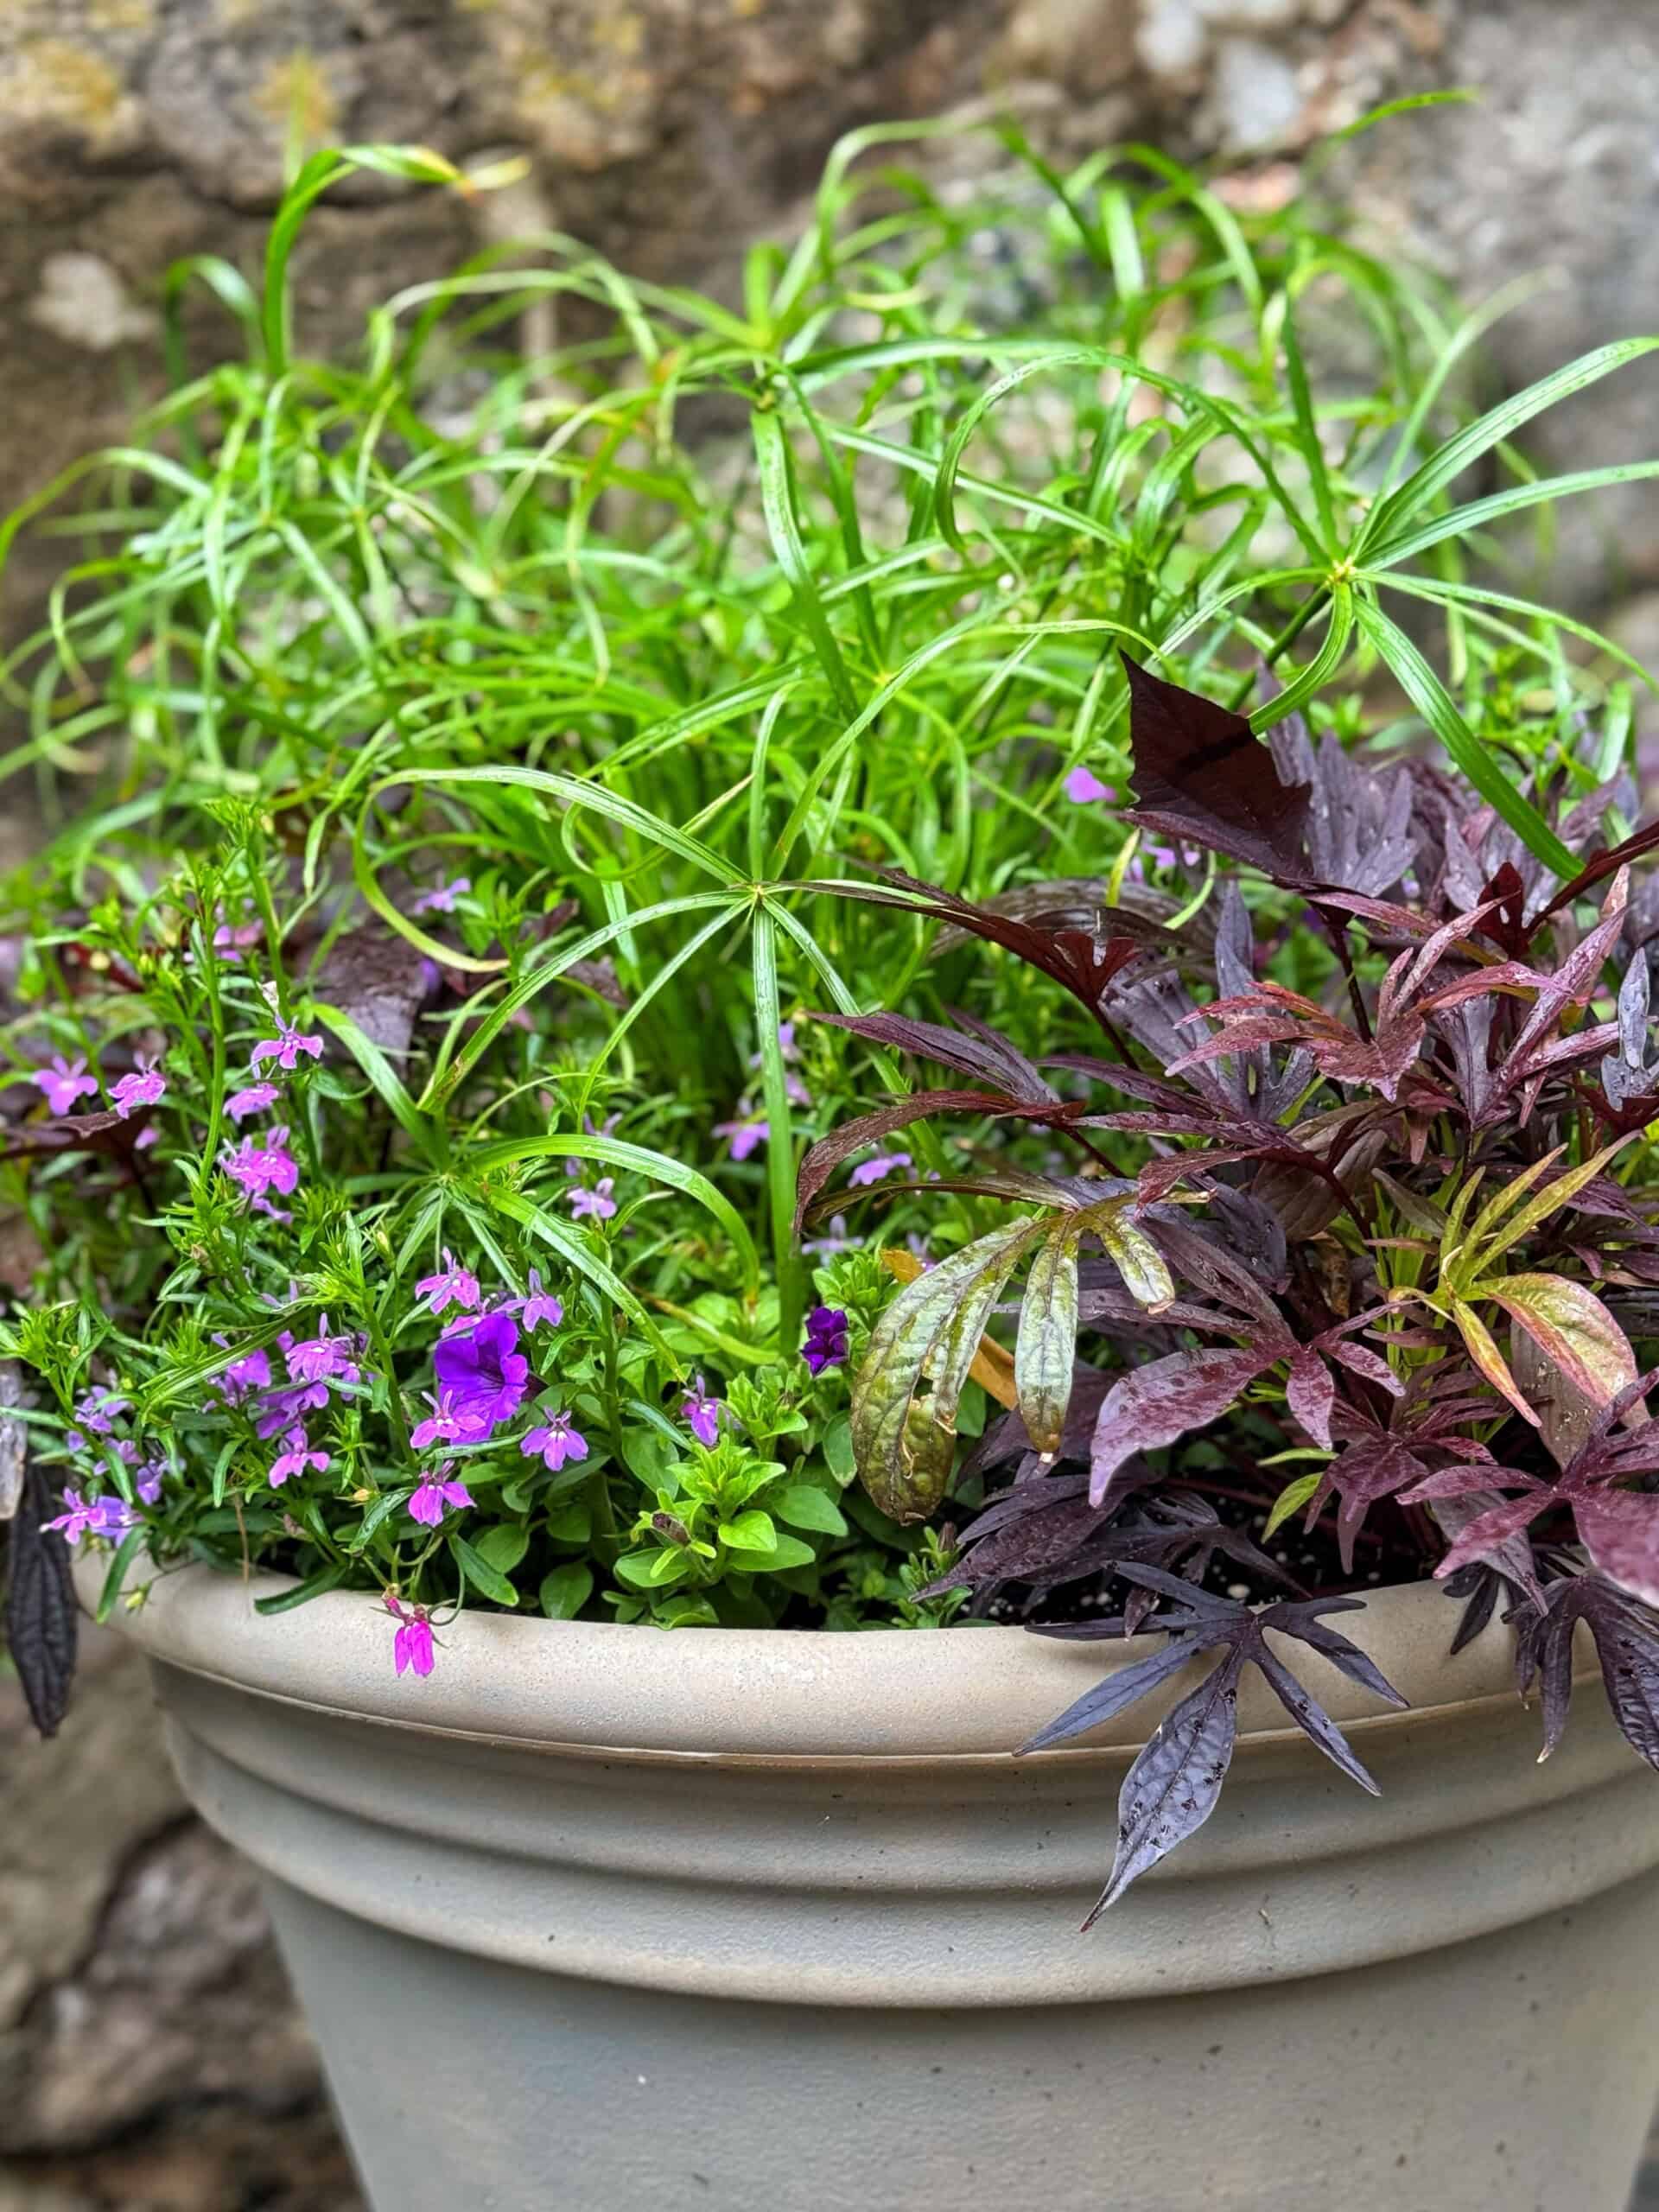
Some of My Favorite Spillers for Container Gardens
- Sweet Potato Vine (Ipomoea batatas) Sweet potato vine is known for its vigorous growth and striking foliage, available in various colors, making it an excellent choice for trailing over the edges of containers.
- Ivy (Hedera spp.) Ivy provides a classic look with its dense, trailing foliage, adding elegance and greenery to any container garden.
- Bacopa (Sutera cordata) Bacopa produces a profusion of small, delicate flowers and lush foliage that cascade beautifully, adding a soft, trailing element to container arrangements.
- Supertunias (Petunia hybrids) Supertunias are a type of petunia that are known for their prolific blooming and vigorous trailing habit, making them perfect spillers for adding vibrant color.
- Calibrachoa (Calibrachoa spp.) Often called “million bells,” calibrachoa plants produce abundant small flowers that cascade over the sides of containers, providing a continuous display of color.
- Sweet Alyssum (Lobularia maritima) Sweet alyssum is a fragrant, low-growing plant that produces masses of tiny flowers, creating a beautiful and aromatic trailing effect.
- Lantana (Lantana camara) Lantanas, while also effective as fillers, can serve as spillers in larger containers due to their spreading habit and vibrant flower clusters.
- Verbena (Verbena spp.) Verbena is prized for its long-lasting, colorful blooms and trailing habit, making it an excellent choice for adding a splash of color that spills over the edges of containers.
Sun vs. Shade: Choose the Right Spillers for Your Location
Just like with thrillers and fillers, spillers thrive only when they get the right light:
- Full sun spillers: sweet potato vine, lantana (in large pots), verbena, calibrachoa, Supertunias
- Part shade spillers: ivy, bacopa, sweet alyssum
- Shade-friendly options: ivy, sweet alyssum (in cooler zones)
Matching light requirements keeps your spillers from stretching, fading, or burning.
Pro Tip from My Garden: If you want dramatic movement, choose spillers with varying lengths like a long trailing vine (like sweet potato vine) paired with a medium-length spiller (like calibrachoa) adds layered interest with blooms, and keeps your design from looking flat.

Step 6: Plant and Arrange Your Thriller, Filler, and Spiller Plants
Now that you’ve selected your plants, it’s time to bring your container design to life. This step is where everything comes together—structure, flow, color, and texture.
After decades of planting containers in my Zone 6b garden, I’ve learned that successful planting is less about “perfect placement” and more about proportion, soil prep, and spacing. Follow the structure below and your pots will look full, balanced, and healthy from the start.
How to Arrange Your Plants
1. Place your thriller first
Set your thriller in the center of a round pot or the back of a rectangular container.
This creates the height and visual anchor for the entire design.
2. Position fillers around the thriller
Arrange your fillers to create a natural, mounded shape.
Space them evenly—they will grow together, but avoid crowding the roots too tightly.
(In short growing seasons like mine, a little “stuffing” is okay!)
3. Add spillers at the edges
Place your spillers near the rim so they can trail over the sides as they grow.
Vary spiller lengths (long + medium) for dimension and movement.
4. Rotate the container
Turn the pot as you arrange your plants to make sure it looks good from all angles—especially if the planter will be visible from multiple viewpoints.
Now that you have your plants, it’s time to arrange them in your container. Start by placing the thriller in the center or back of the pot, depending on the container’s placement.
Next, arrange the fillers around the thriller, ensuring even spacing. Finally, place the spillers near the edges of the container so they can trail over the sides.

Planting Your Container: Step-by-Step Instructions
Supplies
- plants
- container
- potting soil
- weed fabric
- gloves
- scissors
- fertilizer
- hand trowel
Directions
1. Line the container (optional but helpful)
Cut weed fabric to size and place it inside the container.
This keeps soil from escaping through drainage holes and helps maintain moisture.
2. Add a base layer of potting soil
Use your hand trowel to add enough soil so plants will sit at the correct depth.
You want the soil line to end up about 1 inch below the rim to allow room for watering.
3. Check planting depth
Place plants while still in their nursery pots to test height.
Add or remove soil as needed so everything sits evenly.
4. Remove plants from pots and loosen the roots
Gently fan out the roots before planting.
This encourages them to grow outward rather than stay bound in their nursery shape.
5. Arrange and plant
Set your thriller, fillers, and spillers in place and begin backfilling with fresh potting soil.
Tamp gently to remove air pockets and ensure good root-to-soil contact.
6. Add a slow-release fertilizer
Mix or sprinkle in a balanced slow-release fertilizer like THIS ONE.
This gives plants a steady supply of nutrients during the growing season.
7. Water deeply
Water the container thoroughly after planting to settle the soil and hydrate the roots.
Make sure water flows freely from the drainage holes.
Pro Tip from My Garden: If you’re planting a very large container, lighten the pot by adding a layer of empty nursery pots or flipped-over plastic containers at the bottom. This improves drainage and makes the planter easier to move.

Step 7: Maintain a Lush, Healthy Container Garden
Even the most beautifully designed container garden needs consistent care to stay vibrant all season long. Containers dry out faster, use up nutrients more quickly, and experience more temperature swings than in-ground plantings, so regular maintenance is key.
After more years of planting containers in my Zone 6b garden, these are the practices that keep my planters looking full and thriving from spring through fall.
Watering: Keep Moisture Consistent
Container plants rely on you for water, especially during hot summer days when soil can dry out within hours. The best way to keep your plants happy is to check the soil regularly and maintain even moisture.
My Watering Method (Total Game-Changer)
I use a drip irrigation kit set on timers for my window boxes, hanging baskets, and container gardens. It’s truly a set and forget system that:
- Waters consistently
- Prevents stress from underwatering
- Saves you hours of manual watering
- Keeps blooms steady and lush all summer
If you grow many containers or live in a hot climate, this is one of the BEST upgrades you can make.
When to Water Manually
If you don’t have drip irrigation, water:
- In the morning to prevent disease
- When the top 1–2 inches of soil feel dry
- Deeply, until water drains from the bottom

Fertilizing: Feed for Continuous Growth
Container soil loses nutrients quickly due to frequent watering. To keep blooms coming, you’ll need to replenish them.
My Fertilizer Routine
- I add a slow-release fertilizer at planting time.
- This feeds plants gradually, so I don’t have to fertilize weekly.
- If you prefer, you can use a water-soluble fertilizer weekly for extra blooms.
Both methods work, so choose what fits your gardening style.

Deadheading: Encourage More Blooms
Removing spent flowers redirects energy into producing new blooms.
Deadhead when:
- Flowers fade or turn brown
- Plants start looking “tired”
- Seedheads form
This keeps containers looking fresh and encourages non-stop color.

Pruning: Revive Leggy Plants Midseason
Some plants, especially petunias, calibrachoa, and verbena, can get leggy by midsummer.
To refresh them:
- Trim back long, straggly stems by ⅓
- Fertilize lightly
- Water deeply
Within a couple of weeks, you’ll see fuller, healthier new growth and fresh blooms.

Monitor Light & Temperature Throughout the Season
Containers are mobile, which is a huge advantage. Use it!
- Move sun-loving plants into brighter light as the season shifts
- Shift shade-loving plants away from harsh afternoon sun
- In extreme heat, consider moving containers to morning-sun areas
- In cool spells, keep tropical plants protected
Your containers will perform best when you adjust placement based on weather and light patterns.
Pro Tip from My Garden: Heat waves can dry out large containers faster than you think. Even with drip irrigation, I check on my planters during extreme temps — sometimes they need a little extra water or a shift into partial shade for a day or two.

Common Container Design Mistakes to Avoid (Learned From My Early Days!)
Even with the best intentions, it’s easy to make a few missteps when designing container gardens—trust me, I’ve made all of these at some point over the last 30 years. The good news? These mistakes are easy to fix once you know what to look for. Here are the most common issues I see (and have done myself!) and how to avoid them.
1. Mixing Plants With Different Light or Water Needs
One of the biggest mistakes I made early in my gardening journey was choosing plants based solely on color or texture. If your thriller needs full sun but your filler prefers shade, one of them will suffer.
Fix: Always group plants with matching light and watering requirements. Your design will grow evenly and look better for it.
2. Choosing a Container That’s Too Small
I used to buy smaller pots because they were cheaper and easier to move—but they dried out constantly and my plants struggled.
Fix: When in doubt, go bigger. Healthy roots = a full, lush design.
3. Underplanting (Not Using Enough Plants)
In my Zone 6b garden, our growing season isn’t long enough to wait months for plants to fill in. I learned this the hard way when my early containers looked sparse until mid-summer.
Fix: Plant a little closer than the tag recommends. Containers can handle it, and you’ll get instant fullness.

4. Choosing a Thriller That’s Too Small (or Too Big!)
Your thriller sets the tone for the whole arrangement. Early on, I sometimes chose thrillers that got lost in the design—or completely overpowered it.
Fix: Aim for a thriller that’s 1–2× the height of the container for balanced proportion.
5. Not Loosening the Roots Before Planting
When I first started gardening, I didn’t know to loosen root-bound plants help encourage them to grow outward. As a result, my container plants struggled to establish and barely grew.
Fix: Gently tease roots apart before planting to encourage outward growth.
6. Planting Too Low in the Container
If the soil level is too far below the rim, water pools and plants never look full. I’ve absolutely done this when rushing spring planting.
Fix: Keep the soil line about 1 inch below the rim.
7. Forgetting to Rotate the Pot
Containers viewed from multiple angles can start to look lopsided if they aren’t rotated regularly. This is especially true for hanging planters.
Fix: Rotate your pot every week or two so sunlight reaches all sides evenly. I set a reminder on my phone!

8. Overcrowding Spillers or Using Only One Type
Some spillers grow much faster than others—I’ve had sweet potato vine swallow entire designs!
Fix: Pair one vigorous spiller with one finer-textured spiller for balance.
9. Underwatering in Summer Heat
Especially before I switched to drip irrigation, my containers dried out FAST in July and August.
Fix: Check soil daily during heat waves or use a drip system with a timer for consistency. Once you fail with planters in the summer heat a few times, you’ll realize how valuable those easy-to-install drip irrigation systems are!
Remember…
These mistakes are normal and every gardener makes them, including me. The more you experiment, observe, and adjust, the better your container designs will get. With a little practice (and avoiding the pitfalls above), you’ll create containers that stay lush and gorgeous all season long.

Final Thoughts on Container Gardening Design
Designing a gorgeous container garden with the thriller, filler, spiller method is one of the easiest—and most rewarding—ways to elevate your outdoor living spaces. After more than 30 years of planting containers in my Zone 6b garden, I can confidently say this method creates beautiful, balanced planters every single time. It’s a simple framework that gives you room to be creative while still ensuring your design feels full, layered, and intentional.
If you’d like to go even deeper into container gardening, I have several resources you’ll find helpful. Start with my Container Gardening for Beginners guide for a full foundation, or explore real-life design inspiration like my easy outdoor planter idea for sun and how to plant flowers in window boxes. You can also check out my seasonal container garden ideas to see how this method works year-round.
Above all, container gardening should be fun. Choose plants you love, experiment with new combinations, and enjoy watching your creations grow and flourish. The more you practice, the more confident and creative you’ll become.
Happy gardening, friend!
For more information about container gardening design and the thriller, filler, spiller method, please read this article from Fine Gardening.
What are you favorite plants and flowers to use with your container garden designs? I would love to chat more with you in the comments below!
Thank you for visiting the blog today!
Enjoy your day! xo
To drill down on more beginner gardening techniques and tips, please read these posts:
- Flower Gardening for Beginners
- Growing a Cut Flower Garden for Beginners
- Container Garden Ideas for Beginners
- How to Start a Vegetable Garden
- Herb Gardening for Beginners
Thank you for visiting the blog today!
Enjoy your day! xo


These look great Stacy. Your video was fabulous!
Thank you Rachel! I really love how they turned out!
Very pretty Stacy. The copper is striking.
Thank you so much Cindy! I really love these planters with those plants! xo
Such a great choice of plants you used too!! You have an amazing nursery down there!!
Thank you Jennifer! xo
These containers are so beautiful Stacy! And it was so fun to watch you plant all your pretty plants.
Thank you – I LOVE these planters. They are even more gorgeous in person! xo
So beautiful my friend, can’t wait to plant mine now!
Thank you for the inspiration.
xoxo,
Brendt
Such great tips and I need all the help I can get! At first I was like – what is she using to fill those tall planters with. Then you out smarted me. Love all that you do and wish I had just one of your green thumbs. I blame it on where we live. 😉 pinned
Awe thank you Cindy! xoxoxo
You always have the most beautiful flowers and gardens, Stacy. Thanks so much for sharing your tips. I can’t wait to put them to good use when I get out and plant my flowers later this spring. Pinned!
Thank you so much Jen! I really appreciate that.
This is such an amazing idea!
thanks so much Jessica!
This might be the answer to my garden sadness this year, then when I move I could gift them to my friends and neighbors!
!
You totally can! I can’t wait to see your new place!