Create stunning DIY Thanksgiving decorations without breaking the bank. Learn how to upcycle thrift store finds into festive centerpieces, table runners, and more.
I almost wasn’t going to share this one but it’s too good not to share!
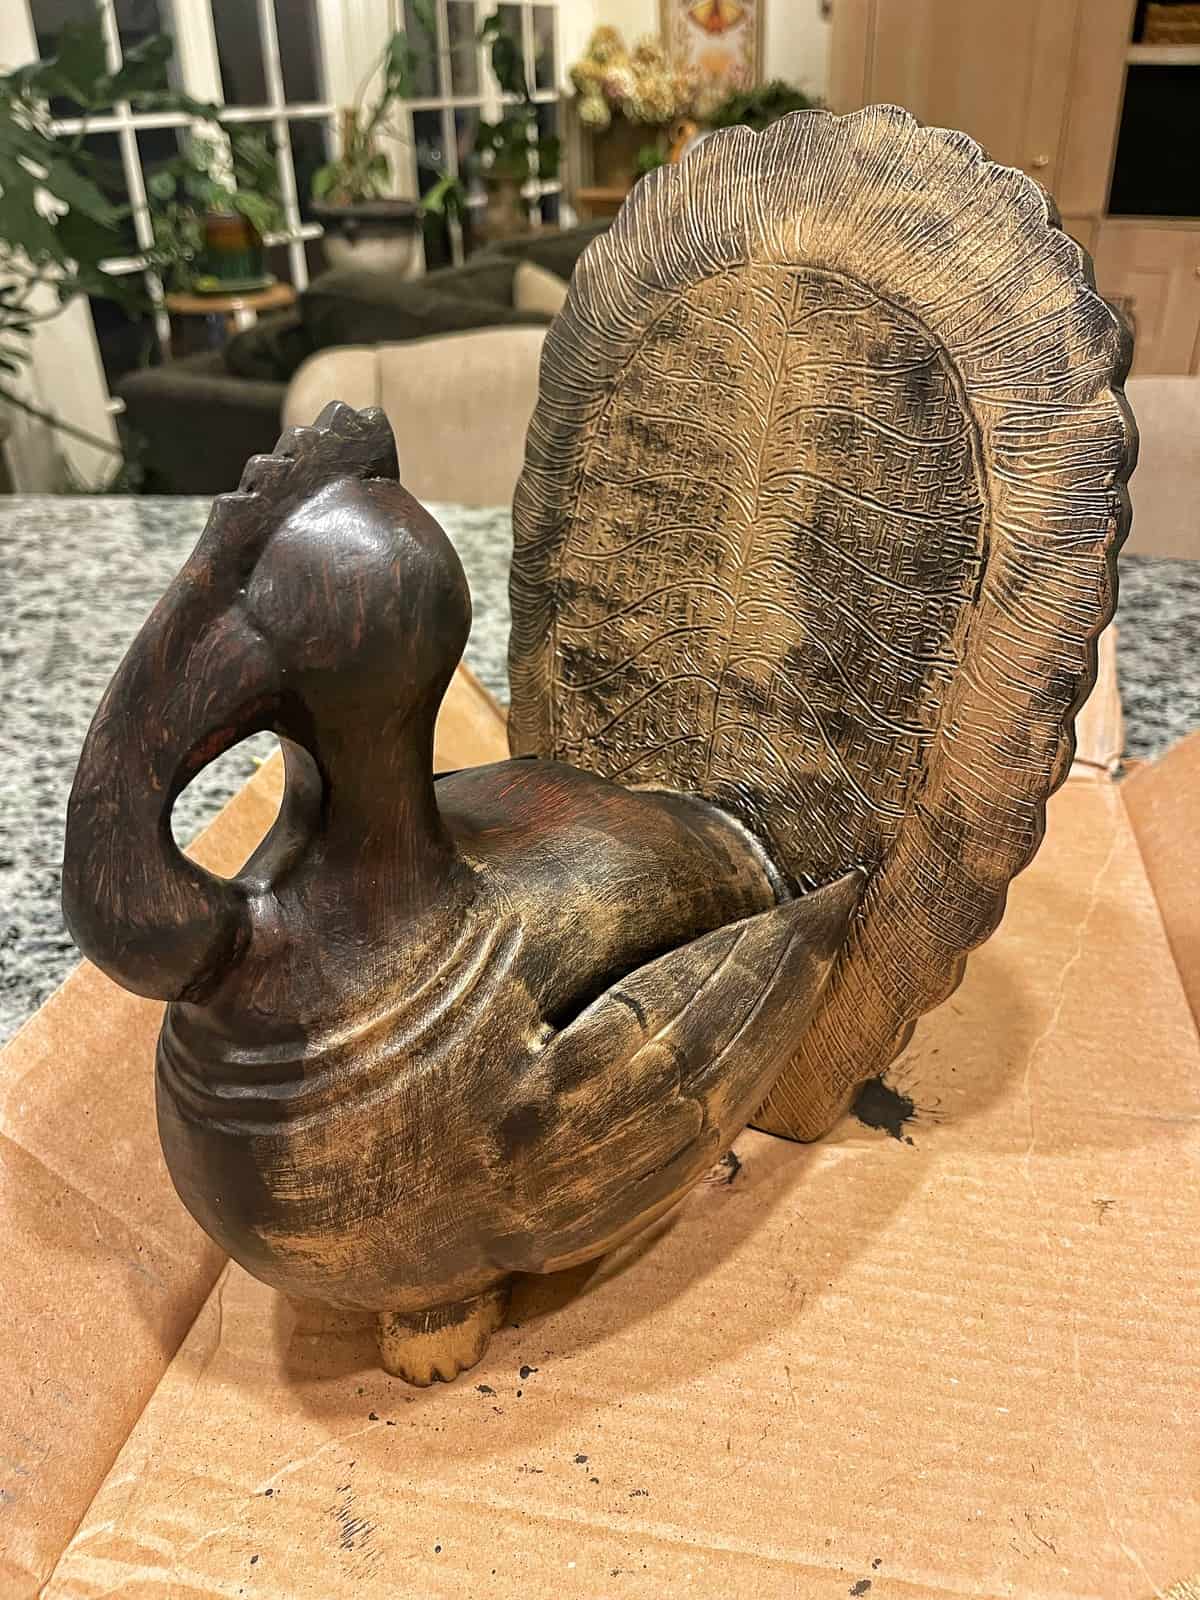
When I was thrifting around last year, I found this adorable wooden turkey for $5. My husband thought I was nuts for bringing this one home because he didn’t love the look, but I had a vision for it.
Wait until you see how I flipped my thrift store finds into beautiful Thanksgiving decor!
(Posts on stacyling.com may contain affiliate links. Click HERE for full disclosure.)
The Inspiration
So last year, I fell in love with Courtney from French County Cottage‘s gorgeous golden Turkey Thanksgiving tablescape where she used this gold vintage turkey statue as part of her centerpiece.
When I clicked on the turkey to purchase it, I almost fell out of my chair. That turkey is over $200! I mean, it’s gorgeous and all, but not at that price!
DIY Thanksgiving Decorations: How to Flip a Thrift Store Find for Your Table
Last year, my husband and I made our weekly thrifting trip to the Restore in Manville, NJ and I found this little wooden turkey. I don’t know whether I shared it with you before but I love him!
Isn’t he cute?
He looks OK as it is, but he would look even better spruced up with some vintage glam. Don’t you think? He’s got lots of cool details that would really come through with a little makeover.
Here’s how I did it!

Upcycling Supplies for DIY Thanksgiving Decorations
Fortunately, I had everything on hand already to upcycle my thrift store wooden turkey. Here’s what I used to bring him from trash to treasure.
- Black Fusion Mineral Paint (Chalk Paint would work well too!)
- Rub ‘n Buff in Antique Gold and Gold Leaf
- Small Paintbrush
- Chalk Paint Brush
One of the reasons I chose mineral paint is because I had it on hand already. But chalk paint would work equally as well on something like this.
Either one makes a great base layer because you don’t need to pre-sand the piece before working on it.


How to Make This Thanksgiving Decor
Now I realize not everyone will find a little wooden turkey like I did at the thrift store or flea market, but you can use this idea for other things you find too.
This is one of the cool things about thrifting around because you’ll find unique pieces that are one of a kind instead of mass-produced. So you can do this technique on other types of pieces you find too.
As I say this, FYI this little wooden turkey had a Pier 1 Import tag on the bottom. So I guess he’s still mass-produced anyway. LOL!
But we are going to flip him into something super cool for my Thanksgiving table. Here is how I glammed up my thrift store turkey in a matter of minutes!

DIY Thanksgiving Decorations Directions
- Because I’m using mineral paint, pre-sanding is not required. I simply cleaned him off and got right to work. Chalk paint works in the same way. That said, if you want to scuff him up with a light sanding, go for it!
- Apply a thin coat of paint onto the turkey and allow it to dry. Mine was good in under an hour.
- Next, apply a layer of Rub ‘n Buff in antique gold. Use a light hand when you brush it on and I found worked best when stippling the brush to make it look more vintage.
- Then apply a lighter thin coat of gold leaf. I didn’t use much of this but wanted to add a little dimension.
- Allow the piece to fully dry and cure.
DIY Thanksgiving Decorations FAQs
You might be wondering why we’d need to paint the turkey black before adding the Rub ‘n Buff. And that’s a fair question.
The black serves as a base coat to give it a little depth and dimension. We want it to look a little old and weathered. Because this piece had lots of details, the black paint helps age the piece and gives it a little more character and interest.
So the idea is to allow the black paint to come through so it’s not a solid gold or brass-looking piece.
You also might be curious as to why I didn’t use a top coat to protect the finish. And while you can do that, Rub ‘n Buff does not need it so I left it alone and just allowed it time to cure.
And that’s it! Super easy right? He looks so cute on my table too! And Chris appreciates him more now too. hahaha
Happy Thanksgiving!

More about DIY Thanksgiving Decorations and Upcycling Thrift Store Finds
What is your favorite thrift store find? I would love to know more in the comments below.
And don’t miss joining my Gardening DIY and Decorating Community on Facebook for more chatter. And follow along there and on Instagram as well. There are behind-the-scenes daily things that I share on Instagram that don’t make it to the blog. Would love to see you there too!
If you prefer to binge-watch Bricks ’n Blooms on TV, we go more in-depth with tours and posts on my YouTube channel. Would love to hang out with you there!
And… If you’re catching up on blog posts you may have missed, be sure to sign-up to get my newest posts via email to stay up to date with everything that’s happening here on the blog and more.
Want to See More Thrift Store Finds?
I’ve been sharing lots of cool items I found for our new home and garden.
Come thrift with me!
- Antiquing Secrets: How to Find the Best Deals and Avoid Fakes
- Collecting Milk Glass for Beginners
- 7 Fun Finds from the Thrift Store Near Me
- Prettiest Thrift Flip Idea for the Front Porch
- How to Decorate on a Budget with Thrift Store Finds
- How to Plant a Fall Garden in a Flea Market Find
- Thrift Unique Decorating Ideas
- My Thrift Store Vintage Finds for the Garden
Let’s See What My Friends Found Thrifting This Month!
My good friends also went thrifting this month to decorate their homes and garden spaces. Discover new ways to use thrifted finds with these incredible ideas for the holidays.
Click on the blog name on the photo to see the inspo. Wait until you see what they found!


Sign Me Up!
Sign up for my free newsletter to get blog posts, seasonal tips, recipes, and more delivered straight to your inbox!
Plus, get free VIP access to my Resource Library where you’ll find insider freebies not readily available to the public.

Thank you so much for following along.
Enjoy a beautiful day! xo


